This document is intended to guide GeneXus developers in the process of publishing (for the first time or update) their Android applications to Google Play.
Every application that will be published in Google Play must be signed, and after being uploaded only will be updated if it is signed with the same signature.
GeneXus 15 (as of U2) signs the APKs file automatically with the Android's default debug-signature.
On every build, the IDE alerts of this state with a warning message until the developer signs it with an own signature.
========== Android Compilation started ==========
The generated application will be signed using a default key. Note that you should change this key (in SmartDevices > Android Specific > Application Signing) before releasing it.
This mechanism forces the developers to sign their applications when they publish it (on production) but allowing an easy prototyping of it.
If the application is not signed with a custom certificate, Google Play does not publish it on the store.
How to obtain a Signature?
- Create an account in Google Play (reference price at June/2011: registration fee $25.00).
- Create a "Key Store file" for signature the application's packets with the follow command. It is distributed with the JDK on the /bin directory.
keytool -genkey -v -keystore my-release-key.keystore -alias alias_name -keyalg RSA -keysize 2048 -validity 10000
Where:
| |
-genkey |
Generate a key pair (public and private keys). |
| |
-v |
Enable verbose output. |
| |
-keystore |
The name for the keystore containing the private key. |
| |
-alias |
An alias for the key. Only the first eight characters of the alias are used. |
| |
-keyalg |
The encryption algorithm to use when generating the key. Must be RSA for GeneXus applications. |
| |
-keysize |
The size of each generated key (bits). If not supplied, Keytool uses a default key size of 1024 bits. In general, we recommend using a key size of 2048 bits or higher. |
| |
-validity |
The validity period for the key, in days. A value of 10000 or greater is recommended. |
Note: if you sign your application using your keystore and it uses SD Map control, you have to follow these steps.
Then, complete all information requested. You have to save the password for the next step.
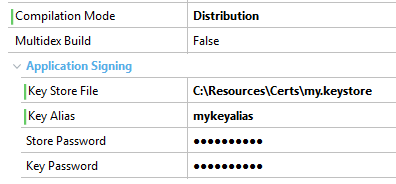
- Complete the Application Signing properties in the generator properties:
- Key Store File: The filepath to "my-release-key.keystore" file in the keytool command.
- Store Password: That's the one you set (you are asked for it ) while you run the keytool command.
- Key Password: That's the one you set (you are asked for it ) while you run the keytool command.
See in the image below.
Note: For those developers who already has applications in production with the previous default settings (i.e. the *.apk file signed with Artech credentials) must set its properties manually with legacy values.
| |
Property |
Default |
Legacy (as of GeneXus 15 Upgrade 3) |
| |
Key Store File |
C:\<GeneXus_Dir>\Android\debug.keystore |
C:\<GeneXus_Dir>\Android\legacy.keystore |
| |
Key Alias |
androiddebugkey |
alias_name |
| |
Store Password |
android |
artech |
| |
Key Password |
android |
artech |
You will need (not counting optional)
Screenshots:
file PNG or JPEG (no alpha) of 24 bits
of 320 x 480, 480 x 800, 480 x 854,
of 1280 x 720, 1280 x 800.
Full screen, no borders.
Application icon:
32 bits PNG or JPEG image and 512 x 512,
máximum: 1024 KB
3.5 Check your Android permissions
Before publishing your app make sure it will ask the user the minimum required permission from the device.
In order to modify the required permissions open and edit the AndroidManifest.xml file located under <Genexus Path>\Android\Templates and remove or comment the uses-permission tags that do not apply to your app. For more info see Android Application Permissions.
4. Publish
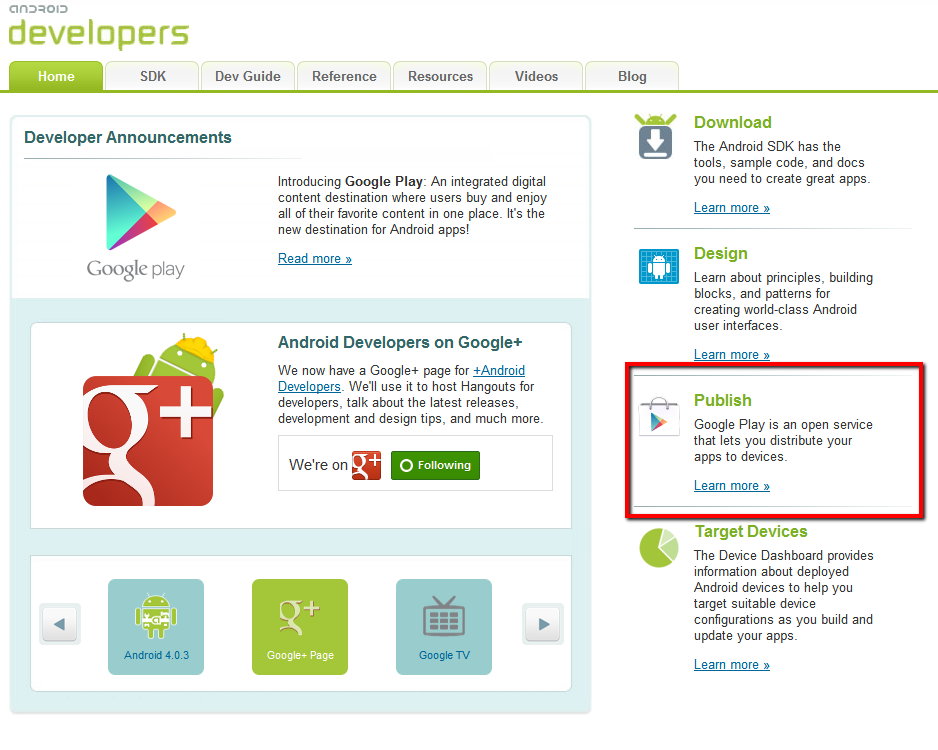
At this point, you are ready to upload the application to Google Play. Go to play.google.com, log in using a Google account, and go to Developers (at the bottom).
Then go to "Publish".
This will take you to the Android Developer Console. Once you are here:
- If you are creating a new application:
Click Upload Application button to access a wizard to create a new application. See here for detailed information.
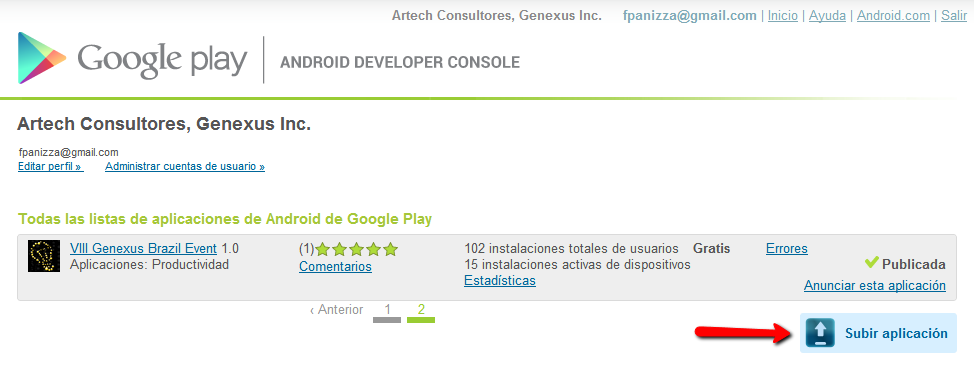
- If you are updating an existing application:
Click on your application title. The detail information will be displayed. Click Upload APK button.
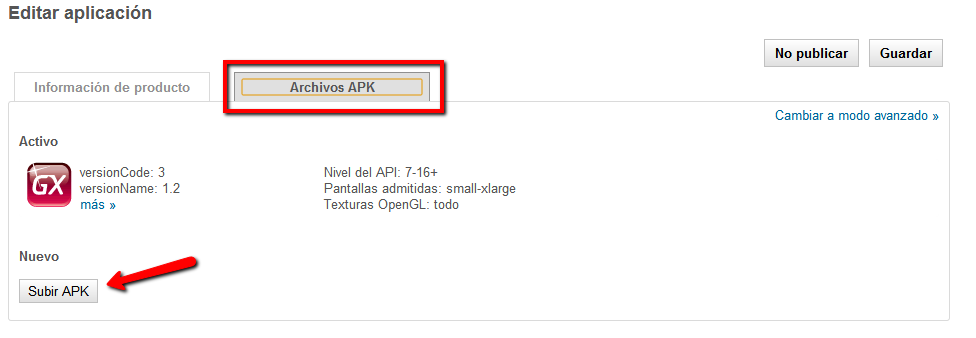
And upload the new APK; you should note that:
- The Version Code or Version Name property must have a higher value than the previous version.
- The keystore used to sign the application has to be the same as the previous version.
- There aren't any relation between the signature and the developer registered in the Market. Any developer can publish any APK; the signature is not important.
- Once the APK was published with a user, only this user is the one can upload new versions of the same application; however, this user may assign the application to other, then, this other can upload new versions.
 Prototyping and Executing
4}}}