The objective behind Cloud prototyping is to provide a simple mechanism to prototype your applications in the cloud.
This is a simple guide to help you to deploy an application to the cloud using this mechanism and to know details that can be useful.
The deployment process deploys the application to Artech's cloud (based on Amazon servers), and the platforms available are: Java and Ruby Generators using MySQL as DBMS and Net using MySQL or SQL Server as DBMS.
It's available to deploy Web or Smart Devices (Android, BB and IOS) applications.
Remember: this feature is available for prototyping purposes only; it should not be used to host applications in production that might require another SLA.
GXtechnical authentication
In order to deploy an application you need a GXtechnical user account. If you don't have one you can create it here.
The process starts with an existing KB. You can use an existing environment or create a new one with Java, Ruby or .NET generator. If you're creating a new one, don't forget to set it as the target environment.
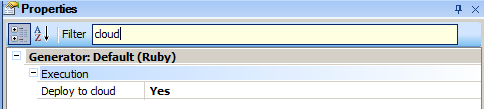
The first step is to specify that you want to deploy your application to the cloud. This is done by setting the "Deploy to Cloud" generator property to Yes as shown below:
Once this property is set, default values for Server and Virtual Directory are automatically set:
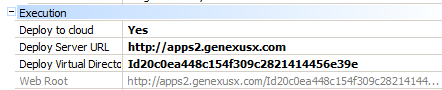
The Deploy Server URL property set may vary depending the generator and the GeneXus Version. See Servers available for Cloud prototyping for more information.
Tip: You may want SSL, if so, read more about this at Deploy Server URL property.
Deploy Virtual Directory property is set to [environment GUID] which is an ID that identifies the environment. It may be changed for a friendlier name (availability is checked later in the process).
Data Store properties values are automatically set:
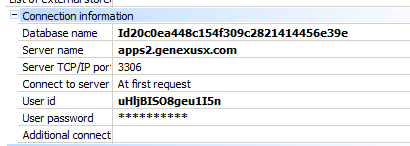
Database Name is set to [environment GUID] which is an ID that identifies the environment. It may be changed (availability is checked later in the process).
Server Name must be the same server specified at "Deploy Server URL Property", so it's set to the same value. Do not change it because these are the available platforms; otherwise, errors may occur.
User ID and User Password are set to a generated value (the same value for both properties), please change them as soon as possible to avoid forgetting it, security problems, etc.
- The platforms available are Java/Ruby using Mysql and NET using MySQL or SQL Server (default). Consider this when changing the properties.
- If more than one environment is used in the same KB, check the DBName property to avoid accidentally creating tables over existing data. Consider Virtual Directory property too.
A GXtechnical User Account is needed to manage the applications deployed to the cloud, so when you run them for the first time a dialog asking for it is displayed. Check the details here.
If you don't have a user account, please create it here.
Once the user's details are provided, the account is checked for existence using GXtechnical's services. If it exists and it has the necessary privileges, the process continues checking Virtual Directory and Database Name availability. If these values are available, DB and Virtual Directory are created; if not, an error informing the issue is displayed.
The process continues creating the tables, generating and deploying the application to the server.
Finally the application is run, that is, the browser is opened and the emulator is started, etc. (depending on the generators and configurations used). For further information about running the application please check Executing From QR Codes.
To learn more about the mechanism behind this process please check Deploy to GeneXus Prototyping Cloud - FAQ.
 Prototyping and Executing