Drill down is a feature usually applied in analysis and managerial information systems. With it, we can navigate within the information presented in the GXquery Pivot table, going from general aspects to specific details.
For instance, we need detailed region data in the sales report of a travel agency to obtain information by country and the total data for one country so that we can also see data of cities within each country.
The traceability of information (knowing where it comes from) is one of the aspects of the data we view, when its credibility is involved and consequently our proper decision-making based on it..
By simply double clicking on a totalized piece of data. That is: on the last row prior to the first numeric value (listed on the data area), on the last column, and on all the pieces of data in the data area (to the right of the rows) and below the columns.
There are two different types of drill downs: the one that is done along axes (rows and columns), and the one that is done on the data area
This example is meant to show the number of invoices that each customer has per year at a travel agency. The table below shows the attributes used and the areas where they are located.
| Name |
Type |
Area |
Value |
| Customer Name |
Attribute |
Row |
Customer name |
| Invoice Date |
Attribute |
Row |
Year |
| Invoices |
Formula |
Data |
Count(CustomerId) |
| Amount |
Formula |
Data |
Sum(InvoiceAmount) |
The following image shows the results obtained upon executing the query.
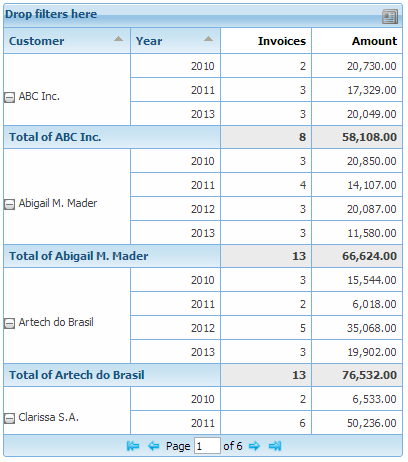
As shown, the names of customers are exhibited, followed by the year, the number of invoices for each year, and at the end, the total of invoices for each year, ending with an overall total per customer. Let’s now suppose that we want to see how the total per year is made up. To do that we use the drill down.
We double click, for example on the first 2010 (any of them) and the screen will show the following dialog box.
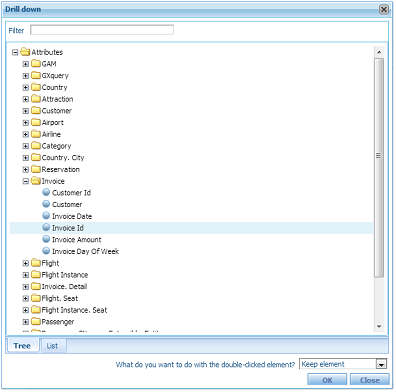
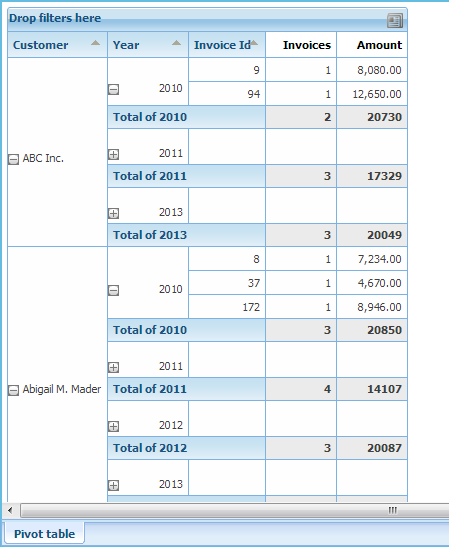
In this window we can select the attribute that will be accessed. Since we want to view invoices, with the mouse we mark the Invoice Id attribute and then press the OK button to view the following image.
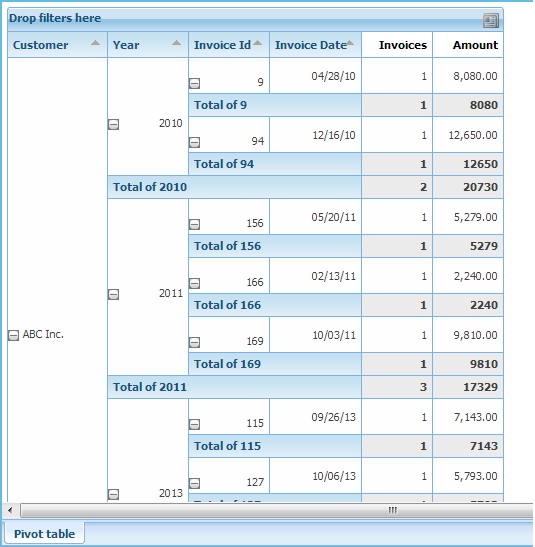
Let’s now suppose that we also want the date of invoices. We then double click on the first value of Invoice Id, select Invoice Date, and we will get this image.
As shown in Figure 2, there is a combo box in the lower right, which is meant to inform GXquery what we want to do with the element selected, for which we have three possible options, namely:
| Keep element |
Keeps (or forwards) element in the Rows area. It is the case of the example shown above. |
| Drag elements to page |
Moves the element to the page area. |
| Set element as filter |
Moves the element to the filter area. |
 Drill down: de lo general a lo particular (español)