|
There are two options to establish the connection to the database: ADO.NET and ODBC. The first one is a native method of the generator and is recommended, since it allows generating multi-tier Windows applications, enables statement caching, offers application monitoring tools, performance improvements (as regards ODBC access) and implies using 100% “.NET managed code” to access the DBMS.
For those database managers that were not released or do not have an ADO provider, accessing with ODBC (PostgreSQL, Informix) is required.
To setup the connection to the database you must set the following:
- Access Method model property (ADO.NET/ODBC)
- Connection values from “Access technology to set” = ADO/ODBC
Having some objects with ADO connection and other with ODBC is not possible. If a model is ADO all the objects and datastores will use this connection method.
When working with ADO.NET the entire logic is in gxclasses.dll. On the other hand, in ODBC access, it is implemented under gxdata.dll, like the rest of the Client Server generators.
As regards the DBMSs, each of them uses a Data Provider to access the database; each DBMS has its own Data Provider for ADO.NET access.
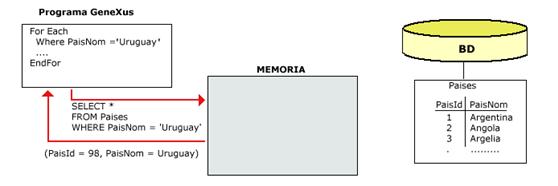
The use of ADO.NET as method for the connection to the database by the .NET generator, has enabled the possibility of performing statements caching. This implies scanning the table once and, in the following queries, go to a “cache” memory with the results of this already executed statement instead of scanning the database again.
The “cache” concept applies to a fast-accessed intermediate memory, where most frequently used data can be saved. As regards applications that query the database, the concept deals with keeping the query results on the tables in the memory. This results in avoiding connection costs and everything implied in “bringing” data from the server.
When making a query for the first time, the result remains saved in memory, as shown in the following figure:
In a second instance, when making the query again, no communication whatsoever with the database server is required:
Although the “cache” is performed at statement level, it is setup at table level, allowing to select the time while data will persist in memory before having to search for them again in the database.
This implies that all statements affecting a table will be cached depending on the value of this table.
If the time has expired, the database is accessed to obtain the data again and store them in the “cache”.
To enable ADO.NET statements “cache” and setup the corresponding properties you must go to the “General/.NET specific/ADO.NET specific” section of the model properties.
 The .Net platform is quite strict regarding types checking, both in compilation and in runtime, the generator is in charge of doing as many “casts” and conversions as possible. Nevertheless, errors may occur because of wrong programming (the most common one is the overflow in numeric types). The .Net platform is quite strict regarding types checking, both in compilation and in runtime, the generator is in charge of doing as many “casts” and conversions as possible. Nevertheless, errors may occur because of wrong programming (the most common one is the overflow in numeric types).
Some considerations are required in the mail data type:
- The data type to manage the mail in “Internet” modality (SMTPSession, POP3Session) and Outlook is implemented.
- In web environment, you must setup the following to use Outlook mode:
o User impersonate
o Setup Internet Information Service (IIS) virtual directory, for it to use a user with rights on an e-mail account in Outlook (editing the properties \Directory Security\Edit)
- The Mapi mode is not implemented.
Implementation
GXMail.dll: An assembly .Net that implements the entire Mail management
Before GeneXus 9.0 upgrade 2, the implementation was in:
GxOffice2net.dll is the one used from the programs.
Interop.GxOffice2lib.dll is gxoffice2 wrapper. It is always required.
GxOffice2.dll is the implementation when using Outlook mode.
The program executing the reorganization is the reor.exe assembly, created under the bin directory.
It takes the specifications from reorganization.dll and checks the presence of the reorgpgm.gen file (a flag). This is necessary when you must execute reorganizations or generations of the database in the production server.
The information on the database connection is in the client.exe.config file. This is valid for both GUI and Web models.
The files required only for the creation/reorganization are the following:
GxClasses.dll, log4net.dll, Reor.exe, Reorganization.dll, reorgpgm.gen, messages.<language>.dll
Executing the reorganization without interface with the “nogui” parameter is possible. The command syntax is: reor.exe –nogui
The “Transactional Integrity” property is not taken into account with ADO.NET. Objects are always generated with transactional integrity, with the exception of the database reorganizations (with Autocommit).
The .NET generator supports multi-level transactions, but every .NET transaction must have a maximum of one flaT level and at least one. 1-level transactions with subfile are not supported. E.g.: structures of the following type are not supported either:
A*
B
(C*
D
(E*
F)
It is to be pointed out that what is not supported is the generation of the program corresponding to the transaction for the transaction execution, but these transactions are supported as regards the structure design of the databases determined by them. That is to say, you cannot execute transactions with these structures in .NET, but they are taken into account to create and reorganize the database.
This feature is not implemented; therefore, generating HTML files with the information obtained from the database is not possible.
Like in the rest of the generators, to call a “sp1” stored procedure, it must be defined within the “List of remote programs” model property. To call it in the GeneXus code, programming the following is enough:
call('sp1', parm1, parm2)
Parameters must be defined in the extprog.ini file, where the name of the parameters defined in the DB is mapped; e.g.:
storeproc
ProgramName=Sp1
ProgramType=StoredProcedure
ParmMode=inout,in
ParmType=Number,5,0;Number,5,0;
ParmName=parm1,parm2
In previous versions, when working with ADO.NET, there was the constraint that the variables had to have the same name as the parameters of the Stored Procedure being called and all parameters had to be inout type.
In the case detailed above, in the Database, sp1 Stored Procedure must have two parameters called @parm1 and @parm2 (both inout type).
The submit command uses a Thread pool instead of creating a new thread each time. This limits the number of threads that can be created, thus avoiding a potential overload problem. It is used whenever a submit is done and there are 25 threads per processor. In ASPNET, you can setup the number of threads (in processModel of config) but not in a win application, unless the host is rewritten. If the thread dies for any reason, an error occurs in the log event. This is could be one of the reason of generating the submits as queued components.
COM+ is a service infrastructure that supports component execution.
Some of the services are: automatic transactions, queued components, object pooling, and others. In .NET, COM+ components may be implemented.
“Object Pooling”, for instance, enables you to have a “pool” with N objects. When an object is needed, it is withdrawn from the “pool”, and returned to it when it is no longer used. This stops you from incurring in "costs" for creating and killing objects in each call, which can actually be costly depending on what an object requires (for instance a connection to the DB).
In the architecture of GeneXus three-tier applications, the impact of this is relative, since the greater cost accounts for connection, and GeneXus has a pool of connections that is reused with different objects.
It works like a procedure called with Submit. Instead of being run in another thread, it is placed in a queue of a COM+ service, which is in charge of instantiating and running it.
If it is not possible to run it for some reason, (application error, unavailable resources), there are 5 attempts, and if there is still failure, it is sent to a special queue of “failed” objects. This is useful when you want to ensure process execution, regardless of the moment of execution. Furthermore, it is executed in a process different from the caller process.
-
Message Queuing installed (comes with Windows, but it is not installed by default). For installing it, it is necessary to access Control Panel/Add-Remove Programs/Add-Remove Windows Component
This implementation is only valid for procedures.
For GeneXus objects to be generated this way, they must meet the following requirements:
· They must be defined as main object (Object property “Main object = true”)
· “Assembly” must be put together with “Strong name” (Model property “Strong name = true”)
· It cannot have layout
If any of these requirements is not met, the object is generated with no possibility for it to be called as “Queued component”, and the Submit is done by raising another Thread.
Together with an object, information is generated for its settings, which is included in the COM+ application, when registered.
This type of assembly runs in a COM+ application; therefore, it is necessary to set it up as such. In order to do that, the following is required:
· The security settings are automatically generated by the generator; it generates a scheme without authentication (the most common way of testing an application)
· Registration. The COM+ component must be registered with the following command:
“regsvcs <assembly name>”
For example: regsvcs bin\aprc01.exe.
This creates the COM+ application (with the model name), and sets it up with security and generated transactional scheme. Regsvcs is a tool from the .NET Framework that is useful for registering assemblies as COM+ applications.
Moreover, client.exe.config must be copied to the Windows system directory (typically Windows\system32).
· Everything that is COM, DCOM and COM+ is setup from Control Panel/Administrative Tools/ Component Services
· Security settings
They are not necessary if an application has been registered as indicated in “Settings, execution”. For testing, the most common thing is a MSMQ workgroup installation (that does not require domain controller). In this type of installation, there is no “Active directory store” against which to authenticate callers, and therefore, it is necessary to deactivate authentication (otherwise it will give “Access denied” when making the call). In order to deactivate authentication from Component services/Computers/My Computer/COM+ Applications, press right button on the properties/security application, unselect the “Enforce access checks for this application” checkbox, and setup “Authentication level for calls” in “None”. This settings are generated by the generator, and occur when a component is registered. Settings for production depens on each installation. In general, it has a domain controller and security must be setup.
· Setup transactional support
This is not necessary if an application has not been registered as indicated in “Settings, execution”. Inside the COM+ application, go to Components, select the one that corresponds to the GeneXus object, press right button, properties/transactions, set “Transaction support” in “Not supported”. This settings are generated by the generator when a component is registered
The purpose of this tool is helping you to perform a Deployment of a .NET Win 2 or 3-tier application via HTTP.
The idea is being able to perform application installations or application updates in the client PCs in a simple and centralized way.
Description
Given an application, the tool will allow a client to install the application or application upgrades just by clicking from a URL.
To access the tool, we must go to the Execution: Build -> Run (F5) window and click on the Publish button

Once you have generated the application exe, the methodology is quite simple:
1) From the Execution window, you select the exe corresponding to the Deployment and click on the Publish button.
2) Then, in GeneXus .NET Publication Assistant, you edit the Deployment preferences:
Application name: name to be given to the application; by default, it is the description of the selected main.
Client installation folder: folder where the application will be installed in the client; by default, it will be added at the end of the selected folder: GxPrograms\Application name.
Shortcut Icon: icon to be assigned to the exe; it will be ModelPath\GXPUB\gxappstart\net.ico, the icon distributed by default (*).
Shortcut for unistall: you specify if you want to add a direct access to the application Unistall.
Publication URL: URL from which the Deployment will be performed; by default, it will be, http://server/app, where server is the name of the PC where the Deployment is being performed and app is the name of the exe.
Physical path: directory where the application is located in the server; by default, it it is ModelPath\Publication.
Application files: files making up the application; by default, they are loaded from the model bin directory.
(*): the GXPUB is created under the model directory on pressing Publish.
On pressing Publish, the GXPUB directory is created under the model directory. All the files required to keep control of the application new versions will be stored in this directory.

3) Once the Deployment preferences have been established, you press Publish.
At this point:
- The GXPUB directory is created under the model directory. All the entered preferences are stored in this directory and all the files required to build the deployment are copied to this directory.
- The application files located in the model bin are copied to the Physical path. An appname_manifest.xml file is also copied. It will be used to know whether there are new application versions to be installed.
- A virtual directory is created with the same name as the application, pointing at the physical path.
- The application to be used in the client to perform all the application installations and updates is built. Its sources remain in \GXPUB\gxappstart.
- If no error occurs, the URL to be accessed to perform the installation will remain in GeneXus .NET Publication Assistant Output . This URL is built based on the previously specified Publication URL.

4) Put the URL in a browser of the client PC.

5) Install the Application.

6) The application is successfully installed in the client, ready for execution.
Each time you execute the application in the client, the appname_manifest.xml file located in the client will be compared with the appname_manifest.xmlfile located in the server and, if differences are found, you will be asked if you want to download the update:

The same applies for 3-tier applications.
- Microsoft Windows® 2000, Windows XP Professional or Microsoft Windows Server 2003
- .NET Framework 1.1
- Setup security to be able to execute http://server/App/Setup/NoTouchDeploymentStub.exe.
Comment: the requirements are shown in the install.html file. You access this file the moment you perform the installation.
By default, the publication of an application creates a group of files similar to the model bin in the “Publication” folder (or depending on the value entered in the “Physical Path” option). The following is added to it:
-Object_manifest.xml: there is a xml file for each published main. This file contains the manifestId information (auto numbered), and each file hashcode. Both are checked to verify if the application needs an update or not.
-Folder Setup: it contains the files to install the application, to wit:
- Install.html is an interface that simply calls the NoTouchDeploymentStub.exe
-NoTouchDeploymentStub.exe: it has embedded Microsoft standard dlls and information of the manifest installed in the client.
-NoTouchDeploymentStub.exe.config: it allows modifying the manifest URL. This is useful when the server name is not known the moment the publication is performed.
This file must be created by the user with the following structure:
<?xml version="1.0" encoding="utf-8" ?>
<configuration>
<appSettings>
<add key="manifestUri" value="http://myserver/uMnuPpal/uMnuPpal_manifest.xml" />
</appSettings>
</configuration>
This feature is available since the generator upgrade 2.
When the client installs an application, the latter resides in the folder setup in the “Client installation folder” property (by default Application Data). The following is installed there:
- Folder APP: has the proper application installation (Client.exe.config and dlls)
- Updaterconfiguration.config: this file is created the first time the application is installed and withdraws information from NotouchdeploymentStub.exe. The latter has information such as the location of the manifest in the server.
- Microsoft.Application.xxx.dll: these Microsoft block Application standard files are installed from NotouchDeploymentStub.Exe
- GxAppStart.exe: It is the executable in charge of triggering the checking process of a new version. It is called by the application executable.
The verification mechanism of an application update is triggered by the client gxAppStart.Exe file, called on starting the application exe. It compares the ManifiestId, located at Object_manifest.xml on the server side. In case it is different, the update is activated. If manifiest Id has not changed, it starts comparing the hashcodes of each file (also located in Object_manifest.xml). If one of them has changed, the update is activated. The update activation consists on calling the NoTouchDeploymentStub.Exe, which transfers the files needed by the client.
There are some specific settings for those PDF reports that are configurable through PDFReport.INI configuration file.
By editing the PDFReport.INI file, it is possible to configure the left and top margins in the ‘LeftMargin’ and ‘TopMargin’ properties respectively.
E.g.:
LeftMargin=3.5
TopMargin=2
In both cases, the default value is 1.
The decimals separator must be the dot and not the comma; e.g.: LeftMargin=3.5
Specific fonts might be included in the GX report and the end user might not have them available when executing this report. The procedure to avoid this is to embed the desired fonts in the generated reports.
This list is included through the PDFReport.INI file specifying its font and its location in the Embedded Fonts section. E.g.: in some cases, this is necessary to visualize the bar code. In this case, just setting up the following in the file will be enough:
Embedded Fonts
3 of 9 Barcode= true
Fonts Location (MS)
3 of 9 Barcode= C:\WINDOWS\Fonts\3of9.TTF
The path must be the Web Server absolute path and may vary according to the operating system; e.g.: C:\WINNT\Fonts\3of9.TTF
configuration file – PDFReport.ini
This file is located in the directory where the report is executed and is automatically generated when executing a report in case it is not present.
|
Embedded Fonts
|
Boolean indicating whether to embed the fonts or not (see 'Embedded Fonts' Section)
|
|
SearchNewFonts
|
Boolean indicating whether the fonts must be searched if they are not in the INI when embedding them
|
|
SearchNewFontsOnce
|
Boolean indicating that the fonts must be searched just once if they are not found
|
|
Version
|
Indicates the PDFReport version (a.b.c.d format) // Currently, it always generates 1.0.0.0
|
|
FontsLocation
|
Indicates the fonts location
|
|
LeftMargin
|
Indicates the left margin associated to the document (in centimeters)
|
|
TopMargin
|
Indicates the top margin associated to the document (in centimeters)
|
|
OutputFileDirectory
|
If the path is not specified in GeneXus report output_File, the outputDirectory is considered
|
|
OutputFileDirectory
|
If the path is not specified in GeneXus report output_File, the outputDirectory is considered
|
|
DEBUG
|
Indicates that DEBUG will be shown for stdout. It shows information such as the following:
GxSetDocName: 'reporte.pdf'
setPageLines: 999
setLineHeight: 15
GxAttris:
\-> Font: Helvetica (8) BOLD
\-> Fore (0, 0, 0)
\-> Back (255, 255, 255)
GxEndDocument!
|
'Embedded Fonts' Section
A boolean is associated to each font name. This boolean indicates whether to embed the font or not (for finest GeneralProperty granularity). To embed a font, the generalProperty and the property of this section must have 'true' value. To setup the fonts to be embedded you can execute 'com.genexus.reports.PDFReportConfig' *
'Fonts Location (MS)' and 'Fonts Location (Sun)' Section
The 'FontName= location of the associated .ttf' mappings are stored. These mappings are different for MS and Sun. These mappings are automatically created.
'Fonts Substitutions' Section
'Font= Font' pairs mapping a font within other are stored. E.g.: you can put 'Impact= Courier' to map one TrueTypeFont within another one. You can also map a font in a Type1; e.g.: 'Impact= Helvetica'. These mappings can be performed by the user.
Like with the other generators, it is possible to include language native code in the generated programs. The CSHARP command is used for this.
The syntax consists in adding the CSHARP as a code prefix.
Another option to include user .Net native code is to call an external function. For this, you must define a csharp program (.cs) and call the function with:
call('FuncExt', par1, par2)
This is translated to C# code:
new funcext(ref _Context).execute(ref AV8par1, ref AV9par2)
Considerations:
- There must be a class with the function name
- This must have a builder that receives a IGxContext type parameter (namespace GeneXus.Application must be included
- There must be an execute method that receives the parameters as reference.
- All names are always in lower case.
For further information refer to appendix and/or this complete example at: http://www.gxopen.com/gxopen/servlet/hproject?395
The security scheme for .NET Assemblies (dlls y exes) is a rather complex one, although it is also quite secure. To configure the development environment, we need to take some considerations into account.
To be able to work with remote models, we need to disable the .NET security control. Otherwise, it is not possible to execute locally the web objects located in another PC through the network; i.e.: to execute, in the web server, objects that are not physically in the same PC. This is a security restriction of the .Net Framework.
This only involves the development environment. In the final installation (where the server and the DLLs are in the same PC) this is no longer necessary and, in fact, disabling the security measures is not recommended at this stage.
How should this be done? To inhibit security, the "caspol -security off" command must be executed in the PC where the objects will be executed. This command is set by PC, and does not affect objects generation, only the execution in the development environment. If the objects to be executed are in the same PC, this process is not necessary. In the future, the configuration of security policies regarding the code will be supported at object level.
To execute reorganization that is an assembly (reor.exe), if it is run from some intranet PC it will not have all the required resources.
The assembly has different security levels according to the site where it is located:
My Computer: Full Trust (programs are completely reliable and can access all the required resources).
Local Intranet : they have a different level, lower than the one of Full Trust; thus, they cannot access a group of resources such as the file system.
Internet: They have the lowest reliability level and in general they cannot perform tasks without the approval of the user.
To solve this problem:
1) Move to the directory
<SYSTEM DRIVE>:\<WINDOWS FOLDER>\Microsoft.NET\Framework\<Version Number>\
2) Execute the command
mmc mscorcfg.msc
this opens the console: ".Net Admin Tool"
Among other things, there is an entry for "Runtime Security Policy"

Then, go to the link: “Adjust Zone Security”
Select the Intranet zone and increment the security level to “Full Trust“

Another possible solution is to give permits; in this case only to the reorganization exe (reor.exe).
For this, go to the link: "Increase Assembly Trust" and increase the level to “full trust” only in this assembly.
It is possible to configure the same using the following command line (Framework 2.0) :
caspol m cg LocalIntranet_Zone FullTrust
If it is necessary to assign different authorization levels to different web objects within the same virtual directory, the following steps must be taken.
Create a .aspx file per each web panel, web proc, etc. in the virtual directory. The file contents are not relevant; the only thing that matters is the fact that the file exists so that the ISS can verify the permits.
Then, in the ISS, press the right button on the virtual directory / properties. In the area of application settings, go to the Configuration button. On the page “App mappings”, choose the aspx extension and go to the “Edit” button. Then, activate the check box: "check that file exists”.
|