The purpose of this document is to explain how to create a List User Control for Android Smart Devices.
What are we going to create?
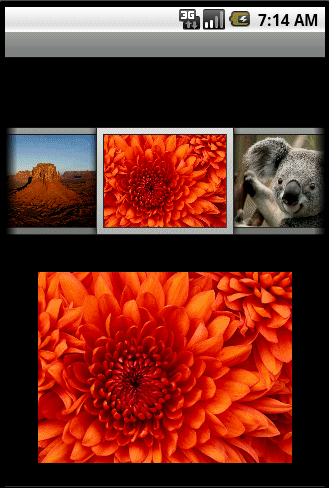
We will create a User Control for Smart Devices similar to the GeneXus SDImageGallery User Control. The image gallery is a layout widget used to display items in a horizontally scrolling list and positions the current selection at the center of the view.
After completing this step by step guide you will have a new user control named "SDMyImageGallery" available.

Basic Steps
A list of steps to create the user control (with the basic functionality) is detailed below.
Create the user control definition and make sure it is available in GeneXus. For this case copy and paste the \UserControls\SDImageGallery as \UserControls\SDMyImageGallery.
Change the User Control name and description; for example SDMyImageGallery.
Add the name of the main class to the Android_ClassName tag (in this case UCImageGallery).
<Android_ClassName>com.mycompany.extendedcontrols.UCImageGallery</Android_ClassName>
Check this article for further information.
Project setup
Set up your Android development environment.
You can check the Gallery tutorial to understand how to use the Gallery widget.
Open the FlexibleClient Eclipse project and create the UCImageGallery class on the com.mycompany.extendedcontrols package extending the android.widget.LinearLayout class.
Make sure it implements the com.artech.controls.IGridView interface to provide most of the functionality for a List User Control.
Add the following classes to the project:
-
UCImageGalleryAdapter class based on android.widget.BaseAdapter.
-
SDImage01Definition based on com.artech.controls.grids.CustomGridDefinition.
Check the complete source code here. Important bits of code will be detailed below:
-
Class constructors and dependencies. It references a specific layout "imagegallery_layout", we will come back to it later
public UCImageGallery(Context context, LayoutItemDefinition def)
{
  super(context);
  mApplicationContext = context;
  mContext = (GridContext) context;
  createView(context);
  setLayoutDefinition(def);
}
private void createView(Context context)
{
  LayoutInflater inflater = LayoutInflater.from(context);
     if (inflater != null)
        inflater.inflate(com.artech.R.layout.imagegallery_layout, this, true);
        mGallery = (Gallery)findViewById(R.id.gximagegallery);
        mGallery.setCallbackDuringFling(false);
        mTitleTextView = (TextView)findViewById(R.id.gxuctitleTextViewImageGallery);
        mSubTitleTextView = (TextView)findViewById(R.id.gxucsubTitleTextViewImageGallery);
mImageView = (ImageView)findViewById(R.id.gximagegalleryview);
        mImageView.setOnTouchListener(new OnTouchListener()
        {
            @Override
            public boolean onTouch(final View view, final MotionEvent event)
            {
                gdt.onTouchEvent(event);
                return true;
            }
        });
        mImageView.setLayoutParams(new LayoutParams(LayoutParams.FILL_PARENT, LayoutParams.FILL_PARENT));
        mImageView.setPadding(15, 5, 15, 5);
        setLayoutParams(new LayoutParams(LayoutParams.FILL_PARENT, LayoutParams.FILL_PARENT));
-
We are defining the OnTouch listener; check the private class GestureListener too which implements the onFling and onSingleTapConfirmed.
-
Populate the User Control with the data provided; the UCImageGallery instance attributes mCurrent* (ArrayList) will be used to hold all the values; they will be referenced later.
@Override
public void update(ViewData data)
{
// There is no image in the definition?
if (!Services.Strings.hasValue(mGalleryDefinition.getThumbnailAttribute()))
return;
String thumbnailField = mGalleryDefinition.getThumbnailAttribute();
String titleField = mGalleryDefinition.getTitleAttribute();
String subtitleField = mGalleryDefinition.getSubtitleAttribute();
mCurrentImages.clear();
mCurrentTitleImages.clear();
mCurrentSubTitleImages.clear();
for (Object entity : data.getEntities())
{
Entity e = (Entity) entity;
mCurrentImages.add(e.optStringProperty(thumbnailField));
String strTitleImages = Strings.EMPTY;
if (Services.Strings.hasValue(titleField))
strTitleImages = e.optStringProperty(titleField);
String strSubTitleImages = Strings.EMPTY;
if (Services.Strings.hasValue(subtitleField))
strSubTitleImages = e.optStringProperty(subtitleField);
mCurrentTitleImages.add(strTitleImages);
mCurrentSubTitleImages.add(strSubTitleImages);
}
if (mAdapter == null)
{
mAdapter = new UCImageGalleryAdapter(mContext.getBaseContext());
mGallery.setAdapter(mAdapter);
}
mAdapter.setData(data.getEntities());
mAdapter.notifyDataSetChanged();
}
-
Set the layout definition, in this case this is delegated to the SDImage01Definition class. The class is in charge of accessing the control properties defined and assign the values to the layout:
private void setLayoutDefinition(LayoutItemDefinition layoutItemDefinition)
{
  mGalleryDefinition = new SDImage01Definition(getContext(), (GridDefinition)layoutItemDefinition);
}
-
Implement the init method, in this case is used the GridHelper class from the com.artech.controls.grids package. It contains common functionality for grid controls; check the addListener and onSingleTapConfirmed methods.
@Override
public void init()
{
  mHelper = new GridHelper(this, null);
}
-
The imagegallery_layout.xml file will contain the layout to hold the list; a Gallery, two TextViews and an ImageView widget.
-
Specialize the android.widget.BaseAdapter class to populate your View using the UCImageGalleryAdapter class. Check the getCount, getItem, getItemId and getView methods. In particular the getView method will get the current selected image and use the com.artech.commonImageHelper Helper class to display the current selection.
ImageHelper.showDataImage(mContext.getImageLoader(), holder.Image, mCurrentImages.get(position));
Finally, make sure the project compiles and it works as expected!
Package your UC to be deployed in other GeneXus installations, check this article.