GeneXus Translation Tool is part of the GeneXus Application Localization scenario. It is a free program intended for translators that have to translate an application but do not have a GeneXus license.
Support for this feature starts with GeneXus 9.0.
The latest version can be downloaded here.
Today's applications have to be able to run in different languages. Usually developers do not have the skills to translate them into all the languages needed. Translators are usually hired for this job. Developers send all translatable strings to the translator, he/she translates them using this tool and sends them back to the developer that integrates them back into the application. The process can be repeated as many times as required.
The first step in the translation process is to prepare what have to be translated. This is called Export Translation. It takes a given language (or more than one) and creates a file containing translatable strings (the translations file). Select Tools/Translation/Export Translation File from the menu and the following screen will be displayed.
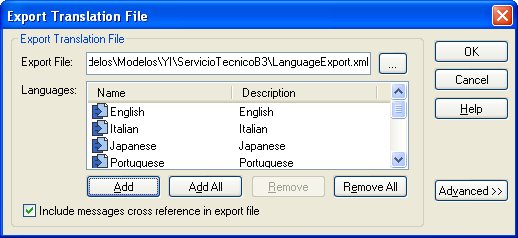
Export Translation File: Is the name of the translations file. The default translations file name is LanguageExport.xml. The default directory is the KB directory. You can change both according to your needs.
Objects: Displays the language objects to be exported.
Add: Allows you to add more language objects to the list of objects to be exported, through the Select Object Dialog.
Add All: Allows you to add all language objects.
Remove: Deletes all selected objects from the column of objects to be exported.
Remove All: Deletes all language objects.
Include messages cross references in export file: Allows you to include text cross references in the translations file (i.e. what objects in the KB reference what messages)
Advanced
By pressing this button, you can see advanced options of the messages that you want to export.
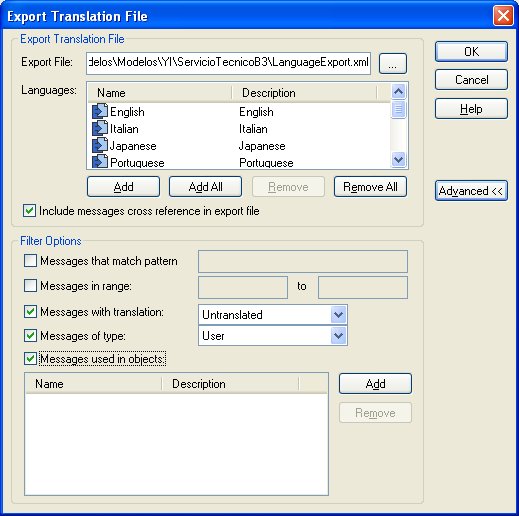
Filter Options
Messages that match pattern: Allows you to specify a pattern (not regular expression) to include messages matching that pattern.
Messages in range: Allows you to specify a range (for example, from 'A' to 'C') to include messages matching that range.
Messages with translation: Includes all messages for the Language, only those translated, only those that do not have a translation (default value), or both.
Messages of type: Allows selecting User messages (default value), Internal (i.e. GeneXus) messages, or Both.
Messages used in objects: Selecting a list of objects will include message references by any (or all) of the selected objects.
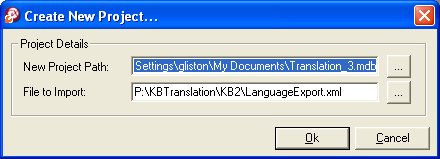
To start translating, translators must first create a project and specify the name of the file created in the previous step (the translations file).
Once imported, the translations file containing the Language object(s) will be displayed as follows:
The left column shows all the project languages, and the right side shows the contents of each one of them.
The options in the upper part of the Language object allow filtering the messages to translate. The options are as follows:
Messages that match pattern: Shows only the messages that match the pattern.
Messages used in object: Allows you to select the messages used in one object.
Untranslated messages only: Shows only the untranslated messages.
User messages only: Shows only the user messages.
In addition to the previous options, you can add a reference language if it's necessary to simplify translation. This option can be accessed by right-clicking the language name, Load Reference Language.
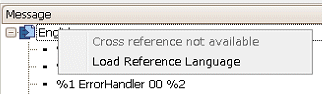
This language is used in the event that the translator doesn't know the original language of the Knowledge Base. For example, suppose that the Knowledge Base is in Spanish and has to be translated into Simplified Chinese. To do so, it is translated from Spanish into English, and then from English into Simplified Chinese by using English as reference language.
Once the translation is done, it needs to be sent back to the developer via a translations file. Select Tools/Export Translations.
Next, send back this file to be imported into the Knowledge Base.
Sometimes you will need to add more messages to the project to be translated so you have to Import the new messages by selecting Tools/Import Translations. You need to select whether you want to Overwrite existing translations or not.
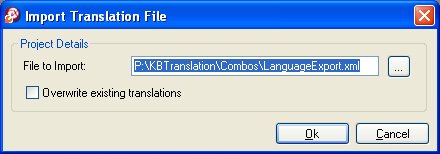
Once the translation is done, it has to be imported from the translations file that the translator created. Select Tools/Translation/Import Translation File. Only translated messages from the Translation file are imported.
Note for GeneXus 9.0 users: the import can be done in any model (Design, Prototype, etc.) as translations are Model-independent.
You will be prompted for:
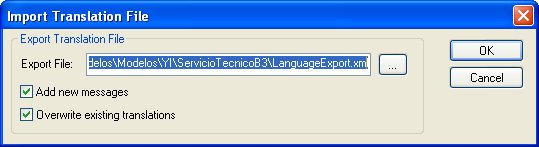
Export File: This is the name and directory of the translations file.
Add new messages: Allows adding new messages to the Knowledge Base. If this option is not checked, only the translations of existing messages in the Knowledge Base will be imported.
Overwrite existing translations: Imports translation file messages that have already been translated in your Knowledge Base.