This document explains how to upload images, videos, or audios using an API object, and provides a brief overview about it.
An API object makes it possible to upload Image, Video, Audio or BlobFile files.
To achieve this, two things must be taken into account:
- Two entries are generated from a service that has some parameter with the in operator of Image, Video, Audio or BlobFile type: one to upload the file (which is generated automatically) and another one to send that file to the database.
- You can use any tool that allows you to perform an HTTP POST with the binary to upload the file, for example, Postman.
Suppose you want to upload an image. To do so, follow these steps:
Consider the following Transaction defined as a Business Component:
Picture
{
  PictureId*          (Type:Id)
  PictureName         (Type:VarChar)
  PictureImage        (Type:Image)
}
Create a Procedure called InsertPicture and define the following:
Variables:
Picture                (Type:Picture)
PictureId              (Type:Attribute:PictureId)
PictureName            (Type:Attribute:PictureName)
PictureImage           (Type:Attribute:PictureImage)
Response               (Type:VarChar)
Rules:
Parm(in:&PictureId, in:&PictureName, in:&PictureImage, out:&Response);
Source:
&Picture.PictureId = &PictureId
&Picture.PictureImage = &PictureImage
&Picture.PictureName = &PictureName

if &Picture.Insert()
  &Response = 'Insert OK'
  commit
else
  &Response = 'Insert ERROR'
  rollback
Endif
Create the API object called “APIPicture” and define the following:
Variables:
PictureId              (Type:Attribute:PictureId)
PictureName            (Type:Attribute:PictureName)
PictureImage           (Type:Attribute:PictureImage)
Response               (Type:VarChar)
Service Source:
Picture{
      [RestMethod(POST)]
      [RestPath("/ServiceUpload")]
      InsertImage(in:&PictureId,  in:&PictureName, in:&PictureImage, out:&Response) =>
      InsertPicture(&PictureId, &PictureName, &PictureImage, &Response);
      }
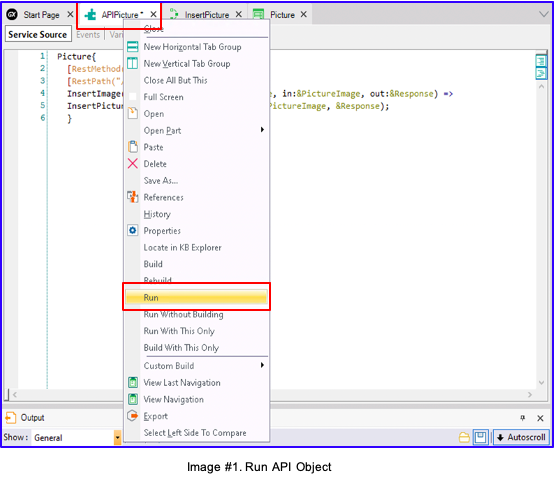
Run the API object (by right-clicking on the APIPicture tab and selecting Run).
To continue, you can choose one of the following options:
- Use Postman to prototype.
- Use HTTPClient to call the service from a program.
To use Postman, follow the steps below:
- Upload URL to Postman.
- Upload the image to the server.
- Send the image to the database.
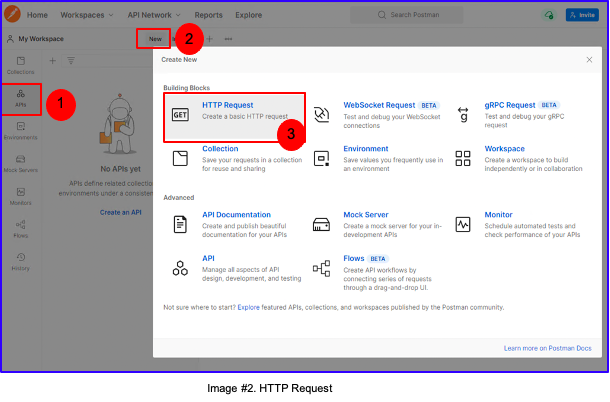
Go to Postman, click on APIs, then click on New, and finally on HTTP Request:
The following will be displayed:
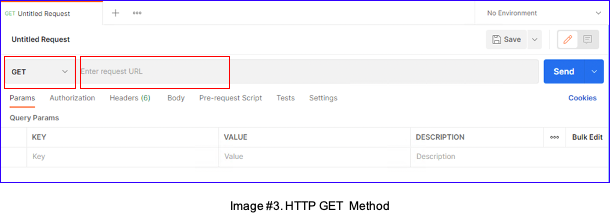
When you click on GET, a dynamic combo will be displayed. Select POST, enter the URL of the API object, and add /gxobject at the end, as shown below:

What is being done is to point to the gxobject method, which is automatically generated by GeneXus and allows you to upload the image to the server.
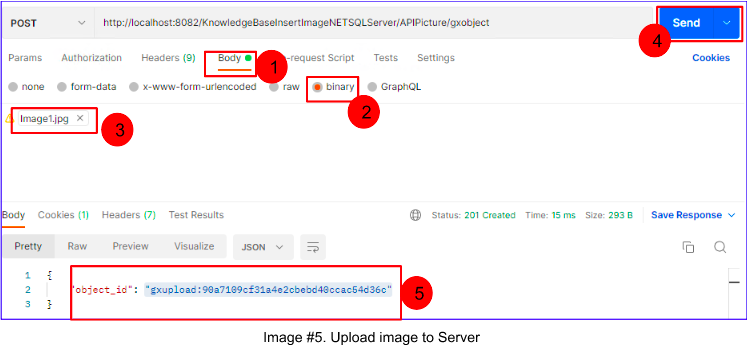
The steps to upload the image to the server, as shown in image #5, are the following:
- Select: Body.
- Select: Binary.
- Upload the desired image.
- Click on the Send button.
- Copy what appears in object_id.
To send the image to the Database, you will have to use the method that was defined in the API object; in this case, ServiceUpload.
Note: In this example, the method name is ServiceUpload, since a RestPath annotation was defined. If the annotation is left out, the name of your method will be the one that was first defined; in this case, “InsertImage”: http://localhost:8082/KnowledgeBaseInsertImageNETSQLServer/APIPicture/InsertImage
Open a new tab in Postman, copy the URL of the API object, and add /ServiceUpload at the end. Go to Body>raw and type the input variables as shown below:
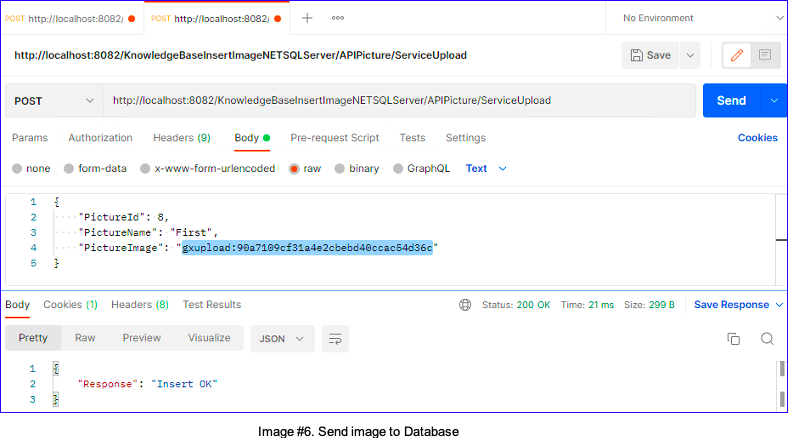
Note: In PictureImage, the input variable where the image is saved, paste what is shown in object_id (point 5, in Image #5).
In this case, it is: gxupload:90a7109cf31a4e2cbebd40ccac54d36c
By clicking on Send, you will be able to see the Insert OK message. This means that the image was successfully sent to the database. You can run the Picture Transaction to view the inserted record with the image.
You can consume any REST service with GeneXus, whether it's been generated with it or not.
To consume a REST service, take into account the following:
- In GeneXus, a REST service is consumed using the HttpClient data type. You can have all the objects automatically generated using the OpenAPI import tool.
- Remember that the appropriate content type headers must be sent using the AddHeader method. For example, for a JSON body, the code should be as follows:
&httpClient.AddHeader("Content-Type", "application/json")
In addition, since you are trying to upload an image, keep in mind that two HTTP POST methods are required:
- An HTTP POST "<Object name>/gxobject" (below the URL of the web application) attaching the file to the HTTP request. This returns a reference that you must use to insert the image into the database.
- Next, run an HTTP POST procedure to the REST by sending a JSON request that includes the information to be processed.
If GAM is enabled, remember to add the mandatory Authorization header. Use the GetAgentServiceHeader method to get the correct one for your use case. If you want to call it manually, using the Access_token GAM Service, then include:
&httpclient.AddHeader('Authorization', &access_token)
Furthermore, because the JSON format of the Image is provided, it is necessary to use SDTs to load the data to be sent to the service.
In this case, it will be necessary to follow the three steps shown below:
- Create SDTs
- Create a Procedure
- Run the Procedure
Create an SDT named, for example, Imageref, and define the following:

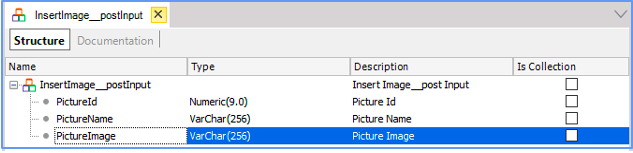
Create another SDT named, for example, InsertImage__postInput with the following structure:
Create a Procedure and define the following:
Variables:
httpClient     (Type: HttpClient)
ImagePath      (Type: Character)
Imageref       (Type: Imageref)
Ivc            (Type: VarChar)
Picture        (Type: InsertImage__postInput)
ref            (Type: VarChar)
body           (Type: VarChar)
Source:
&ImagePath = 'C:\Downloads\Image1.jpg' //add the path to the image.

&httpClient.Host ='localhost'  //Insert service
&httpClient.Port = 8082         //Insert port
&httpClient.BaseUrl = 'KnowledgeBaseInsertImageNETSQLServer/APIPicture/'   //Insert basepath

&httpClient.AddHeader('Content-Type','application/jpg') //AddHeader Method use to up image
&httpClient.AddFile(&ImagePath)  //The AddFile method adds the contents of the file to the variable holding the file path.
&httpClient.Execute('POST','gxobject')  //Executes POST HTTP method in the URL path for the gxobject whose information is to be obtained.

&lvc = &httpClient.ToString()  //Returns the HTML code of the image in the variable &lvc
&Imageref.FromJson(&lvc)  //loads the &Imageref structure from the contents of the &lvc variable
&ref = &Imageref.object_id
msg(&ref,status)

//add the image data to be uploaded in a variable based on the SDT
&Picture.PictureId= 4
&Picture.PictureName = 'Image4'
&Picture.PictureImage = &ref   //PictureImage is where the image is stored, so you must assign the variable &ref.

&body = &Picture.ToJson()   //Returns a string with the JSON representation for the &Picture
msg(&body,status)

&httpClient.AddHeader('Content-Type','application/json')
&httpClient.AddString(&body)

&httpClient.Execute('POST','ServiceUpload')
&lvc = &HttpClient.ToString()
msg(&lvc,status)
In the Procedure, configure its Main program property to 'Yes' and its Call protocol property with the 'Command line' value.
Next, run it. To do so, right-click on the Procedure tab and select Run.
In the Output, you can have details of the result of the procedure, which will be similar to the image:

The Insert OK message means that the image was successfully sent to the database and you will be able to see it in the Web Form of the Picture Transaction.
If you run the API object and a tab opens in your browser as shown below:
Select and copy the link to that page. Actually, you will be copying the URL of the API object, which is composed of:
http://{{host}}/{{baseurl}}/{{BasePath}}
Where:
host = localhost:8082
baseurl = KnowledgeBaseInsertImageNETSQLServer
BasePath = APIPicture
Note: This can happen if you are using the GeneXus .NET Generator and the value of the Generate OpenAPI interface property is not Yes or if you are using any other generator. In any case:
- You will only have to copy the URL of the API object (http://localhost:8082/KnowledgeBaseInsertImageNETSQLServer/APIPicture) and disregard the rest.
- Check that the BasePath matches the Services base path property. That is, if Services base path = "APIPicture” the URL must be http://localhost:8082/KnowledgeBaseInsertImageNETSQLServer/APIPicture
Since GeneXus 17 Upgrade 9.
Execute method
BaseUrl property
AddFile method
ToString method
FromJson method
ToJson method