Download here
Control Description
The idea behind a fisheye control is a strip of icons, being vertical or horizontally laid out that reacts to the user's mouse as it approaches the icon as shows the following image:
Using the control
The Fisheye Menu User Control is based on the Dojo Fisheye Widget.
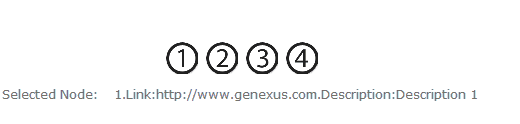
The control loads a SDT with a list of images. When an element is selected the OnClick event is raised and the SelectedImageId property is loaded with the index of the selected image. It can be handled as follows in the GeneXus object:
//Handling the Item Selection
Event fisheye1.OnClick
  &fisheyeIndex=fisheye1.SelectedImageId
  TextBlock1.caption = "Selected Node: " + &fisheyeIndex.ToString() + ".Link:" + &FisheyeData.Item(&fisheyeIndex).Link + ".Description:" + &FisheyeData.Item(&fisheyeIndex).Description
EndEvent
In this case, the TextBlock1 texblock displays the SelectedItem properties.
In adition the control offers a set of properties to customize its behavior. Check the following image:
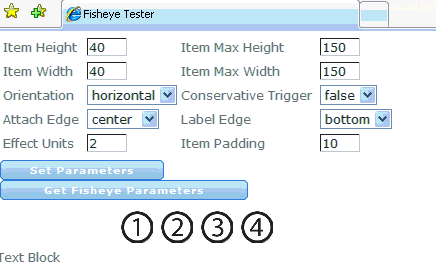
Control Properties
-
Width: width of menu item (in pixels) in it's dormant state (when the mouse is far away) (Default: 40).
-
Heigth: height of menu item (in pixels) in it's dormant state (when the mouse is far away) (Default: 40).
-
MaxWidth: width of menu item (in pixels) in it's fully enlarged state (when the mouse is directly over it) (Default: 150).
-
MaxHeight: height of menu item (in pixels) in it's fully enlarged state (when the mouse is directly over it) (Default: 150).
-
Orientation: orientation of the menu, either "horizontal" or "vertical" (Default: horizontal).
-
effectUnits: controls how much reaction the menu makes, relative to the distance of the mouse from the menu (Default: 2).
- itemPadding: padding (in pixels) betweeen each menu item (Default: 10).
- attachEdge: controls the border that the menu items don't expand past;for example, if set to "top", then the menu items will drop downwards as they expand. Possible values are: "center", "left", "right", "top", "bottom". (Default: center).
- labelEdge: controls were the labels show up in relation to the menu item icons; possible values are "center", "left", "right", "top", "bottom" (Default: bottom).
- SelectedImageId: Contains the index of the selected image when the OnClick event is raised.
- ConservativeTrigger: if true, don't start enlarging menu items until mouse is over an image; if false, start enlarging menu items as the mouse moves near them (Default: false).
- ControlName: Fisheye control name.
- FisheyeData: SDT contaning the Fisheye image list. This is a SDT Collection of FisheyeDataItem's with the following elements:
- Description: item description.
- Image: item image path.
- Link: item additional information.
Control Events
// Fisheye sample code
Example
When dropping the Fisheye User Control to the Web Form the following code snippet is added to the WebPanel Events section:
Sub 'FisheyeSample'
    // Load SDT with a Data provider sample
    // Default sample for .Net Generator, for Java check the Data Provider Code
  &FisheyeData =  FisheyeSampleData()
EndSub
The FisheyeData SDT is loaded using the FisheyeSampleData DataProvider with 4 sample images distributed with the control.
FisheyeData
{
    // Image Reference must be changed depending on the generator
    // Using relative images
    //         Net: "Fisheye/images/fisheye_1.png"
    //         Java: "../static/Fisheye/images/fisheye_1.png"
    // When using Blob, use the PathToUrl() function
    &basePath = "./" // Use "./" for .Net and "../static/" for Java
    FisheyeDataItem
    {
        Description = "Description 1"
        &path = &basePath + "Fisheye/images/fisheye_1.png"
        Image = &path
        Link = link("http://www.genexus.com")
	Id = "Identifier #1"
    }
    FisheyeDataItem
    {
        Description = "Description 2"
        &path = &basePath + "Fisheye/images/fisheye_2.png"
        Image = &path
        Link = link("http://www.gxtechnical.com")
	Id = "Identifier #2"
    }
    FisheyeDataItem
    {
        Description = "Description 3"
        &path = &basePath + "Fisheye/images/fisheye_3.png"
        Image = &path
        Link = link("http://www.gxopen.com")
	Id = "Identifier #3"
    }
    FisheyeDataItem
    {
        Description = "Description 4"
        &path = &basePath + "Fisheye/images/fisheye_4.png"
        Image = &path
        Link = link("http://www.genexus.com")
	Id = "Identifier #4"
    }
}
Notes
Please visit: Default Installation Instructions for User Controls.
Just drop the control in a Web Panel and load the related FisheyeData SDT variable with your images and tune the user control parameters as you wish. Within the user control folder installation, there's a FisheyeTester.xpz sample to test it.
This user control uses the Fisheye Widget from the Dojo framework which is automatically distributed with GeneXus, no license is needed. For more information click here.
Contact information
Please send feedback to: lsilveira@artech.com.uy
- Version 1.0.2
- Version 1.0.3
- the MouseOver operation now details the image description (contribution by Marcelo Iriarte).