This article is a guide on how to implement the authentication flow of apps developed in JS frameworks such as React or Angular. It includes cases of apps not developed with GeneXus that require authentication with GAM through the OAuth2.0 protocol.
The architecture of this solution is divided into three participating layers:
- Frontend
- GAM
- External IDP
Communictions between GAM and the IDP remain exactly the same as usual, and they are not covered in this document.
Below is a full flow diagram followed by a step-by-step explanation.
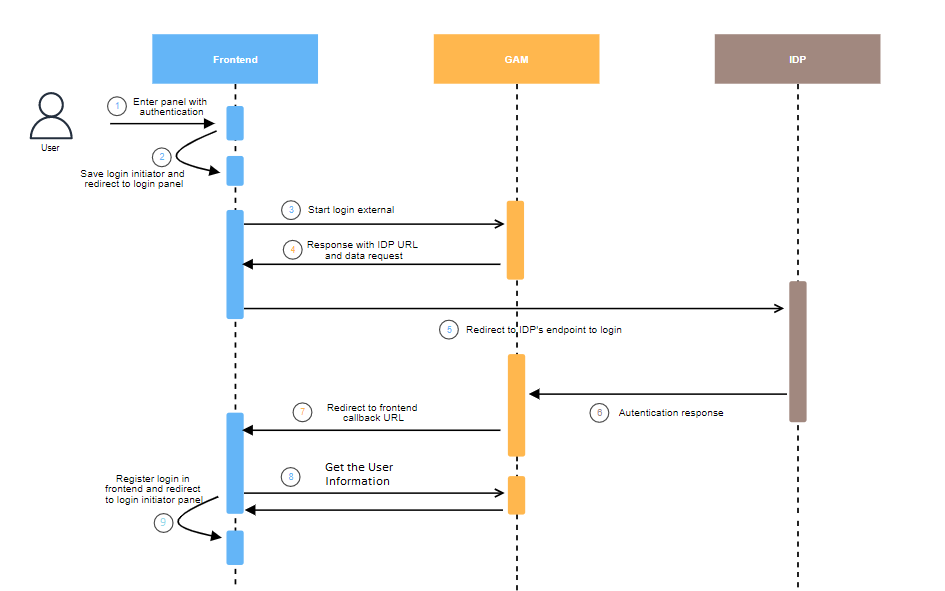
This is the baseline for any authentication, where a user tries to access a Panel that requires authentication to enable the entry. The session is checked at this point, and if valid it will be no longer necessary to continue with the authentication flow. Otherwise step 2 is next.
Once the frontend detects that there is an attempt to access without authentication, a redirect to a Panel will be required to allow the user authentication. Prior to leaving the Panel entered originally, that Panel's url will be saved in the client storage in order to conclude the login flow at that point.
The user will select the authentication type, and for the case of external authentication the external login flow in GAM is triggered.
This is done by means of a POST to the API of GAM /oauth/access_token, with the following data:
BODY
- client_id - Parameter that must be set up in GAM to identify this application.
- client_secret - Parameter that must be set up in GAM to identify this application.
- grant_type - Indicates the authentication type (for example: "Facebook") that has been previously set up in GAM.
- username - Name of user; used only in authentitcation type GAMRemoteRest.
- password - User password. Like the username, it is only used in GAMRemoteRest.
- scope - This value must be set as FullControl
- additional_parameters - Additional parameters accepted by GAM. For example, in the event of more than one type of authentication of the same type, the name must be indicated in these additionalParameters. Used in JSON format.
- avoid_redirect - This value must always be set as True.
HEADERS
- 'Accept': 'application/json'
- 'Content-Type': 'application/x-www-form-urlencoded',
- 'Genexus-Agent': 'SmartDevice Application',
- 'avoid_redirect': "true",
- 'redirect_clientloginurl' - This header is required to inform GAM the URL of the client where the authentication's callback must be redirected following the reply of the IDP. (Refer to step 7)
Then the code associated with this implementation is placed in the Angular generator provided by GeneXus.
public loginExternal(type: string, username: string, password: string, additionalParameters: any = null) {
    const url = Settings.OAUTH_ENDPOINT + 'access_token';
    let body = "client_id=" + Settings.GAM_CLIENT_ID;
    body += "&client_secret=" + Settings.GAM_CLIENT_SECRET;
    body += "&grant_type=" + type;
    body += "&username=" + username;
    body += "&password=" + password
    body += "&scope=FullControl";
    if (additionalParameters) {
      body += "&additional_parameters=" + JSON.stringify(additionalParameters);
    }
    body += "&avoid_redirect=true"
    var angularCallbackUrl = this.getLoginInitiator(false);
    const headers = new HttpHeaders(
      {
        'Accept': 'application/json',
        'Content-Type': 'application/x-www-form-urlencoded',
        'Genexus-Agent': 'SmartDevice Application',
        'avoid_redirect': "true",
        'redirect_clientloginurl': angularCallbackUrl
      });
      return this._http.post(url, body,{ headers: headers, withCredentials: true } ).pipe(
      map((response: any) => {

        /*THIS CODE IS SHOWED IN STEP 5*/

      }), catchError(err => {
        return throwError(err);
      })
    );
}
After the post to GAM is done, GAM will constitute a URL based on the setting of the selected authentication type and on the data sent to GAM for the external login. Such URL will be redirected and it will take you to the site of the IDP that has been configured to do the authentication. GAM replies with an HTTP Response and status 301, with the location corresponding to the endpoint that has to be redirected.
The following actions are executed with the URL obtained in the response's location:
- A search is done to obtain the STATE parameter sent by GAM, which is the identifier of the current flow. That state will be saved in the client storage to perform an additional security check at the end of the authentication.
- The redirect to the URL senty by GAM is executed.
This is the point where the control of the execution flow "is lost" because a redirect to the IDP was performed.
The code associated with this implementation is then placed in the Angular generator provided by GeneXus.
          ClientStorage.Set('gx.GAM.on_external_login', "true");
          let url = response.Location;
          var regEx = RegExp("state=(^&*)")
          var state = url.match(regEx)
          if (state != null)
          {
            ClientStorage.Set('gx.GAM.login.state', state1);
            window.location.href = url //THIS EXCECUTES THE REDIRECT
          }
          else
            return throwError("The state is empty");
This step corresponds to the flow between GAM and the IDP. Once the corresponding exchanges between GAM and the IDP are done, the IDP will end the flow by performing a redirect to the GAM endpoint it has established in the preliminary configurations of the authentication type.
At this point, GAM has created the session and it will proceed to communicate to the Frontend that the external authentication flow was completed successfully. This communication is done by a redirect to the callback URL that was sent to GAM at the beginning of the authentication, in step 3.
The referred redirect contains the following parameters:
- access_token - It is the token generated by the successful authentication.
- state - It is the state parameter that identifies the flow.
- refresh_token - This token is used to refresh the access token after expiry.
The access_token and state parameters are MANDATORY, and they will always be there when the request is from GAM.
IMPORTANT: a verification must be made to make sure that the parameters mentioned are not empty and that the state parameter received matches the one that was collected in step 4. When all this is so, then the authentication has been successful, and the corresponding record of session is done in the client.
The code associated with this implementation is placed in the Angular generator provided by GeneXus.
      var access_token = this.getQueryParameter("access_token")
      var state = this.getQueryParameter("state")
      var refresh_token = this.getQueryParameter("refresh_token")
      if (access_token && state)
      {
        if (state == ClientStorage.Get("gx.GAM.login.state"))
        {
          ClientStorage.Remove('gx.GAM.login.state');
          this._authService.finishLogin(access_token, refresh_token);
          return true;
        }
      }
With the access token obtained in step 7, make the request to GAM in order to obtain the user information. This may be done according to the article Userinfo GAM Service
At this point, everything is done to record the successful login, save the access_token and all the user information in the client store or in the safe place provided by the framework.
The last step is to perform a final redirect to the login initiator Panel, that is, the one that the user was attempting to enter in the first place. Now that it has been authenticated, the flow of step 1 will enter through the valid token part, and the flow will be fully completed.