This section describes the initial configuration needed to run pipelines that use the synchronization and building capabilities of GeneXus and GeneXus Server.
Azure pipelines trigger jobs that are executed by agents, which are computing infrastructure with installed software that runs one job at a time. Agents are organized into pools, depending on their capabilities and installed software.
For GeneXus pipelines, you need to create an Agent pool with agents that include GeneXus and its installation requirements.
An agent can be the same development machine used by a developer with GeneXus installed and access to GeneXus Server.
During the day, the developer uses the machine for regular development tasks; at night, the same machine acts as an agent to run Azure pipelines.
Creating and managing Agent pools requires an Administrator account. After logging into Azure DevOps, select your organization and click on “Organization settings” at the bottom of the page.

Next, in the Pipelines section, click on the “Agent pools” option. A list of the agent pools already created for this organization, if any, will be displayed on the right.

Click on the “Add pool” button.

In the pop-up window, do the following:
- Select the “Self-hosted” option.
- Fill in the name for your pool. Keep in mind that the pool name you choose might be used later in your pipeline scripts.
- Fill in the optional description.
- In 'Pipeline permissions', make sure the option is checked by default.
- Click on “Create”.

Once your pool is created, you need to register a machine within the pool that will act as the pipeline executor. Therefore, it must have GeneXus installed, including the specific requirements needed to generate an application according to the generator configuration defined in the Knowledge Base.
If GeneXus is already installed on your machine, you may proceed with the agent software installation. If you need to install it, you may check the hardware and software requirements, and the instructions on how to install and configure GeneXus.
Click on the newly created agent pool, and click on “New Agent” in the top right corner.

You will then be presented with all the system options for the new agent. Select “Windows” and “x64”.
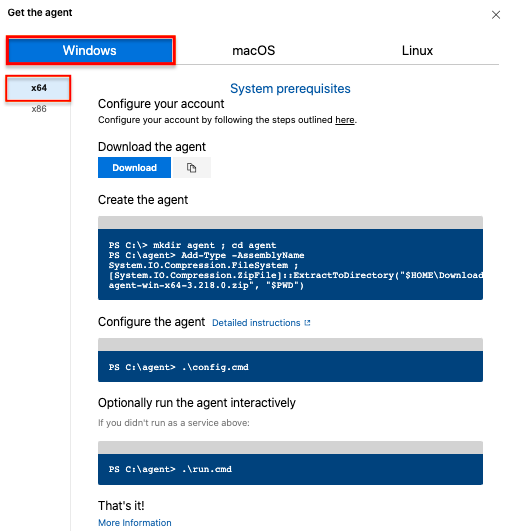
Download the agent to the machine you will use for that and follow the instructions to complete the setup.
During the process, you will be prompted to use a Personal Access Token (PAT), which can be obtained from the menu shown in the image below.

Store the PAT securely for future use — it may be required to register agents in the same pool.
You can verify that your agent has been successfully configured if it is displayed in the “Agents” tab on your newly created agent pool.

It is recommended to install the agent as a Windows service.
The agent should run under a system administrator account to ensure it has the necessary execution permissions.
Additionally
- Using the same Windows user, make sure to run the following command at least once from the Command Prompt:
genexus /install
- For a better experience, it's recommended that the SQL Server instance used by GeneXus has Windows Authentication enabled.
Ensure that the same administrator user running the agent also has administrator privileges on the SQL Server.