Deprecated.
One of the advantages of using a revision control system –such as GeneXus Server for developing with GeneXus– is being able to automate the build process of a project triggered by the changes being made by the developers. Here is a guide to do so.
Why switch to automated project building
Combining GeneXus Server and CruiseControl.NET
Setup Guide
Overview
Step 1 – Selecting a machine
Step 2 – Downloading and installing GeneXus
Step 3 – Downloading and installing the GXserver client by command line
Step 4 – Downloading and installing CruiseControl.NET
Step 5 – Adding GXserver add-in to Cruise Control
Step 6 – Starting CruiseControl.NET server
Step 7 – Creating a working copy of the KB
Step 8 – First update and manual build
Step 9 – Setting up the build project
What's next?
An automatic build process is one of the basic components of Continuous Integration, a software development technique that consists of frequently integrating (several times a day) the work of the various developers involved in order to find integration issues as soon as possible. The developers’ work environments are integrated through the commit operations they make to a central repository, and the integration is checked by an automated project build process which may also include other tests.
But whether in the context of Continuous Integration or of less frequent integrations, automating the build process of what's stored in the repository has advantages of its own.
Building a system is usually a complex process that involves multiple stages, from obtaining the latest changes made to the repository, generating and compiling everything necessary, executing reorganizations, and finally moving the programs to the deployment environment, to name just the most visible ones.
Add the ins and outs of building multiple versions of a project (which take elements from different places, need components from different versions, leave the results somewhere else, etc.) and several build variations (with or without tests, building certain modules or leaving them out, generating a setup file or not, etc.), and the complexity involved can grow significantly.
Automating this process implies, among other things:
- Avoiding the need for a person dedicated to executing each stage, checking the results, deciding the next step to take, etc.
- Not depending on the knowledge of a single person to perform these steps correctly and in adequate order. What happens when this person gets sick or takes a holiday?
- Avoiding the risk of mistakes made by this person, something that often happens in the most stressful situations; that is to say, when there is more risk of potential damage.
In addition, the possibility of running the entire build process in a completely unattended manner and with a single command gives us the chance to take the next big step, which is to automate the process triggering itself. For example, we may want to have the repository checked for new commits on a regular basis and, if so, to have the project automatically built. Some projects may need this several times a day, while others only at night or even during weekends. Here is where the so called continuous integration servers come into play. One example of such servers is CruiseControl.NET.
A continuous integration server is a service that monitors a certain software repository to find out if changes have been made, and in this case it may trigger a project build process.
In our case, we will use CruiseControl.NET as continuous integration server. This software will monitor –at intervals set by us– knowledge bases managed by a GeneXus Server. If new commits are found, it will update a copy of the KB and run the build process. Both the update and build processes will be run through MSBuild tasks with no need to start GeneXus to do it.
First of all, we need a machine with GeneXus and CruiseControl.NET installed. In addition, we will need to have access to a GXserver which can be installed on the same machine or on a different one.
After installing the software, obtaining a copy of the KB from GXserver and manually running the build is recommended to make sure that everything works properly. Then the build process can be automated with Cruise Control.
The first step is to choose the machine where the Build server will be installed. This machine must have GeneXus and CruiseControl.NET installed.
GeneXus X Evolution 2 Hardware and Software Requirements
CruiseControl.NET installation requirements
In order to use CruiseControl.NET’s web console (WebDashboard) we also need to have IIS installed with enabled ASP.NET.
If the GXserver to be used is not installed on the same machine, you will need HTTPS connectivity with the machine where GXserver is installed, whether via intranet or internet.
GeneXus version X Evolution 1 U7 or later must be used.
Download GeneXus X Evolution 2
GeneXus Installation Manual
The GeneXus installation program saves the installation directory path in the GX_PROGRAM_DIR environment variable. Check the content of this variable and adjust it if necessary.
Copy the following files to the GeneXus installation directory:
Artech.Samples.GXserverExtraTasks.dll
Artech.Samples.GXserverExtraTasks.targets
Install the following files on a local directory, such as C:\GXserverClient. From now on this directory will be referred to as [GXserverClient].
TeamDev.exe
TeamDev.exe.config
TeamDev.msbuild
Download CruiseControl.NET
CruiseControl.NET Documentation
The setup screen shows three components to install. CruiseControl.NET Server is a minimum requirement, and installing the Web Dashboard is also recommended.
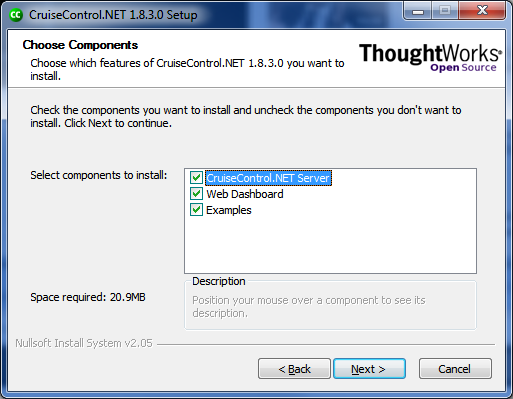
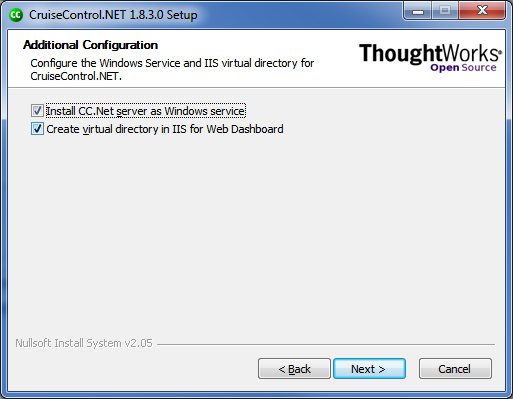
In addition, leaving the "Install CC.Net server as Windows service" and "Create virtual directory in IIS for Web Dashboard" options selected is advisable.
As usual, the installation directory can also be selected; by default, it is similar to C:\Program Files\CruiseControl.Net. From now on, this installation directory will be referred to as [CruiseControl].
CruiseControl’s default configuration supports several repository systems (SVN, CVS, etc.). With this add-in, CruiseControl can also recognize GXserver as a valid repository and interact with it.
Copy CCNet.GXserver.Plugin.dll to [CruiseControl]\server.
CruiseControl.NET can be run in two ways: as a Windows service or as a console application. For its normal operation, using the service is the recommended option. However, in the initial setup stages the console application can be useful because it provides instant feedback with messages in the console. Also, it can be easier to stop and run again. Once the setup is stable, the service can be used.
Both applications are located in the [CruiseControl]\server directory and they are called ccservice.exe (service) and ccnet.exe (console application). In addition, they have their corresponding setup files which are called ccservice.exe.config and ccnet.exe.config. These files allow configuring specific aspects for each execution mode and they both use a third setup file (ccnet.config). The third file is usually shared and it is used to determine the various build projects.
Every build project selects a certain source repository, as well as what should be obtained from it, the interval at which it should be checked for changes, where to keep a local copy of the sources, and what to use in order to run the build.
The default location of the ccnet.config file is also the [CruiseControl]\server directory, even though another location can be indicated by adding an entry such as the one shown below in the <appSettings> section of ccservice.exe.config and ccnet.exe.config:
<appSettings>
<!-- Without this appSetting ccservice will look for ccnet.config in its own directory. -->
< add key=" ccnet.config " value="c:\some\path\to\ccnet.config " />
...
</appSettings>
In turn, the initial content of the ccnet.config file is as follows:
<cruisecontrol xmlns:cb="urn:ccnet.config.builder">
<!-- This is your CruiseControl.NET Server Configuration file. Add your projects below! -->
<project name="MyFirstProject" description="demoproject showing a small config">
<triggers>
<!-- check the source control every X time for changes, and run the tasks if changes are found -->
<intervalTrigger name="continuous"
seconds="30"
buildCondition="IfModificationExists"
initialSeconds="5"/>
</triggers>
<sourcecontrol type="nullSourceControl" alwaysModified="true" />
<tasks>
<exec>
<!-- if you want the task to fail, ping an unknown server -->
<executable>ping.exe</executable>
<buildArgs>localhost</buildArgs>
<buildTimeoutSeconds>15</buildTimeoutSeconds>
<description>Pinging a server</description>
</exec>
</tasks>
<publishers>
<xmllogger />
<artifactcleanup cleanUpMethod="KeepLastXBuilds" cleanUpValue="50" />
</publishers>
</project>
</cruisecontrol>
As indicated in the above example, in each <project> stated in the ccnet.config file, a series of elements can be established:
<triggers> - query triggers based on changes to the source files. In the example, the trigger is simply time-based. The repository will be checked for new changes every 30 seconds and the build will be run if changes are found.
<sourcecontrol> - it’s the repository from where the source files are obtained. The type of repository can be any of the standard repositories ("svn", "cvs", etc.) or, as we will see later, it can also be "gxserver" thanks to the plugin that we installed in step 4. A special type called "nullSourceControl" is used in the example, where a set answer acts as if new changes are found.
<tasks> - these are the tasks to run when changes are found in the source files. Usually, a task that runs the build process is used here. In the example, it is simulated with a ping command that is used simply to run something.
<publishers> - they are the tasks to run after the build is completed. In general, they are used to gather and publish the results.
This initial setup doesn’t build any sources, but it is useful to run CruiseControl.NET and check how it works. Once it has been implemented, any change made to the setup file will be automatically detected.
To start the server, we will run ccnet.exe from a command window (alternatively, we can run the CruiseControl.NET option from the Windows start menu).
After starting the server, you can access the server URL http://localhost/ccnet to confirm that everything is working properly. The CruiseControl.NET console (Web Dashboard) will be displayed:
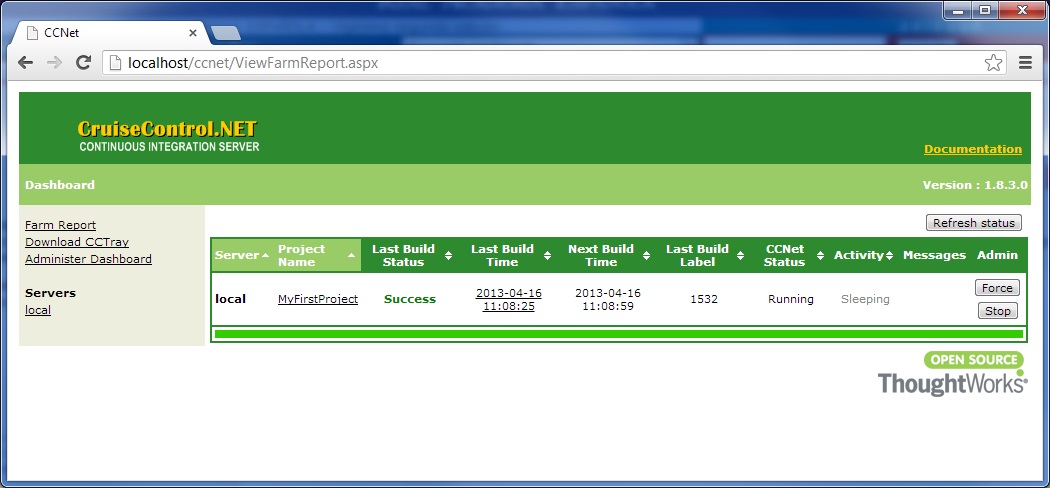
CruiseControl.NET build items are called projects. Each one of them will indicate the GXserver KB being used, its version (if there is more than one), environment, etc. In addition, for each one of these projects the location of a local KB will be indicated. The local KB will be used as a working copy to update from GXserver and then run the build process.
It is recommended that all working copies to be used with CruiseControl.NET be centralized in the same directory structure, so that each project has a directory in which the working KB’s directory is a child.
For example, when automating the Build process of two KBs –a KB called Bobsville (its main version and another one called "Version 1.0") and another KB called Sunflower Valley (its main version and another one called "Version 2.2")– the directory tree could be as follows:
CruiseControlData
|
--- Bobsville
| |
| --- Principal
| | |
| | --- WorkingCopy
| |
| --- Version1.0
| |
| --- WorkingCopy
|
--- Sunflower Valley
| |
| --- Principal
| | |
| | --- WorkingCopy
| |
| --- Version2.2
| |
| --- WorkingCopy
|
.
.
.
The projects corresponding to the same KB of the server (Bobsville and Sunflower Valley in this case) are grouped there under a single directory, even though it isn’t strictly necessary. What is really important, for reasons that will be explained later, is that each build project has a specific directory for the project that contains the working KB directory.
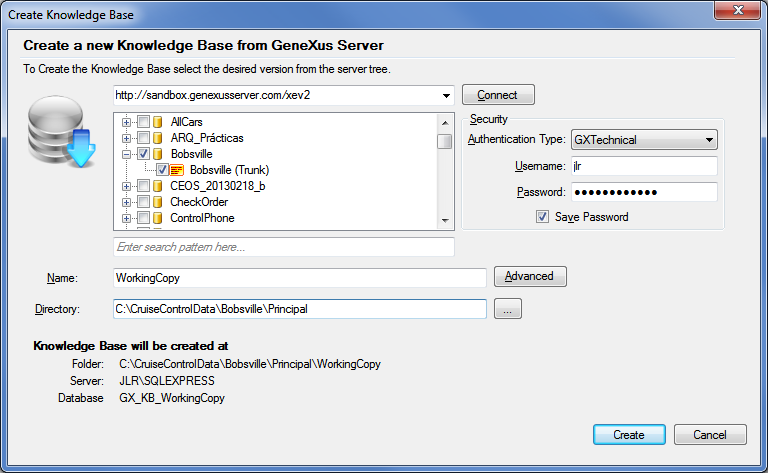
In order to go on with the continuous integration setup, first we will automate the build process of the Bobsville KB main version, so we will create the working copy in the following directory: C:\CruiseControlData\Bobsville\Principal\WorkingCopy. The Bobsville KB can be obtained from the Sandbox GXserver of Evolution 2. Below you can see the screen to Create a new Knowledge Base from GeneXus Server that is displayed when creating this working copy.
After creating the working copy we need to perform an Update and a Build, which in turn require defining (or creating) the application database, and specifying and generating everything for the first time. This process can be avoided if we start from an existing working KB that has already been built, and copy it here with all the generated files.
In any case, we must check that it’s possible to manually perform an Update and a Build, solving any problems that may arise so as to make sure that everything is correctly set up in GeneXus and GeneXus Server, and that from now on we only need to work on their automation.
To set up a build project we need to edit the ccnet.config file, to add a new element of <project> type in the XML code.
First, we will state some variables whose values depend on each installation. They will be referenced later in the project configuration file. In this way, these variables can be shared across several projects and it is easier to update them. Copy the following immediately after the root element of the XML code (ie: <cruisecontrol xmlns:cb="urn:ccnet.config.builder">):
<!-- GeneXus installations -->
<cb:define Gx15="C:\Program Files\GeneXus\GeneXus15" />
<cb:define Gx15U1="C:\Program Files\GeneXus\GeneXus15U1" />
<cb:define Gx15U2="C:\Program Files\GeneXus\GeneXus15U2" />
<cb:define GxDefault="$(Gx15U2)" />
<!-- GXserver credentials -->
<cb:define GXserverUser="GXtechnical\user" />
<cb:define GXserverPassword="**********" />
<!-- KnowledgeBase information -->
<cb:define KBVersion="DevelopmentVersion" />
<cb:define KBEnvironment="JavaCloudEnv" />
<!-- MSBuild executable -->
<cb:define MSBuildExe="C:\Program Files (x86)\MSBuild\14.0\bin\msbuild.exe" />
<!-- CruiseControl configuration -->
<cb:define CruiseControlServerDir="C:\Program Files\CruiseControl.NET\server" />
<cb:define CruiseControlDataDir="C:\CruiseControlData" />
<cb:define GXserverClientDir="C:\GXserverClient" />
<cb:define TeamDevExePath="$(GXserverClientDir)\TeamDev.exe" />
Of course, we need to replace some of these variable values (those highlighted in yellow) with their appropriate values depending on our local configuration and installation paths. The first section defines the path for different GeneXus installations we may want to use, and declares the last one as default.
Important Note: If we are using GeneXus 15 or later version, we need to make sure the path we use for "MSBuildExe" is for MSBuild 4.0 version or higher.
Next, after these variable statements we need to add the following build project statement:
<project name="Bobsville Principal">
<sourcecontrol type="gxserver">
<serverUrl>http://sandbox.genexusserver.com/v15</serverUrl>
<serverUsername>$(GXserverUser)</serverUsername>
<serverPassword>$(GXserverPassword)</serverPassword>
<serverKbAlias>Bobsville</serverKbAlias>
<serverKbVersion>Bobsville</serverKbVersion>
<getAllKbVersions>false</getAllKbVersions>
<workingDirectory>$(CruiseControlDataDir)\Bobsville\Principal\WorkingCopy</workingDirectory>
<workingVersion></workingVersion>
<workingEnvironment></workingEnvironment>
<localSettings>$(CruiseControlDataDir)\Bobsville\Principal\settings.local</localSettings >
<dbaseServerInstance></dbaseServerInstance>
<createDbInKbFolder>true</createDbInKbFolder>
<dbaseUseIntegratedSecurity>true</dbaseUseIntegratedSecurity>
<dbaseServerUsername></dbaseServerUsername>
<dbaseServerPassword></dbaseServerPassword>
<dbaseName></dbaseName>
<executable>$(TeamDevExePath)</executable>
<teamDevTasks>"$(GXserverClientDir)\TeamDev.msbuild"</teamDevTasks>
<msbuildExecutable>$(MSBuildExe)</msbuildExecutable>
<autoGetSource>true</autoGetSource>
<cleanCopy>false</cleanCopy>
<tagOnSuccess>false</tagOnSuccess>
</sourcecontrol>
<triggers>
<intervalTrigger seconds="600"/>
</triggers>
<tasks>
<msbuild>
<executable>$(MSBuildExe)</executable>
<projectFile>$(GXserverClientDir)\TeamDev.msbuild</projectFile>
<buildArgs>
/v:Normal
/t:Build
/p:WorkingDirectory="$(CruiseControlDataDir)\Bobsville\Principal\WorkingCopy"
/p:WorkingVersion=$(KBVersion)
/p:WorkingEnvironment=$(KBEnvironment)
/p:ServerUsername=$(GXserverUser)
/p:ServerPassword=$(GXserverPassword)
/p:GX_PROGRAM_DIR="$(GxDefault)"
/p:MSBuildExtensionsPath="c:\Program Files\MSBuild"
</buildArgs>
<logger>$(CruiseControlServerDir)\ThoughtWorks.CruiseControl.MsBuild.dll</logger>
<timeout>18000</timeout>
</msbuild>
</tasks>
<publishers>
<xmllogger />
<artifactcleanup cleanUpMethod="KeepLastXBuilds" cleanUpValue="50" />
<modificationHistory />
</publishers>
</project>
This projet declaration makes use of the "GxDefault" defined above. If we want to build a project with a different GeneXus installation, we need to change that variable declaration, or use another variable in the project configuration. For instance, if we later wanted one particular project to be built with GeneXus version 15 U1, we would change the line in that project declaration that says
/p:GX_PROGRAM_DIR="$(GxDefault)"

to say

/p:GX_PROGRAM_DIR="$(Gx15U1)"
If instead we wanted all projects using the GxDefault variable to be built with version 15U1, we would just change the variable declaration so that it points to it:
<cb:define GxDefault="$(Gx15U1)" />
Upon saving the contents of the ccnet.config file, the change will be detected by CruiseControl.NET and if we go back to the console (Web Dashboard), we will now see our new project. From now on, every time CruiseControl.NET detects a new commit (GXserver will be queried every 10 minutes, according to what we indicated in <intervalTrigger>) it will build the KB and show the results on the console itself.
If you’ve followed all the above steps, we’d like to know what your experience was like. Any problems, errors, suggestions?
Did everything work ok? If so, please sign the Guest Book. In the Bobsville KB, look for an object with that name, enter your name there and make a commit to let us know.
Of course, feel free to collaborate in the development of the Bobsville KB.