Warning: Since GeneXus 15 onwards, it is recommended to use the
Tab Control instead of the TabbedView Web Component.
You should only use the TabbedView Web Component if you are working in a Knowledge Base migrated from previous versions or for compatibility reasons.
Up to GeneXus X Evolution 3 (and previous versions) the TabbedView Web Component was automatically generated when applying the GeneXus Work With for Web pattern to a Transaction object for the first time in a Knowledge Base to be used in every generated 'View' Web Panel to organize their data in Tabs.
Eventually, the TabbedView Web Component could be reused in your own implementations.
Below is described the implementation generated automatically by GeneXus that uses the TabbedView Web Component in a 'View' Web Panel.
If you need to implement a similar case without generating the 'View' Web Panel, you can refer to this sample.
Consider the following Transaction objects:
Customer
{
  CustomerId*
  CustomerName
  CustomerLastName
  CustomerAddress
}

Invoice
{
   InvoiceId*
   InvoiceDate
   CustomerId
   CustomerName
   CustomerLastName
   InvoiceDescription
   InvoiceAmount
}

Payment
{
   PaymentId*
   PaymentDate
   CustomerId
   CustomerName
   CustomerLastName
   PaymentDescription
   PaymentAmount
}
Suppose you need to define a screen that shows the Customer data organized in tabs:
- General: To show the Customer general information.
- Invoices: To show the Customer's Invoices.
- Payments: To show the Customer's Payments.
The first step is to create a Web Component object for each Tab (in this case named: CustomerGeneral, CustomerInvoices and CustomerPayments). This is necessary to ensure that only one tab will be loaded at a time, preventing overly heavy pages.
The second step is to create a Web Panel object named 'ViewCustomer' and drag a Web Component control from the Toolbox into the Web Form of this Web Panel (in this example, the Web Component is called WebComp1) .
Note: Dragging a Web Component control into the Web Form of a Web Panel doesn't work properly when using
Abstract Layout.
The next step consists in associating the Web Component control (WebComp1) with the TabbedView Web Component object (it is assumed that it is created in the KB).
The TabbedView Web Component has two parameters:
- An SDT representing the available Tabs.
- An identifier that indicates which of the Tabs is active.
The SDT is a collection of a structure as described below:
TabOptionsItem [IsCollection]
{
   Code
   Description
   Link
   WebComponent
}
So, define the following Start event in the 'ViewCustomer' Web Panel:
Event Start

   &TabOptions = new()

   &TabOptionsItem= new()
   &TabOptionsItem.Code         = 'General'
   &TabOptionsItem.Description  = 'General info'
   &TabOptionsItem.Link         = ViewCustomerProcedural.Link(CustomerId, 'General')
   &TabOptionsItem.WebComponent = WCGeneralProcedural.Link(CustomerId)
   &TabOpions.add(&TabOptionsItem)

   &TabOptionsItem= new()
   &TabOptionsItem.Code         = 'Invoices'
   &TabOptionsItem.Description  = 'Invoices info'
   &TabOptionsItem.Link         = ViewCustomerProcedural.Link(CustomerId, 'General')
   &TabOptionsItem.WebComponent = WCInvoicesProcedural.Link(CustomerId)
   &TabOptions.add(&TabOptionsItem)

   &TabOptionsItem= new()
   &TabOptionsItem.Code         = 'Payments'
   &TabOptionsItem.Description  = 'Payments info'
   &TabOptionsItem.Link         = ViewCustomerProcedural.Link(CustomerId, 'General')
   &TabOptionsItem.WebComponent = WCPaymentsProcedural.Link(CustomerId)
   &TabOptions.add(&TabOptionsItem)

   WebComp1.Object = TabbedView.Create(&TabOptions, &TabCode)
Endevent
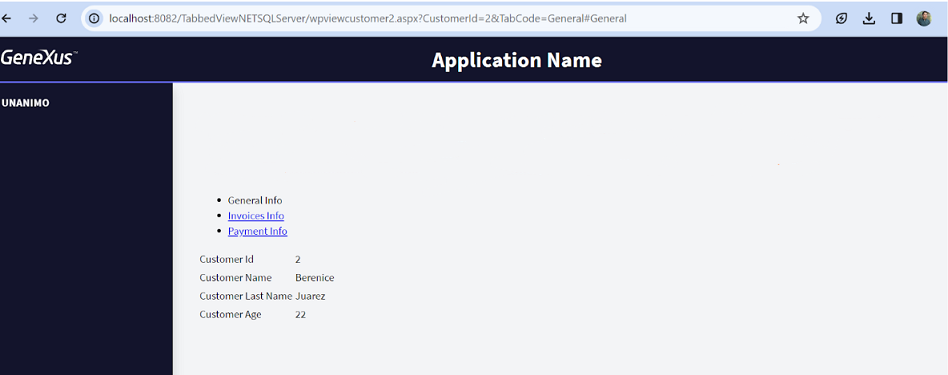
At runtime, you will see the following:

See Data Provider Use Case: TabbedView usage for a simpler code.
Download the XPZ file with a TabbedView Web Component sample (GeneXus 18 Upragde 8).