Here are some frequently asked questions and Troubleshooting for working with Android.
Refer to Android Requirements for version-specific information.
Check that you have the Enable Logging main object property set to "debug" (i.e. any value but "off").
The LogCat is an Android application that debugs your app or finds the error stack trace in order to see what's going on in the background of your apps. It allows you to see what's happening when the app is being executed in the background.
If you are using the Android emulator instead of a device, you can generate debug information by running the following command line:
> android_sdk_path/platforms-tools/adb.exe logcat > some_path_in_your_machine/some_file_name.txt
Example:
> adb.exe logcat > c:\temp\log
4. How is the emulator (AVD) customized?
The AVD used by GeneXus is created the first time an application is run (i.e. when F5 is pressed). The AVD-Manager tool allows changing AVD properties (e.g. change AVD resolution) when the emulator is not launched and even create new ones. In order to launch a non-default emulator, you must run it manually from the avdmanager and then rerun your application from GeneXus.
Since GeneXus 15, KBN prototyping is not available anymore.
The options are obtained from a JSON file located on the server you’re accessing. The content of this metadata can be verified using a browser. The URL looks like this: http://<BaseURL>/gxmetadata/<dashboard_name>.menu.json (e.g. http://sdxapps.genexus.com/gcinv10e/gxmetadata/maindashboard.menu.json).
The result should be as shown below:
{
  "Dashboard": {
    "@Title": "",
    "@Background": "",
    "@Header": "",
    "@Icon": "",
    "@Class": "",
    "instanceProperties": {
      "@IsMain": "True"
    },
    "Item": [
      {
        "@Name": "Customer",
        "@Description": "",
        "@LowCardinality": "False",
        "@Image": "",
        "@Class": "",
        "@Link": "",
        "@LinkType": "Page",
        "@Data": "15cf49b5-fc38-4899-91b5-395d02d79889-WorkWithDevicesCustomer"
      },
     ....
     ]
}
Note: This answer applies for both Android and Apple.
1. The Android device is connected by USB cable, but the emulator is always opened instead of prototyping with the device.
- Cause: The Android driver is not installed. Even if you see your device model with the Windows Explorer, you access your device's files, or the Windows Device Manager is showing your device as Portable Device, it doesn't mean that the Android device is recognized. Thus, the build process will not find any Android device connected, and the run process check sequence will start a new emulator, using the default AVD.
- Solution: In order to check if the android device is properly recognized by Windows, execute the following command line:
> android_sdk_path/platforms-tools>adb.exe devices
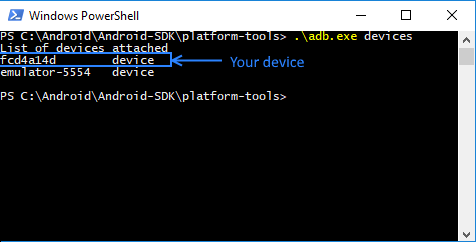
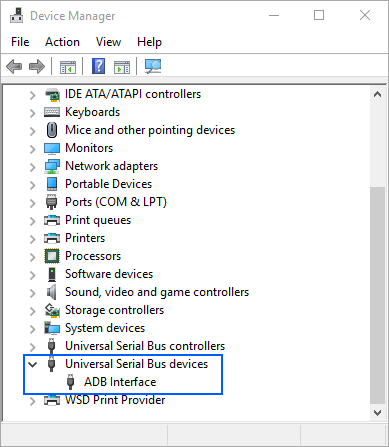
Another way of checking that the Android device is recognized as a device for Windows is to open the Device Manager and look for an ADB interface in the Universal Serial Bus controller node.
If you don't have the driver installed, you may look for it at the factory Internet site and get the suitable driver is by installing the software you use to synchronize the device with your computer. The software will install the adequate driver for your device.
2. android.util.AndroidException: Can't connect to activity manager; is the system running?
Just try pressing F5 again.
3. "Waiting for device to become ready... (this may take a while)" and it takes forever
When an Android application compiles, GeneXus gives the following output and does not progress:
Command:emulator -avd my_gx_avd_instance
Waiting for device to become ready... (this may take a while)
Also, if you try to run the emulator manually with this command:
> android_sdk_path/tools /emulator -avd my_gx_avd_instance
...you get:
emulator: Error: unknown virtual device name: "my_gx_avd_instance "
emulator: could not find virtual device name: "my_gx_avd_instance "
However, the AVD exists (can be listed using avdmanager list devices command).
- Cause: This is due to a known bug in the SDK emulator.exe app that doesn't find the *.avd file.
- Solution: Add a System Variable called ANDROID_SDK_HOME that points to the root of where the SDK Manager is storing your AVD (you can find this path at the top of the list of virtual devices in the SDK Manager).
For example:
ANDROID_SDK_HOME = "C:\Windows\system32\config\systemprofile\"
or
ANDROID_SDK_HOME = "C:\User\myuser\"
More info here. Then try running the emulator again.
4. Run Developer Menu Failed
Output window shows:
Calculating Mobile Targets...
Command:android list avd
Run Developer Menu Failed
5. Error HTTP 404.0 - Not Found
When browsing a REST service (e.g. http//localhost/<ApplicationName>/rest/<transactionName>) the following error appears:
Error HTTP 404.0 - Not Found
- Cause: The server is running on IIS and URL rewriting is not installed or .svc extension is not properly registered in IIS.
- Solution: Refer to How to install URL Rewrite and if it does not work, execute the following command at a command prompt:
> "%WINDIR%\Microsoft.Net\Framework\v3.0\Windows Communication Foundation\ServiceModelReg.exe" -i
6. Failure [INSTALL_PARSE_FAILED_INCONSISTENT_CERTIFICATES] When the F5 process takes place, the following message appears:
\Command:adb install -r "G:\<models>\my_kb\my_environment\mobile\Android\my_main\bin\my_main.apk"

pkg: /data/local/tmp/my_main.apk

Failure [INSTALL_PARSE_FAILED_INCONSISTENT_CERTIFICATES]

664 KB/s (443392 bytes in 0.651s)

Android Execution

Failed Run Developer Menu Failed
- Cause: The application was marked with a different release key that is already installed on the device.
- Solution: Uninstall the application from the emulator and execute F5 again.
7. Failure [INSTALL_PARSE_FAILED_UNEXPECTED_EXCEPTION]
When running the application (i.e. from F5) the following message appears:
Command:adb install -r "C:\temp\my_kb\my_environment\mobile\Android\my_main\bin\my_main.apk"
pkg: /data/local/tmp/my_main.apk
Failure [INSTALL_PARSE_FAILED_UNEXPECTED_EXCEPTION]
Android Execution
Failed Run Developer Menu Failed
- Cause: This error occurs at the end of the build process when GX is trying to sign the application with SDK 7.
- Solution: Uninstall this version and install the JDK 6 or JDK 8 instead.
8. Failure [INSTALL_FAILED_INSUFFICIENT_STORAGE]
When running the application (i.e. from F5) the following message appears:
Command:emulator -avd my_gx_avd_instance
Waiting for device to become ready... (this may take a while)
Command:adb install -r "C:\model\my_kb\my_environment\mobile\Android\my_main\bin\\my_main.apk"
pkg: /data/local/tmp/my_main.apk
Failure [INSTALL_FAILED_INSUFFICIENT_STORAGE]
Android Execution Failed
Run Developer Menu Failed
- Cause: The emulator is run anyway but the application has not been deployed, so it could show an error or run the previously deployed application (e.g. Dashboard.apk previous version). Storage full status is shown as follows:

- Solution: Remove the default generated AVD by using avdmanager tool. When the application is run again, the AVD will be automatically created.
9. Error: Activity not started, unable to resolve Intent { act=android.intent.action.VIEW dat=Android flg=0x10000000 }
When running the application, the following message appears:
Command:adb install -r "C:\Archivos de programa\ARTech\GeneXus\GeneXusXEv2\Android\GenexusPrototyper.apk"
pkg: /data/local/tmp/GenexusPrototyp
er.apk Success 306 KB/s (0 bytes in 440906.001s)
Command:adb shell am start -n com.artech/.PrototyperActivity -e url http://10.0.2.2:10080/FirstAndroidappRubyEnvironment/ -e name
First Android app Starting: Intent { act=android.intent.action.VIEW dat=Android }
Error: Activity not started, unable to resolve Intent { act=android.intent.action.VIEW dat=Android flg=0x10000000 }
10. Error: Failure [INSTALL_FAILED_MISSING_SHARED_LIBRARY]
When running the application, the following error appears:
Command:adb install -r "C:\myModel\Data\mobile\Android\App\bin\App.apk"
pkg: /data/local/tmp/App.apk
Failure [INSTALL_FAILED_MISSING_SHARED_LIBRARY]
Command:adb shell am start -n com.artech.mymodel.App/.Main
Starting: Intent { cmp=com.artech.mymodel.App/.Main } Error type 3
Error: Activity class {com.artech.myModel.App/com.artech.myModel.App.Main} does not exist.
- Causes:
- Google API is not installed.
- The AVD is damaged.
- Solution: Check Android-SDK requirements or repair the AVD by using AVD Manager tool (or simply delete it -- It'll be created again the next time the application is run).
11. Error: Failure [INSTALL_FAILED_DEXOPT]
Command:adb install -r "c:\..WorkWithDevicesCustomer.apk"
pkg: /data/local/tmp/WorkWithDevicesCustomer.apk
Failure  [INSTALL_FAILED_DEXOPT]
- Causes: the application was previously installed using different Libraries version.
- Solution: delete the my_gx_avd_instance emulator using AVD Manager or deleting C:\Users\<my_user>\.android\.avd directory. It will be created next time F5 (run) is executed.
12. Error: No Internet Connection
When running the application, the following error appears:
No internet connection
- Cause: The emulator has no access to the internet (you can check it by opening a website through the device browser). The root cause could be:
- Your machine has no internet access.
- Your launched emulator has no internet access (WiFi or data plan is off).
- Solution: Delete the default generated emulator by using avdmanager tool. It will be created the next time F5 (run) is executed with Internet access by default. Refer to StackOverflow - Android emulator internet access.
13. Error: UNEXPECTED TOP-LEVEL EXCEPTION
When compiling the application, an error like the following occurs:
[dx] UNEXPECTED TOP-LEVEL EXCEPTION:
[dx] com.android.dx.util.DexException: Cannot merge new index 66032 into a non-jumbo instruction!
[dx]     at com.android.dx.merge.InstructionTransformer.jumboCheck(InstructionTransformer.java:108)
[dx]     at com.android.dx.merge.InstructionTransformer.access$800(InstructionTransformer.java:25)
[dx]     at com.android.dx.merge.InstructionTransformer$StringVisitor.visit(InstructionTransformer.java:71)
[dx]     at com.android.dx.io.CodeReader.callVisit(CodeReader.java:114)
[dx]     at com.android.dx.io.CodeReader.visitAll(CodeReader.java:89)
[dx]     at com.android.dx.merge.InstructionTransformer.transform(InstructionTransformer.java:48)
[dx]     at com.android.dx.merge.DexMerger.transformCode(DexMerger.java:808)
[dx]     at com.android.dx.merge.DexMerger.transformMethods(DexMerger.java:779)
[dx]     at com.android.dx.merge.DexMerger.transformClassData(DexMerger..java:751)
[dx]     at com.android.dx.merge.DexMerger.transformClassDef(DexMerger.java:654)
[dx]     at com.android.dx.merge.DexMerger.mergeClassDefs(DexMerger.java:526)
[dx]     at com.android.dx.merge.DexMerger.mergeDexBuffers(DexMerger.java:168)
[dx]     at com.android.dx.merge.DexMerger.merge(DexMerger.java:186)
[dx]     at com.android.dx.command.dexer.Main.mergeLibraryDexBuffers(Main.java:300)
[dx]     at com.android.dx.command.dexer.Main.run(Main.java:232)
[dx]     at com.android.dx.command.dexer.Main.main(Main.java:174)
[dx]     at com.android.dx.command.Main.main(Main.java:91)
- Cause: There is a setting issue resolved since GeneXus Tilo Beta 2.
- Solution: You have to manually add the line dex.force.jumbo=true to the file <GX>/Android/Templates/default.properties or <GX>/Android/Templates/project.properties, delete <model>\mobile\android\ directory and compile again.
When running the application, an error similar to the following appears:
error: BUILD FAILED
error: C:\Android-SDK\tools\ant\build.xml:542: Unable to resolve project target 'android-23'
error:
error: Total time: 3 seconds
Android Compilation Failed
Run MyMain Failed
- Cause: You are using a GeneXus upgrade that is trying to use the newest Android-SDK that you have installed.
- Solution: You must update your SDK since SDK Platform and Google APIs are required. Learn more.
15. An implementation for object 'xxx' was not found in package.
- Cause: This error may appear at runtime if an offline object is called by an online app.
- Solution: That scenario is not supported.
16. Error: AAPT err(Facade for 24252884): libpng error: CgBI: unhandled critical chunk
When compiling the Android application, the following error appears:
AAPT err(Facade for 24252884): libpng error: CgBI: unhandled critical chunk
- Cause: There are image extension integrity issues.
- Solution: Run the pngcheck tool on different directories res\drawable-<density> of the main object, to verify the integrity of PNG, JNG and MNG files.
17. Error Could not reserve enough space for 2097152KB object heap
When building the application, the following error appears:
FAILURE: Build failed with an exception.
* What went wrong:
Unable to start the daemon process.
This problem might be caused by incorrect configuration of the daemon.
For example, an unrecognized jvm option is used.
Please refer to the user guide chapter on the daemon at [https://docs.gradle.org/2.13/userguide/gradle_daemon.html]
Please read the following process output to find out more:
-----------------------
Error occurred during initialization of VM
Could not reserve enough space for 2097152KB object heap
* Try:
Run with --stacktrace option to get the stack trace. Run with --info or --debug option to get more log output.
- Cause: JDK x64 is not installed or the PC doesn't have enough memory to build the Gradle project (at least 2GB).
- Solution: Check the Android Requirements and/or change Android specific properties to assign less memory to Gradle. Alternatively, delete the %USERPROFILE%/.Gradle directory, and Rebuild-All.
18. Emulator 'GeneXus-API24-X86' was launched, but timed out waiting for it to respond.
When building the application, the following error appears:
========== Android Execution started ==========
Creating Android Virtual Device 'GeneXus-API24-X86'...
Command: android create avd --name GeneXus-API24-X86 --target android-24 --abi google_apis/x86 --skin WXGA720 --device "Nexus 4" --sdcard 200M
Launching Android Virtual Device 'GeneXus-API23-X86'...
Command: emulator -avd GeneXus-API24-X86 -gpu auto
Waiting for device to become ready... (this may take a while)
error: Emulator 'GeneXus-API24-X86' was launched, but we timed out waiting for it to respond.
Android Execution Failed
Run SDLlevoTodo Failed
- Cause: There is an ADB process already running on your machine or the AVD is corrupted.
- Solution: Check if there is an adb.exe program executing (use the Task Manager). In such case, kill the process and retry.
If the problem persists, delete the %USERPOFILE%/.Android/avd directory.
19. The "android" command is no longer available.
When building the application, the following error appears:
error: Error creating Android Virtual Device 'GeneXus-API24-X86'.
The "android" command is no longer available.
For manual SDK and AVD management, please use Android Studio.
For command-line tools, use
tools\bin\sdkmanager.bat and tools\bin\avdmanager.bat
- Cause: As of Android-SDK 25.3.0, Google has changed its command tools and made them non-backward compatible. This requirement was introduced to the Android Generator in GeneXus 15 Upgrade 5. For that reason, once the developer updates this requirement without backing up previous requirements (set in Android SDK Directory property), it is not possible for previous versions of GeneXus to create a new AVD or run an existing one. In other words, GeneXus Android Generator is trying to use a newer version of the Android-SDK that is non-backward compatible.
- Solution: There are two alternatives for avoiding this problem.
1) Duplicate your Android-SDK installation directory in order to backtrack changes if some problem occurs (e.g. /Android-SDK and /Android-SDK-GeneXus-15u3).
2) Download the previous requirements from this site.
3) Once the *.zip file is downloaded, you must replace the /tool directory on your Android-SDK directory (i.e. /Android-SDK-GeneXus15u3).
4) Ensure that your Android Requirements are according to your GeneXus upgrade (It might be helpful the "SDK Manager.exe" program or Android.bat).
5) Set the Android SDK Directory property) with the installation folder which we have previously modified.
20. Windows cannot find '\lib\monitor-location'.
When executing monitor.bat tool from Android-SDK for debugging purposes, the following dialog is displayed:
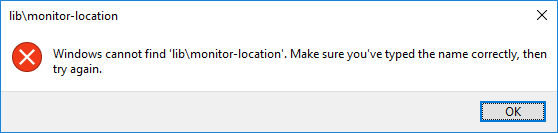
- Cause: As of Android-SDK 25.3.0, Google has deprecated the logcat debugging by using the monitor.bat tool.
- Solution: Execute the logcat of adb command line tool. Below there is an example of how you can execute the command:
> adb logcat -v tag GeneXusApplication:* System.out:I *:S
Note: You must ensure that adb tool is reachable from the CMD by adding the Android-SDK\platform-tools directory to the environment variables, or you must be positioned in that directory before executing the command.
This command will filter only those GeneXus applications and System output streams from all the process running on the device.
21. Error: Android Virtual Device 'GeneXus-API24-X86' already exists
When running an Android application the AVD (Android Virtual Device) is not recognized and the following message is displayed:
========== Execution started ==========
Execution Success
Calculating Mobile Targets for SmartDevices (Smart Devices)
========== Android Execution started ==========
Creating Android Virtual Device 'GeneXus-API24-X86'...
Command: avdmanager create avd --name GeneXus-API24-X86 --package system-images;android-24;google_apis;x86 --abi google_apis/x86 --device "Nexus 4" --sdcard 200M
error: Error creating Android Virtual Device 'GeneXus-API24-X86'.
Error: Android Virtual Device 'GeneXus-API24-X86' already exists.
Use --force if you want to replace it.

Android Execution Failed
- Cause: Since GeneXus 15 Upgrade 5 and due to the Android SDK requirements of Android SDK, Google has made the avdmanager tool non-backward compatible, unrecognizing those AVDs created with previous versions of this tool.
- Solution: You must delete the following resources and run (F5) the application again.
- %USERPROFILE%\.android\avd\GeneXus-API24-X86.avd
- %USERPROFILE%\.android\avd\GeneXus-API24-X86.ini
22. Chronometer control does not trigger Tick event
This undesired behavior causes the application to not work properly according to business logic.
- Cause: You are running the app on Android 8.0 or higher and Chronometer control is invisible. This behavior is a known bad practice for Google since Chronometer is a UI widget, not an async task.
- Solution: Make the control visible and assign 0dip on its container row height.
23. Error: File path too long on Windows, keep below 240 characters
24. Gradle build daemon has been stopped: stop command received
- Cause: You may have multiple KBs building and running Android apps on your computer, and one of them has been closed. Gradle daemon is reused, and once it has been killed, other apps cannot be built, producing such error.
- Solution: Disable daemon when building your apps. This can be done by setting Gradle Options property by replacing "--daemon" flag with "--no-daemon".
25. error: Emulator 'GeneXus-API16-ARM' was launched, but we timed out waiting for it to respond.
The above message was displayed after 6 minutes trying to run the emulator (by executing emulator -avd my_gx_avd_instance command).
The following error is from the second try:
error: Error starting Android Virtual Device 'GeneXus-API16-ARM'.
glMatrixMode:1543 GL err 0x500
Also, if the command is executed manually in the terminal, the following error is displayed:
PANIC: Missing emulator engine program for 'arm' CPU.
- Cause: You may be running GeneXus in a VM (Virtual Machine) or using Parallels in a Mac, but Android emulator cannot start properly due to GPU instability.
- Solution: Run the emulator manually by disabling GPU acceleration. This can be done by executing this command:
C:/<android-sdk-path>/emulator > emulator.exe -avd GeneXus-API16-ARM -gpu off
26. Error message: "Error exists in the bytecode"
error: A problem occurred configuring project ':SD_HOME'.
error: > Failed to notify project evaluation listener.
error:    > Uninitialized object exists on backward branch 142
error:      Exception Details:
error:        Location:
error:          com/android/build/gradle/internal/pipeline/VariantInfoImpl.<init>(Lcom/android/build/gradle/internal/scope/VariantScope;)V @200: goto
error:        Reason:
error:          Error exists in the bytecode
error:        Bytecode:
- Cause: Known error, produced in some versions of JDK 1.8.
- Solution: Update to the latest version of JDK 1.8 available.
27. Build error when using a Proxy:
When using a proxy connection in GeneXus 16 upgrade 5 (or higher), errors are encountered during compilation because the Android generator requires an Internet connection. To avoid such errors, the Proxy's properties must be set up within the Gradle option property. To achieve this, the following documents must be checked: Build Environment.
========== Android Compilation started ==========

Command:
gradle :PanelSmartDevices1:assembleDebug --no-daemon --parallel
-Dorg.gradle.jvmargs=-Xmx3072m
-Dorg.gradle.internal.launcher.welcomeMessageEnabled=false
To honour
the JVM settings for this build a new JVM will be forked. Please consider using
the daemon: https://docs.gradle.org/5.4.1/userguide/gradle_daemon.html.
Daemon will
be stopped at the end of the build stopping after processing
Configuration
on demand is an incubating feature.
FAILURE: Build failed with an exception.
What went wrong:
error: A
problem occurred configuring root project Android.
error: >
Could not resolve all artifacts for configuration :classpath.
error:
> Could not resolve com.android.tools.build:gradle:3.4.1.
error:
> Could not resolve com.android.tools.build:gradle:3.4.1.
error:
> Could not get resource
https://dl.google.com/dl/android/maven2/com/android/tools/build/gradle/3.4.1/gradle-3.4.1.pom.
error:
> Could not GET
https://dl.google.com/dl/android/maven2/com/android/tools/build/gradle/3.4.1/gradle-3.4.1.pom.
error:
> dl.google.com
error:
> Could not resolve com.android.tools.build:gradle:3.4.1.
error:
> Could not get resource
https://jcenter.bintray.com/com/android/tools/build/gradle/3.4.1/gradle-3.4.1.pom.
error:
> Could not GET
https://jcenter.bintray.com/com/android/tools/build/gradle/3.4.1/gradle-3.4.1.pom.
error:
> jcenter.bintray.com
error:
> Could not resolve com.google.gms:google-services:4.2.0.
error:
> Could not resolve com.google.gms:google-services:4.2.0.
error:
> Could not get resource
https://dl.google.com/dl/android/maven2/com/google/gms/google-services/4.2.0/google-services-4.2.0.pom.
error:
> Could not GET https://dl.google.com/dl/android/maven2/com/google/gms/google-services/4.2.0/google-services-4.2.0.pom.
error:
> This is usually a temporary error during host name resolution and means that the local server did not receive a response from an authoritative server (dl.google.com)
error:
> Could not resolve com.google.gms:google-services:4.2.0.
error:
> Could not get resource
https://jcenter.bintray.com/com/google/gms/google-services/4.2.0/google-services-4.2.0.pom.
error:
> Could not GET
https://jcenter.bintray.com/com/google/gms/google-services/4.2.0/google-services-4.2.0.pom.
error:
> This is usually a temporary error during host name resolution and means that the local server did not receive a response from an authoritative server (jcenter.bintray.com)
error: Run
with --stacktrace option to get the stack trace. Run with --info or --debug
option to get more log output. Run with --scan to get full insights.
error:
Get more help at https://help.gradle.org
error:
BUILD FAILED in 24s
In this case, it is not possible to connect to the URL dl.google.com. Besides configuring the associated proxy parameters in gradle, will need to download and install certificates in some cases, you could execute commands similar to the following:

# Certificate for my company
keytool -import -trustcacerts -alias SomeName -file SomeFile.cer -keystore cacerts
# Other certificates
keytool -import -trustcacerts -alias Bintray -file Bintray.cer -keystore cacerts
keytool -import -trustcacerts -alias Gradle -file Gradle.cer -keystore cacerts
28. Peer not authenticated during compilation
The following error occurs during compilation and some libraries cannot be downloaded:
Execution failed for task ':MainObject:checkDebugAarMetadata'.
> Could not resolve all files for configuration ':MainObject:debugRuntimeClasspath'.
   > Failed to transform hwid-6.3.0.301.aar (com.huawei.hms:hwid:6.3.0.301) to match attributes {artifactType=android-aar-metadata, org.gradle.category=library, org.gradle.libraryelements=jar, org.gradle.status=release, org.gradle.usage=java-runtime}.
      > Could not download hwid-6.3.0.301.aar (com.huawei.hms:hwid:6.3.0.301)
         > Could not get resource 'https://developer.huawei.com/repo/com/huawei/hms/hwid/6.3.0.301/hwid-6.3.0.301.aar'.
            > Could not GET 'https://developer.huawei.com/repo/com/huawei/hms/hwid/6.3.0.301/hwid-6.3.0.301.aar'.
               > peer not authenticated
Check the policies under the JDK used. Specifically, you can add the following to the java.policy file under <jdk-location>\conf\security\java.policy (notice the location will vary depending on the JDK version):
grant codeBase "file:${{java.ext.dirs}}/*" {
        permission java.security.AllPermission;
};