With the Application Deployment tool, you can run Java applications on Google App Engine.
Summary
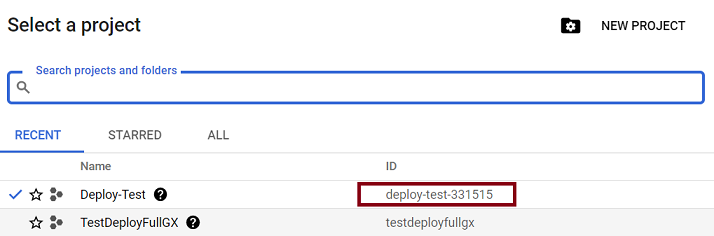
First, you need to set the Google environment using the Google management console.
Important Note
Google no longer supports Google App Engine Java 8 Runtime. For more information, see Google documentation.
Therefore, applications have to be upgraded to Java 11+ runtimes.
Below are the options available to deploy your app after upgrading to Java 11+.
There are two main options and the recommended one is the second choice, mostly for new applications.
- Compile your app using Java 11 or Java 17.
In this case, as the Jetty version that will be used is 9 (see Google reference here), and it does not support Jakarta, you have to set Java platform support property to Java EE.
- Compile your app using Java 21.
In this case, use Java platform support property = Jakarta (default value). Jetty version is 12 in this case so it guarantees Jakarta support.
1. Select the Main objects to be included in the Deployment Unit object. Then go through the contextual option "Deploy Application" of the deployment unit just created.
2. In Target, select the option "Google App Engine".
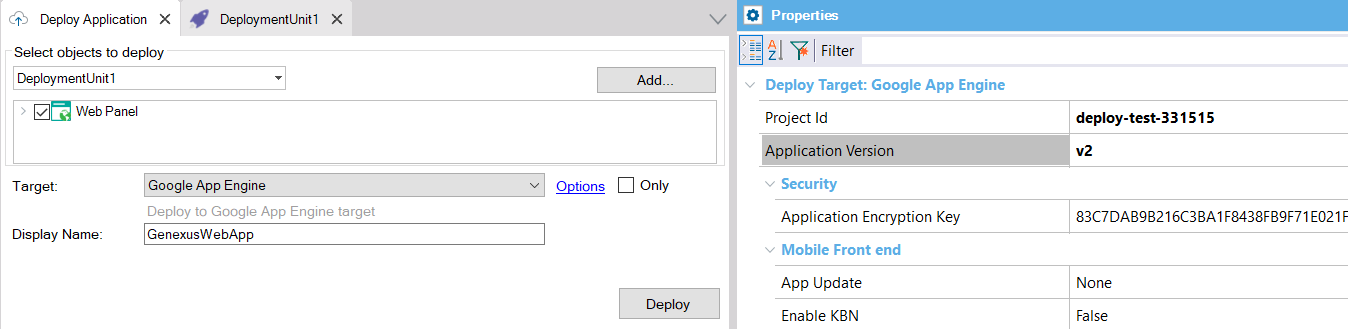
3. In the Deployment screen, complete the following:
- Project Id
Enter the Project ID as obtained using the Google management console.
- Application version
The app version that will be created or replaced by this deployment. If you don't specify a version, one will be generated for you.
App Engine uses this version identifier to determine whether to create a new version of the app with the given identifier (or replace the version of the app with the given identifier if one already exists). You can test new versions of your app with a URL using "-dot-" as a subdomain separator in the URL; for example, https://VERSION_ID-dot-default-dot-PROJECT_ID.REGION_ID.r.appspot.com. Using the Google Cloud Console, you can select the default version of your app. The default version is loaded when no version, or an invalid version, is specified.
After selecting the main objects and configuring the necessary properties for the automatic deployment, press the Deploy button.
It will build the WAR package, as well as upload and deploy it on Google App Engine.
You'll see an output similar to the following:
Services to deploy:
descriptor:                  [C:\models\TestDeployGoogle\TestDeployGoogle\Java8\Deploy\GAE\DeploymentUnit1\20211113123339\WEB-INF\appengine-web.xml]
source:                      [C:\models\TestDeployGoogle\TestDeployGoogle\Java8\Deploy\GAE\DeploymentUnit1\20211113123339]
target project:              [deploy-test-331515]
target service:              [default]
target version:              [v2]
target url:                  [https://deploy-test-331515.uc.r.appspot.com]
target service account:      [App Engine default service account]
Beginning deployment of service [default]...
#============================================================#
#= Uploading 4 files to Google Cloud Storage                =#
#============================================================#
File upload done.
Updating service [default]...
.............................................................................................................................done.
Setting traffic split for service [default]...
.....................................done.
Deployed service [default] to [https://deploy-test-331515.uc.r.appspot.com]
You can stream logs from the command line by running:
$ gcloud app logs tail -s default
To view your application in the web browser run:
$ gcloud app browse
Deploying to Google App Engine finished successfully.
Once deployed, your application runs on the URL https://<YOUR_PROJECT_ID>.appspot.com.
Execute the Google console and go through the App Engine panel (Versions option on the left). On the right, you have the list of all the versions deployed and their URL.
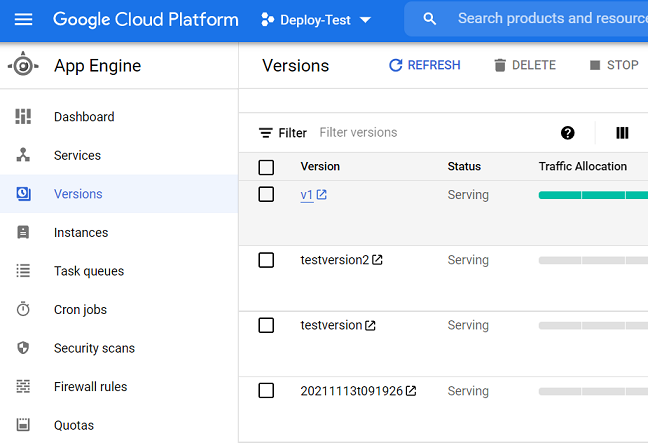
For example: [https://20211113t091926-dot-deploy-test-331515.uc.r.appspot.com/com.testdeploygoogle.webpanel1]
Number 20211113t091926 is the version, deploy-test-331515 is the project ID, and com.testdeploygoogle is the Java package name property set in the Knowledge Base.