Exporting and executing the reorganization is part of the deployment process of an application. GeneXus creates (and by default also runs) the reorganization programs during Build All/Rebuild All and specifically using Build>Create Database Tables, or Build>Impact Database Tables.

The Export Reorganization option can be found under Build>Export Reorganization and lets you create a package with the files required to execute the reorganization programs built in the last build process. That package can be sent to another execution environment (e.g. Production Environment) to be executed there to create or reorganize the corresponding Database schemas.
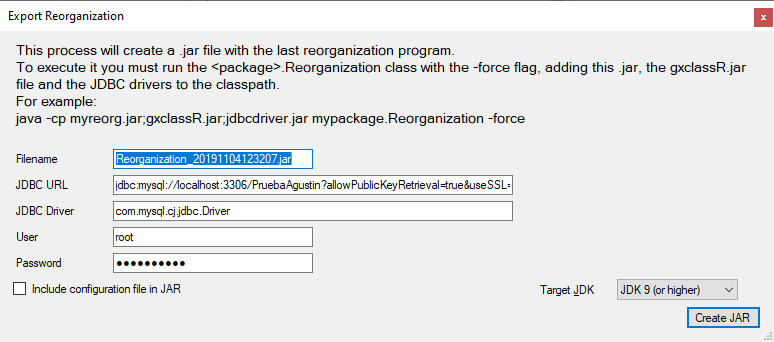
In a Java Environment, the Export Reorganization option creates a .jar file with the last reorganization programs.
The Dialog asks for the following:
- Filename: The name of the .jar that contains the reorganization programs (e.g. Reorganization_20170425155404.jar).
- JDBC URL: Here, enter the server name, port, and name of the database to be reorganized. The specification varies according to the JDBC driver used. The JDBC URL configured in the model is suggested by default (e.g. jdbc:mysql://apps6.genexus.com:3306/Idc17c75b1c3d40de51410883a256e5f2f).
- JDBC Driver: The driver's class name (e.g. com.mysql.jdbc.Driver).
- User: The database user with permissions to run reorganization programs has to be entered here. The user account configured in the model is suggested by default.
- Password: The password of the user account specified in the User field has to be entered here. The password configured in the model is suggested by default.
- Include configuration file in JAR: If set, the reorg.cfg is included in the .jar.
As a result, a .jar with the reorganization files is created. In the containing folder, the JDBC driver is copied too.
To execute it, you may run:
java -cp Reorg.jar; gxclassR.jar;<drivers jdbc> <package name if it has been defined>.Reorganization –force -nogui
More information regarding the flags: Create Database Options property
If the –force option is not included, an error such as the one below will be displayed:
There are no reorganization specifications
If the -nogui option is not included, when running on non-Windows platforms that don’t have a graphic interface, the following error may occur:
Exception in thread "main" java.lang.InternalError: Can't connect to X11 window server using ':0.0' as the value of the DISPLAY variable.
         at sun.awt.X11GraphicsEnvironment.initDisplay(Native Method)
         at sun.awt.X11GraphicsEnvironment.<clinit>(X11GraphicsEnvironment.java:134)
         at java.lang.Class.forName0(Native Method)
         at java.lang.Class.forName(Class.java:141)
         at java.awt.GraphicsEnvironment.getLocalGraphicsEnvironment(GraphicsEnvironment.java:62)
         at java.awt.Window.init(Window.java:231)
         at java.awt.Window.<init>(Window.java:275)
         at java.awt.Frame.<init>(Frame.java:401)
         at com.genexus.GXReorganization.showUI(GXReorganization.java:168)
         at com.genexus.GXReorganization.executeReorg(GXReorganization.java:228)
         at com.genexus.GXReorganization.executeReorg(GXReorganization.java:215)
         at Reorganization.main(Reorganization.java)
To avoid using a graphic interface, the –nogui option should be used. For example, on Linux the command to be executed would be similar to:
java -cp Reorg.jar:gxclassR.jar:<drivers jdbc> <package name if it has been defined>.Reorganization –nogui –force
In a .NET Framework Environment, the Export Reorganization option creates a .zip file with the last reorganization programs.
The Dialog asks for the following:
- Filename: The name of the .zip that contains the reorganization files.
- Trusted Connection: If checked, the reorganization will execute using Windows Authentication to connect to the DBMS.
- User: The DBMS User that is used to execute the reorganization.
- Password: The Password of that User.
As a result, a .zip with the reorganization files is created.
To execute the reorganization, unzip the files and execute reor.exe. You may use flags such as -force, -nogui, etc.
reor.exe -nogui -force
The following exception may occur if the reorganization.zip file is downloaded from the Internet and Windows marks it as "blocked":
Could not load file or assembly or one of its dependencies
Operation is not supported
System.NotSupportedException
The solution is to:
- Right-click over the files downloaded
- Select Properties
- Check the ‘Unblock’ box in the bottom right corner.
.NET packages the reorg as a zip file as well. To execute the reorganization program, run the following command:
dotnet Reor.dll -nogui -noverifydatabaseschema -force
More information regarding the flags: Create Database Options property
This option is available as of GeneXus 15 Upgrade 4.
Reorganization Deployment MSBuild Tasks
Features of Reorganizations
Create Database Options property
Gx X Java Reorg Console Exporter
CSharp XCopy Deployment Extension