Kubernetes has become the de facto standard Docker containers orchestrator. It is so popular and such a great solution for application deployment that all the major cloud providers have a solution for deploying a Kubernetes cluster.
For more information about Kubernetes, read What is Kubernetes.
Kubernetes is based on a metadata file that describes the desired state of an application. This state is declared in a YAML file.
GeneXus creates this YAML file based on your application needs. Here's what you need to know.
The following diagram shows what you want to achieve.
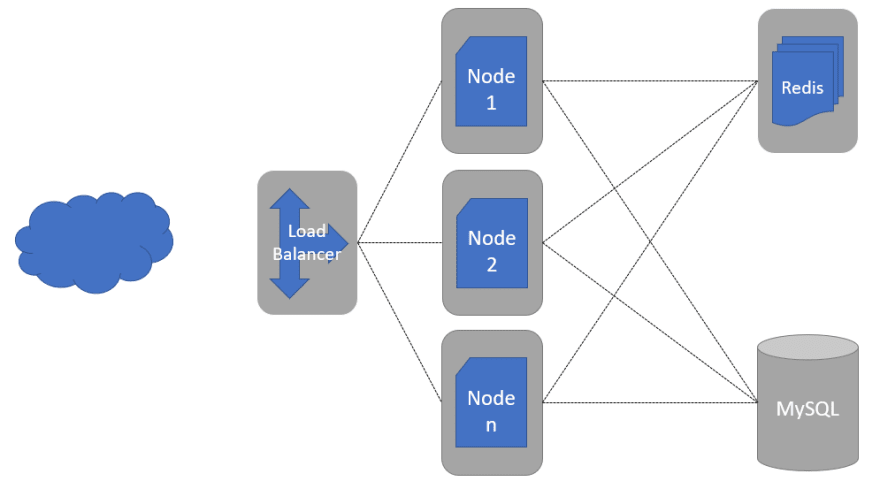
You can see there's a Load Balancer, redirecting your traffic load to the nodes of your app. These nodes are all exactly the same; it is the same Docker Image of your app, initialized n times. By default, GeneXus generates 2 instances, but you can change that in the deployment properties.
Also, if you wish so, GeneXus deploys another container with a Redis server. This allows the application to save the session on that Redis server, so if you don't have server affinity or if one of your nodes (or pods) goes down, your clients can reach a new node without losing their session.
Keep in mind there's no database container deployed here. You will have to manage the database yourself. Every cloud provider has good scalable solutions for relational databases.
Like any other deployment in GeneXus, the starting point is the Deployment Unit object, and since Kubernetes is based on Docker containers you need to create the Docker Image of your application first. So, you need to select Docker Image as your deployment target in the Application Deployment tool.
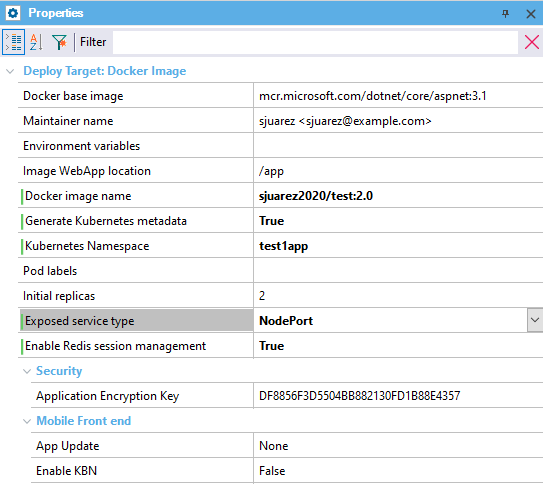
There are a few properties specific for Kubernetes under the Docker Image deployment target.
- Generate Kubernetes metadata: Tells the Deploy Engine to generate the above-mentioned YAML file with the necessary metadata for a Kubernetes cluster.
- Kubernetes Namespace: It is a good practice to create your own Namespace inside the cluster for your application and not use the default Namespace.
- Pod labels: It is a common practice to add labels to your pods. For example, if you want to create a Canary Deployment.
- Initial replicas: Kubernetes allows you to easily spin up many instances of your application; this property tells the cluster how many instances of your application will have to be running all the time. For high availability purposes, more than one is always desired.
- Exposed service type: There are a few differences between hosting a cluster in a Cloud Provider or in a local dev machine using Docker Client or Minikube. Cloud Providers provide a Load Balancer, so you'll need to set this value when thinking about deploying to a production environment, but NodePort is needed if you want to test your solution in your local cluster (more on how to do this later on).
- Enable Redis session management: Session management should be used in OutProc mode in a Cloud Native application. This property will also deploy a Redis container in your cluster that allows your app to have a distributed session management system.
Also, keep in mind that if you use blob files, images, or audios, they must be stored in a Storage Provider solution. Since at any given time any node of the cluster can go down, you cannot rely on the local File System of your containers. More information at Load balancing considerations.
To deploy an application on a Kubernetes cluster, follow the steps below:
1. Build and run your application to test it in a local environment.
2. Create your Deployment Unit; that is, the main programs and services your application will hold.
3. Check the deployment properties and make sure 'Generate Kubernetes metadata' and 'Enable Redis session management' are set to True.
4. Test this deployment locally first, so select NodePort in the Exposed service type property.
5. Make sure you set the Docker image name property (1) with something you can push to a Docker Registry, like Docker Hub.
6. Hit Deploy and pause for a minute.
Here's what happens when you hit the Deploy button. The first two steps are regular deployment application, there's nothing special here. The deployment engine generates the gxdproj file with the objects that need to be deployed and then a war or zip file gets created with the files involved with those objects.
After that, the engine creates a Dockerfile and uses it to build the Docker Image. It will also generate the Kubernetes metadata file for your app, another one for the Redis service, and another one for the Namespace creation. Why three files if it could all be appended into a single file? Because most certainly your app metadata file will evolve in the future, and you will eventually apply many versions of that file. The Redis and the Namespace files will be applied only once.
Generating Kubernetes metadata file
Kubernetes metadata file succesfully generated at 'C:\Models\TestDeploy\TestDeploy\NetCoreSQLServer003\Deploy\DOCKER\context\K8s-DeploymentUnit1-App.yaml'
Make sure you push the sjuarez2020/test:2.0 Docker image to a reachable Docker registry (eg. 'docker push sjuarez2020/test:2.0')
7. Tag and then Push (2) the image to a Docker Registry. If you have set the right values under Docker image name (1), you should simply run the suggested command; in this case:
docker push sjuarez2020/test:2.0
8. You're all set to spin up the cluster. Open a CMD window and go where the metadata file was generated (also described in the Output Window) and execute the following commands:
>kubectl apply -f K8s-test1app-Namespace.yaml
namespace/test1app created

>kubectl apply -f K8s-test1app-Redis.yaml
service/gx-redis-svc created
deployment.apps/gx-redis-app created

>kubectl apply -f K8s-DeploymentUnit1-App.yaml
service/deploymentunit1-svc created
deployment.apps/deploymentunit1-app created
Keep in mind DeploymentUni1 is the name of the selected Deployment Unit, so it could be different in your case; and "test1app" is the Kubernetes namespace configured in the Deployment Unit options (see the image above in this document).
It's useful to have the Kubernetes Dashboard (3) installed, so you can check if the deployment has been done successfully, or if any error has been thrown and needs your attention.
9. Test the app. In order to access an object of your application, you need to know where it has been exposed (remember to add the -n flag if you added a custom namespace):
>kubectl get svc -n test1app
This will show every service in your cluster. Pay attention to the one named after your Deployment Unit followed by app-service.

This tells you that your service is being exposed at localhost, port 31754. So, going to htttp://localhost:31754 in your browser will get you there.
Keep in mind you also need to add the specific object you want to reach. It could be adding just the name of the object plus the .aspx extension for
.NET, or servlet/packagename for
Java.
http://localhost:31754/sessiontester.aspx

http://localhost:30118/servlet/com.k8stest.sessiontester
This feature is available since GeneXus 16 Upgrade 11.