The Grid control displays data associated with many records. In some cases, it also allows entering, updating, and deleting data.
You can include a Grid control in GeneXus objects with UI (User Interface/screen).
The Grid control has different capabilities depending on the object in which it is located. It is important to understand them.
Grids in Web Panel objects and Transaction objects contain structured columns (each one containing an attribute or a variable) and each column has a title.
They are usually called Standard Grids.
To design a more flexible distribution of the attributes/variables for the lines of the Grid (or to add another Grid or other controls inside a Grid), use the Free Style Grid control.
When you add a Grid control in a Panel object and select the attributes/variables to be included inside it, by default, they are placed one next to the other.
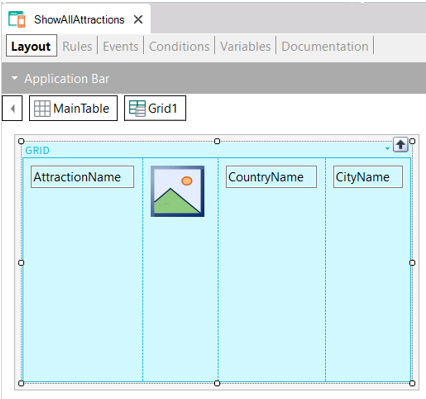
If you leave this kind of distribution, at runtime you will see a result very similar to a Grid that contains columns, but, strictly speaking, they are not columns.
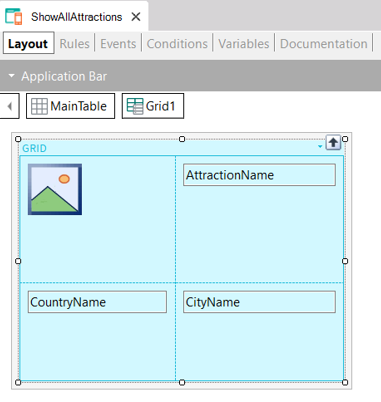
You can move those attributes/variables freely. For example, instead of displaying each attraction's attribute/variable values one next to the other, you can place the attributes/variables as you wish them to be displayed for each attraction.
In addition, you can include another Grid (or other controls) inside a Grid present in a Panel.
That is to say, the Grid control in Panels offers the same behavior as the Free Style Grid control in Web Panels and Transactions.
Moreover, Grids included in Panel objects have the Control Type property which allows presenting the data with interesting formats.
There are different ways to add a Grid:
- Drag the Grid icon from the Toolbox to the desired location on the Web Layout of the Web Panel / Layout of the Panel.
- Select Insert > Grid from the GeneXus main menu.
Next, a Selector window will be opened to select which attributes/variables you want to include in the Grid.
| Web Panel / Panel |
Transaction |
| Attributes included in the Grid are always read-only. They are queried and displayed. You can't change this behavior. |
- Not inferred attributes included in the Grid are editable by default. You can change this behavior if needed. See NoAccept rule.
- Inferred attributes included in the Grid are read-only. You can change this behavior if needed. See Update rule.
|
|
Variables included in the Grid are, by default, read-only.
However, data can be accepted in Grid variables depending on the events programmed in the object:
1. If you are using the For each Line command inside an event.
2. If the Grid includes a control with an associated Click event.
When one of these cases occurs, all variables inside the Grid become input variables. You can define which variables can't be modified by using the NoAccept rule or by setting the variable Read Only property to True.
|
Variables included in the Grid are read-only by default. You can change this behavior if needed. See Accept rule. |
| The main objective of the Grid control in these objects is to query data. |
The main objective of the Grid control in Transactions is to insert, update, and/or delete records in the corresponding associated table. |
| The Grid control's behavior is different in other use cases, such as when including variables based on SDTs. See SDTs on Forms. |
The Grid control's behavior is different when used in Dynamic Transactions. |
- Grids allow for automatic paging.
- Grids with structured columns (those included in Web Panels and Transactions) allow users to order the column's contents (in ascending or descending order) by clicking on their titles.
 Web panel object. First steps