Follow these steps to create your Mini App version bundle:
1. Create a file called MANIFEST.MF; make sure the file encoding is UTF8.
It includes the following configuration entries:
| Version |
Numeric with the bundle version format (Required) |
| Info |
String with the name of the file containing the Mini App info. If not included, the default filename is miniappversion.json |
For example (MANIFEST.MF):
Version: 1
info:version.json
2. Create Mini App Version Info File:
Next, create a file that contains the information of your Mini App version.
This file will provide essential details about your Mini App version.
{
    "code": "string",    /*Optional. You can provide a specific value or leave it empty. If left empty, it will be incremented automatically.*/
    "platform_id": "string",
    "main_name": "string",
    "main_type": "string",    /*Panel, Menu*/
    "metadata": "string",    /*The filename for a file that is included in the bundle*/
    "integrated_security": "boolean",
    "service_url": "URL",
	"compatibilities":[
		{
			"version":"int",
		},
		...
	],
	"status":"char"    /*If left empty, the Mini App Version status will be "Pending". If set to "R", the status will be "Waiting for Review".*/
}
For example (version.json):
{
    "platform_id":"ANDR",
    "main_name": "startObject",
    "main_type": "Panel",
    "metadata": "startobject.android.gxsd",
    "integrated_security": "false",
    "service_url": "https://apps6.genexus.com/Id555317f4080a0da816dc4eb15d69bc1b/",
	"compatibilities":[
		{
			"version":1
		}
	]
}
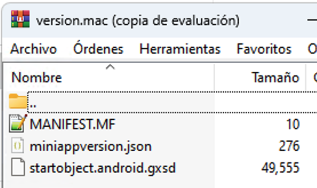
3. Create a ZIP file containing the MANIFEST.MF file.
Lastly, create a ZIP file containing the MANIFEST.MF file and all other files used for the Mini App version information.
For example (version.mac):

By following these steps, you'll successfully create a Mini App version bundle ready for deployment and distribution.
HowTo: Create Mini App Bundle