This article shows you the steps to deploy a Workflow-based application.
Just as any other GeneXus application, it needs to be deployed from the IDE and then export the set of Business Process Diagrams.
The complete process consists of three components: the binary files, the database/metadata, and the protection.
GeneXus provides a simple mechanism to package the generated files and deploy the application.
- Go to Build > Deploy application on the toolbar. This action will display a contextual window in the main section of the IDE.
- Drag every Business Process Diagram from the KB Explorer and drop them inside the "objects to deploy" form. You also need to include a Web Panel object with the property Main program set in True.
It is not necessary to include every dependency of the Business Process Diagram (such as Web Panel, Procedures, etc.), GeneXus will include them on the package without showing them on the dialog.
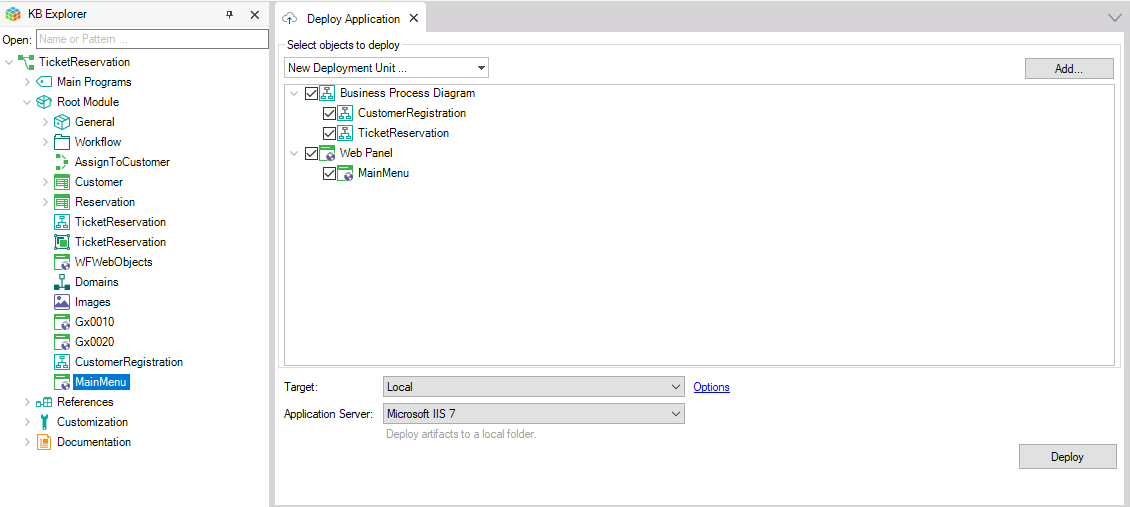
- Set your preferred options and deploy it.
Refer to this document for detailed information.
GeneXus's Business Process Deployer tool makes it possible to impact the production database with the new workflow processes or with the changes made to the existing ones.
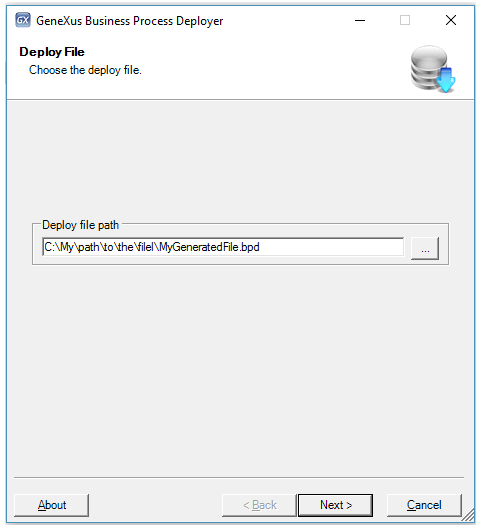
- Go to Tools option in the Main MenuBar > Workflow > Create business process deploy file to export the BPDiagrams.
- Open the BPDeployer and import the generated file.
Refer to HowTo: Impact the production database in GXflow with the Business Process Deployer document for detailed information.
In the production environment, workflow processes are always impacted by new processes. This fact means that the process instances that were still running will be based on the definition of the process previous to the impact. In other words, the changes made in the impact won't take effect on the running processes, only processes created after the impact is made will have the new definition.
Once the application has been deployed and impacted the production database with the Business Process Deployer, it is necessary to update the configuration files of the application to connect it to the production database.
These files depend on the generator used:
- For .NET Framework you have to update at least the following fields in the web.confige file:
<add key="Connection-Default-User" value="databaseUser" />
<add key="Connection-Default-Password" value="UserPassword" />
<add key="Connection-Default-DB" value="databaseName" />
<add key="Connection-Default-Schema" value="databaseSchema" />
- For .NET you have to update at least the following fields in the appsettings.json file:
"Connection-Default-User": "databaseUser",
"Connection-Default-Password": "UserPassword",
"Connection-Default-DB": "databaseName",
"Connection-Default-Schema": "databaseSchema",
- For Java you have to update at least the following fields in the client.cfg file:
CS_SCHEMA=databaseSchema
USER_ID=databaseUser
USER_PASSWORD=UserPassword
CS_DBNAME=databaseName
DB_URL=databaseURL
If you need to encrypt these data, you can use the GxEncryptCMD tool. The key needed to encrypt is located in the application.key file if you are generating with Java and in the KeyResolver.dll file if you choose .Net.
When the application is ready to be deployed on a server, the protection must be updated with it.
Since the introduction of the new GXflow license scheme in GeneXus 15 Upgrade 8, the license setup becomes a very simple task. Use the GXflow license manager to install the licenses. The process is the same for any platform.
The instructions to achieve the licenses set up depend on the platform that will be executed.
- Install Business Process Deployer Setup.
- Go to Start > All Programs > GXflow GeneXus 15 > License Manager and install licenses.
- Copy the "protect.ini" file that resides in C:\Program Files (x86)\GeneXus\GXflow\GXflowGx15\LicMgr to: "C:\Windows\System32" folder and "C:\Windows\SysWOW64" folder.
- Install GeneXus Protection Server.
- (Only for Java) Copy and extract this file to the Tomcat´s lib directory (by default in C:\Program Files\Apache Software Foundation\Tomcat X.Y\lib).
- Go to Start > All Programs > GeneXus 15 Business Process Deployer and deploy the processes.
- Refer to this document for the instructions.
Linux platform
Follow these steps: HowTo: Configuring Protection for GXflow Installed on Linux, AIX and OS400 to install the licenses on the same server as the application.
Or please follow these steps: GXflow centralized licenses configuration (GXflow on Linux) when the licenses will be installed on a remote server (if the licenses are installed remotely, the server must be Windows).
Follow these steps: HowTo: Configuring Protection for GXflow Installed on Linux, AIX and OS400 to install the licenses when it will be installed on the same server as the application at an AS400 server.