This is a step-by-step guide to create and test an Assistants Flow.
First, log in to the Globant Enterprise AI Backoffice. In the Project Dynamic combo box, select the project you want to work with (in this case, Default is used).
Next, on the left side of the screen, you will find the backoffice menu. In this menu, click on Flows.

By clicking on Flows in the Globant Enterprise AI Backoffice, a new window opens in the browser with the Flow Builder, where the Flows associated with the selected Globant Enterprise AI project are created and managed.
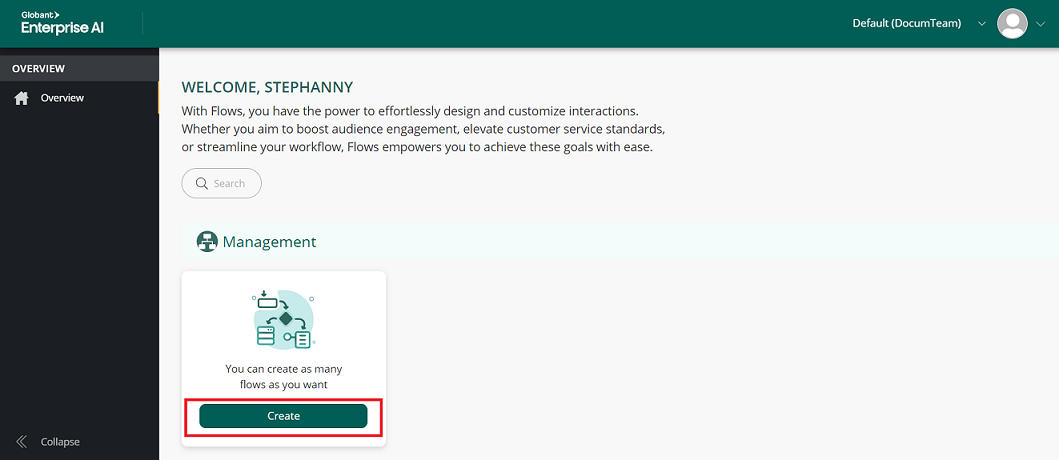
When accessing Globant Enterprise AI’s Flow Builder for the first time, a welcome screen like the one shown in the image below is displayed. From this screen, you can start creating a new flow by clicking on the "Create" button.
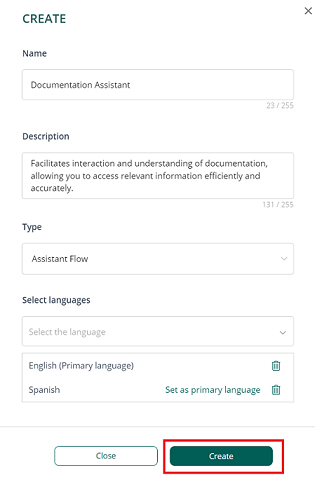
When you click on "Create", a pop-up window opens in which you must fill in the following information:
- Name: Descriptive name for the flow, allowing it to be easily identified.
- Description: This field is optional, but it is recommended to add a brief description of the flow to clarify its purpose or content.
- Type: Allows you to select the type of flow to create, with the options "Chat Flow" or "Assistant Flow". Selecting one of these types will determine specific configurations and characteristics of the flow.
In this case, Assistant Flow is selected.
- Select languages: Sets the language in which the flow will be configured, and allows you to define the language of the hard-coded messages. Multiple languages can be selected, so the same message can be available in different languages.
Once you have completed these fields, you can click on the "Create" button.
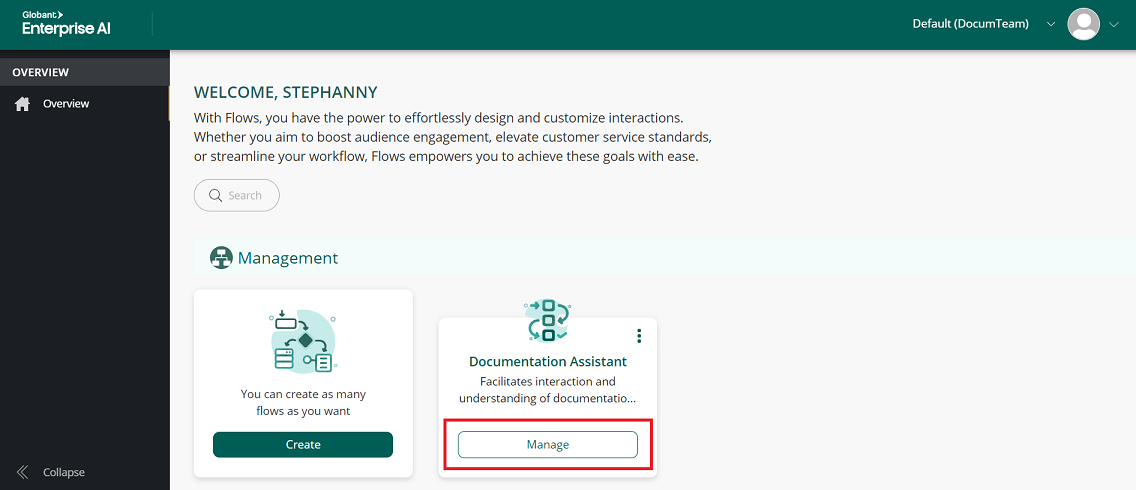
Once you have clicked on "Create," you will return to the welcome screen. There, click on the "Manage" button of the newly created flow to add the assistants you want and customize their behavior.
Clicking on the "Manage" button displays the first flow, which is created automatically.
This initial flow, called "start," establishes a basic configuration that you can customize, adding or modifying interactions, messages and assistants according to your needs.
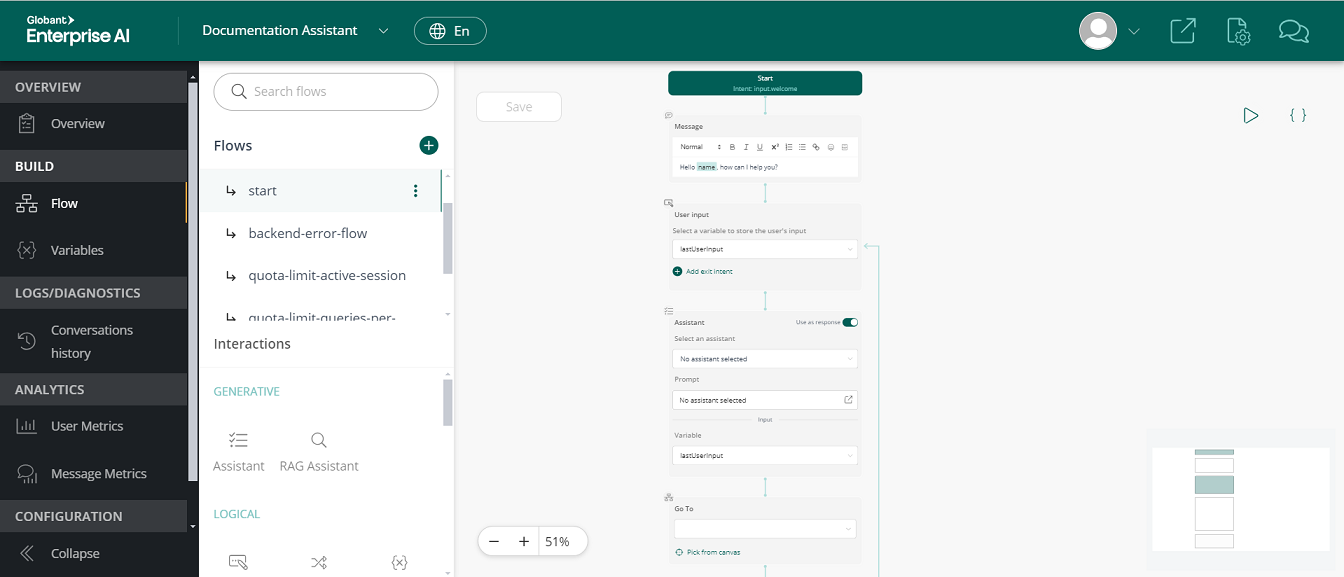
The initial flow, called "start," is automatically generated with the ID input.welcome.
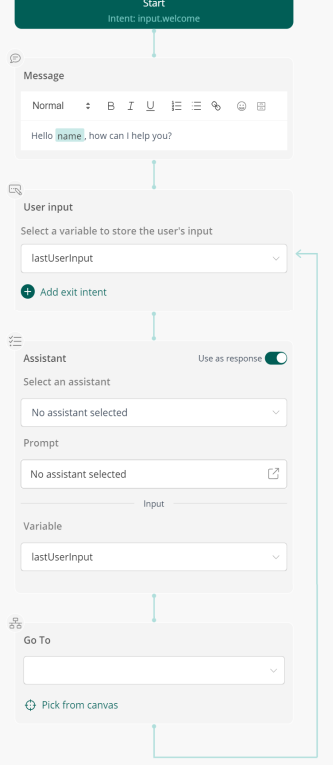
The Start (Intent: input.welcome) node marks the beginning of the conversation flow. This node is activated every time the flow is triggered, and its main purpose is to start the flow and, from there, the other nodes that manage the interaction with the user are connected.
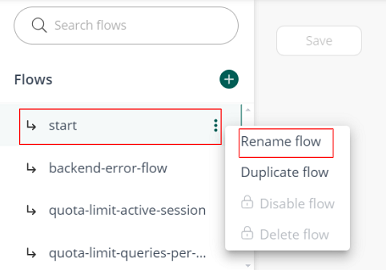
To rename the start node, go to the left menu, find Flows > start, click on the three dots next to it, select "Rename Flow" and, after typing the new name, press Enter to save the change.
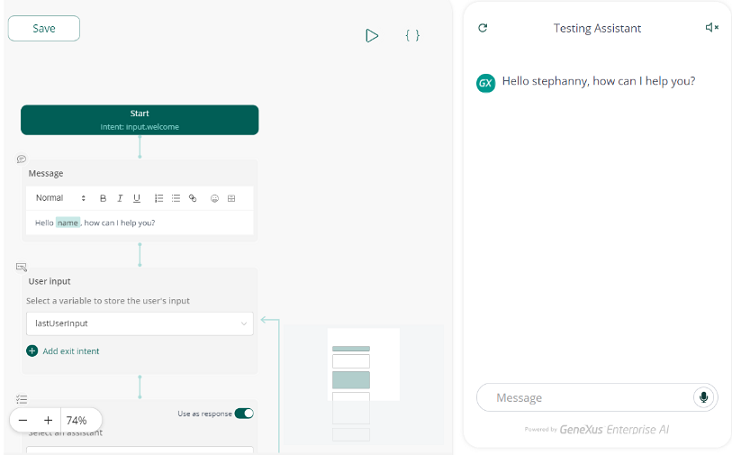
The next node, Message, is in charge of sending the welcome message or any other initial message configured. In this case, the message is: "Hello {name}, how can I help you?". Here, {name} represents a dynamic variable that is filled with the user's name.
The message displayed in this node is customizable, and the text can be formatted by selecting different styles, such as Normal, Heading 1, among others, from the drop-down menu that appears where it says "Normal". This allows you to adjust the text style according to your needs.

On the top bar of the node, you can see several formatting buttons such as bold, italic, underline, among others, to customize the text. In addition, there are icons that allow you to add lists, links and emojis.
The last button, which has the shape of a small drawer, allows you to insert dynamic variables in the message. Clicking on this button displays a list of the variables available in the system, and it is also possible to define new custom variables.
This Message node can be deleted by clicking on the trash can icon to the right of the node. It is also possible to add a variant by clicking on the "plus" (+) button at the top right.
The flow then proceeds to capture the user input through the User Input node, storing it in the lastUserInput variable for later use.
In the Assistant node, you must configure the assistant to perform specific actions. This node uses the information stored in the lastUserInput variable, which contains the text entered by the end user in the User Input node.
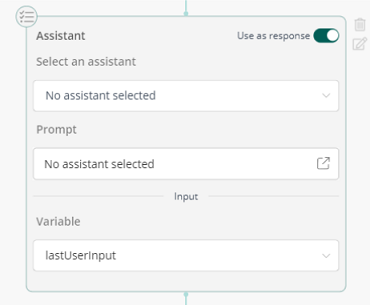
To configure the assistant, click on the "Select an assistant" field. By default, "No assistant selected" will be displayed. From the drop-down menu, choose the assistant you wish to use.
Once selected, the Prompt field will display the message that defines the task of the assistant. This message is read-only and can’t be edited.
The assistant's response can be stored in the lastUserInput variable or in a new variable, depending on your needs.
By default, the Use as response option is enabled, which causes the assistant's response to be used directly in the lastUserInput variable.
If you prefer to store the response in a new variable, disable Use as response. This will enable the Output field, where you can select or create a new variable.
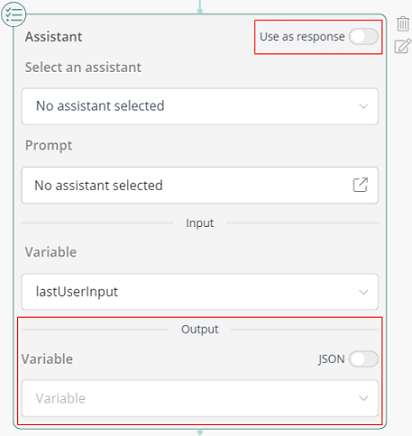
In addition, you can enable the option to read the assistant's response in JSON format. By enabling this option, you will have the ability to map the fields of that JSON to variables previously defined in your configuration. This allows for more precise integration of the assistant's responses in more complex workflows or in systems that require a specific format for data handling.
The pencil icon to the right of the node corresponds to the Edit button. By clicking on it, you can enable or disable the Include conversation history and Include context variables options.
By default, Include conversation history is enabled. It allows the assistant to access the conversation history to generate more coherent and contextual responses.
The Include context variables option is also enabled by default. This option sends to the assistant variables defined in the flow, such as previously captured data or configured values, so that they can be used within prompts.
This node can be deleted by clicking on the trash can icon to the right of the node. In this case, the Assistant node is deleted:
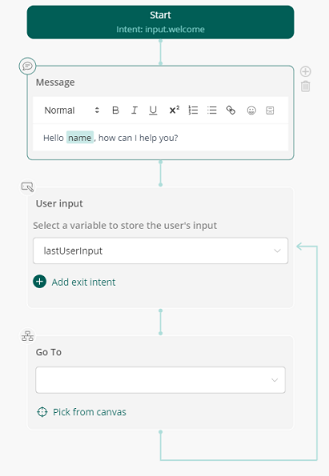
On the left menu, below the Interactions category, you will find the different components that can be added to the flow. In particular, in the GENERATIVE section, you can choose between adding an Assistant or a RAG Assistant.
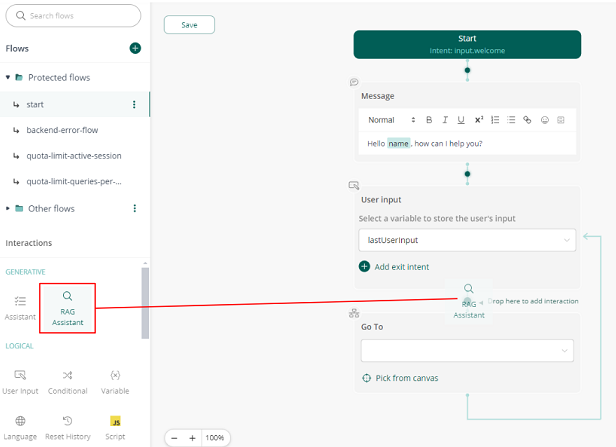
In this case, you need to add a RAG Assistant. To do so, click on the RAG Assistant option in the GENERATIVE section. Next, drag the component to the desired location in the flow. In this case, you can insert it between the User input and Go To nodes.
When you add a new RAG node, you must click on the "Select an assistant" field. By default, the option "No assistant selected" will appear. From the drop-down menu, choose the RAG assistant you wish to use. Once you select the RAG assistant, the next field, "Select a document", allows you to choose a specific document that will act as the source for responding to the end user's request. If you select a document, the assistant will only use that document as a reference.
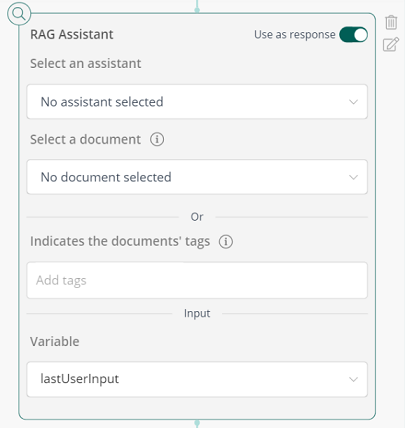
Alternatively, you can use the "Indicates the documents' tags" field. Here you can add the tags defined in Step 2: Upload RAG documents, which are used to filter the documents. This allows the assistant to search only in the documents that match the indicated tags to respond to the end user's request.
In the Input section, a field called Variable is displayed. There, the variable to be used as input for that node is defined; for example, "lastUserInput". This variable contains the user's most recent input and will be used as the basis for the query on the selected documents or tags.
Similarly, in the Output section, there is also a Variable field that specifies the variable in which the output generated by that node will be stored. In this case, we are interested in saving the RAG Assistant’s response in a new variable called lastResponse. Therefore, the Use as response option is disabled.
Clicking on the pencil icon to the right of the node opens the "State Configuration" menu where you can modify the following items:
- Acceptable confidence level: The default value is 0.2, which indicates the level of confidence in the match of the chunks that the RAG obtains after searching the vector database. Only responses that meet or exceed this confidence level will be considered valid.
- Include conversation history: Enabled by default. It ensures that the conversation history is included in the context of the interaction, allowing the assistant to take previous messages into account when generating responses.
- Include context variables: Enabled by default. It allows context variables stored during the conversation to be sent to the assistants so that they can be used within the prompts.
- Show sources: Enabled by default. It allows the assistant to show the sources of the information used to generate the response, which helps to provide transparency and to validate the accuracy of the response.
- Handle empty response: Disabled by default. It handles situations where the assistant is unable to generate a valid response. When enabled, it opens a new flow branch (as shown in the image), allowing you to configure specific actions to follow in case no response is available. In this new branch, you can add any of the components available in the Interactions menu on the left to continue the interaction as needed.
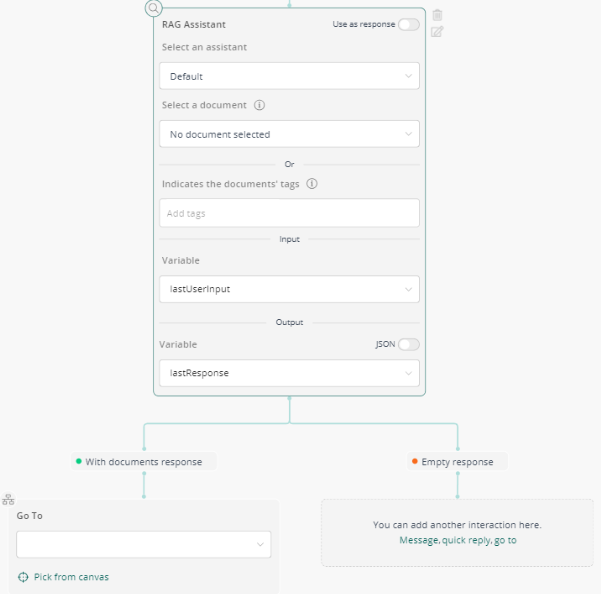
In this case, if the RAG Assistant finds the answer in the documents, you want the flow to call an assistant to translate the response to Japanese and store it in the same input variable (lastResponse).
If no answer is found, the flow goes to a second RAG Assistant configured with documents used in Globant Enterprise AI courses. The variable that goes into the RAG Assistant is lastUserInput, which contains the user's last input. The response generated by this RAG Assistant is stored in the lastResponse variable.
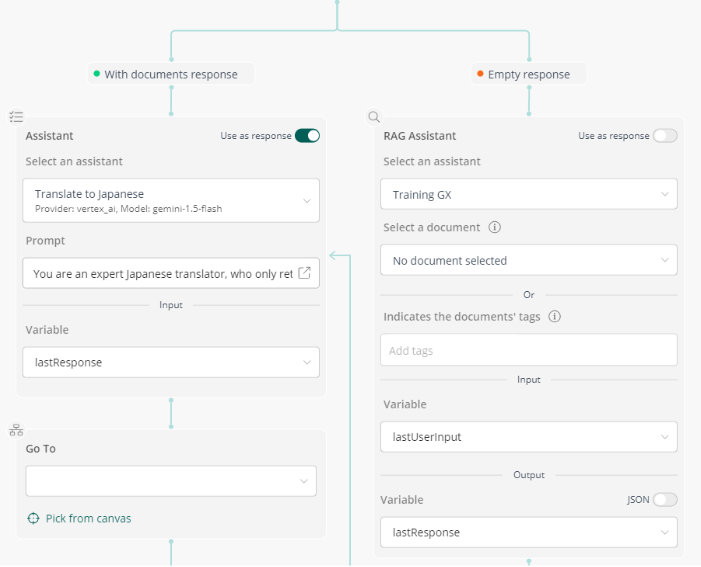
Finally, the Go To node is used to connect different flows within the interaction. This node allows you to select the flow to which you want to redirect the end user based on their current interaction.
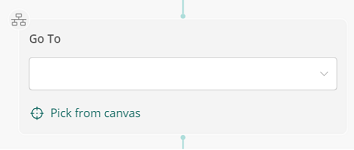
Clicking on the blank bar (corresponding to the drop-down menu) displays a list of available flows:
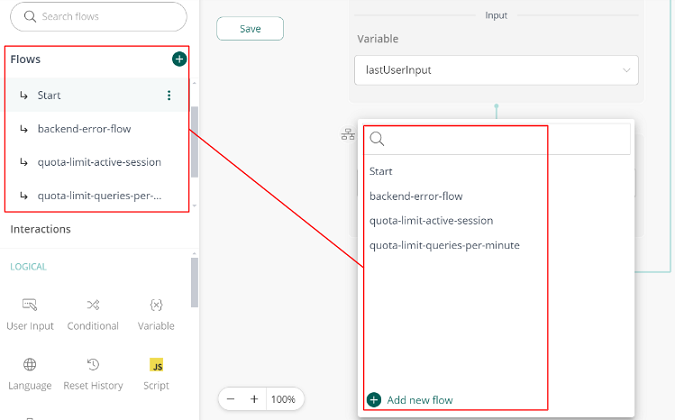
Here you can select and define the flow to which you want to redirect the user. To review or modify any of these flows, you can access the Flows menu on the left side of the screen.
In addition, "Pick from canvas" allows you to select a node directly from the canvas, facilitating navigation and connection between different parts of the Flow.
The 'Go' icon next to the node allows you to navigate directly to the node to which it is connected. In this case, there are two 'Go To' nodes:
- The first 'Go To': Returns to the 'User Input' node. Since the previous node (which translates to Japanese) does not store the response in a new variable and simply redirects to the 'User Input', the response received by the end user is the answer to their question translated to Japanese.
- The second 'Go To': Sends the response to the 'Assistant' node, which is responsible for translating the generated response to Japanese using the lastResponse variable. This variable contains the response obtained from either of the two RAG Assistants previously executed in the flow.
In this way, the flow ensures that the end user receives the response in Japanese, regardless of whether the response was generated by the first RAG Assistant or the second.
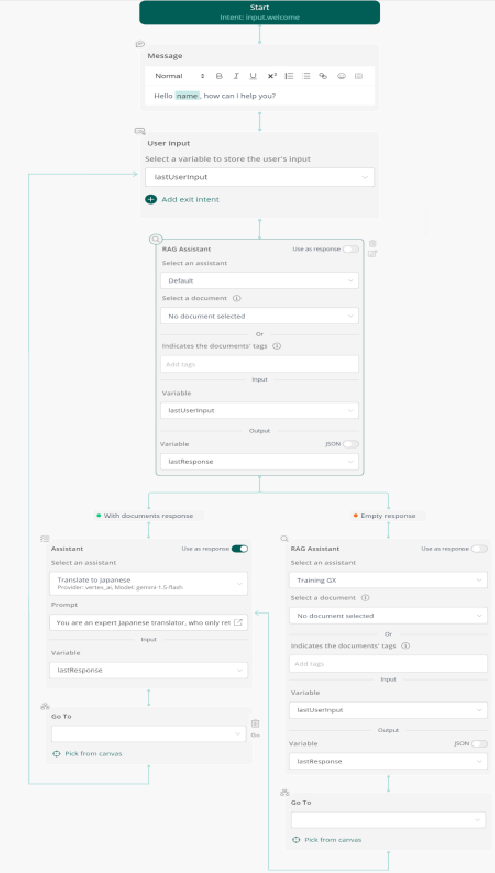
Once you have configured the flow, make sure to click on the 'Save' button located at the top left of the screen. To test the flow you have created, you have three options available from the same design window:

- Click on the arrow icon (similar to the play button) to run the flow ('Run Flow').
- Click on the message icon to open the testing assistant (“Open Testing Assistant”).
- Click on the icon to open in a new window (the box with an arrow) to access the demo page (“Go to Demo Page”).
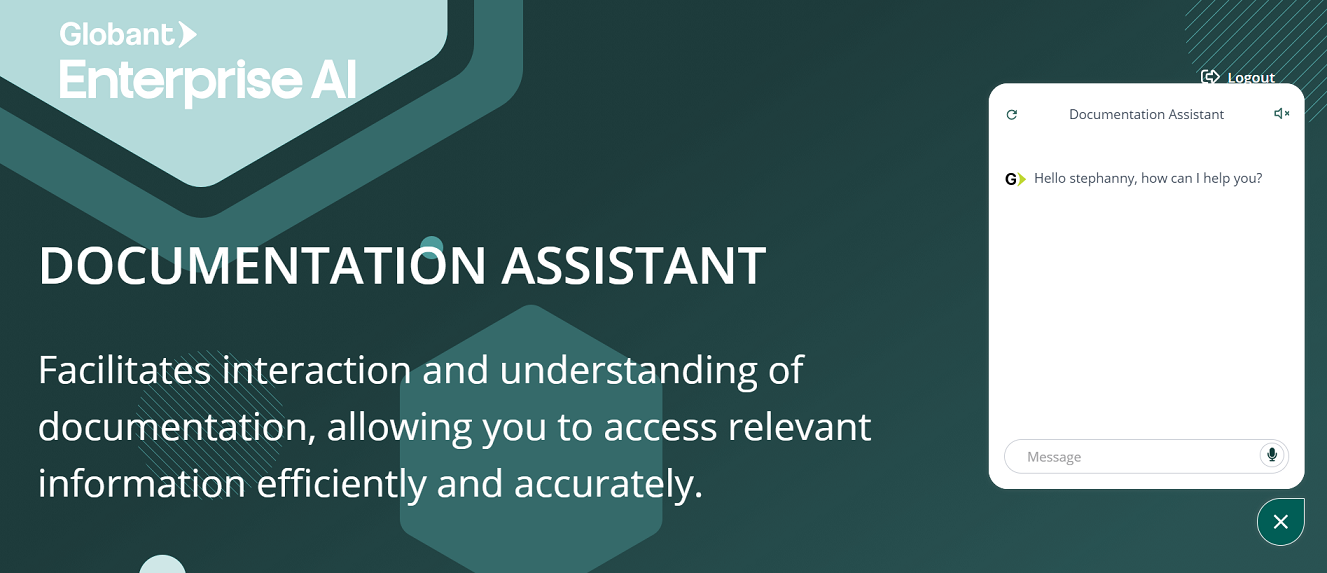
The first two options will open a window on the right side of the screen, while the third option will open a new window in the browser.