The Globant Enterprise AI Start Page allows offering end users a clear guide to the assistant's capabilities and examples of use.
To achieve this, the Start Page allows you to define the following elements that guide end users in their interaction with the assistant:
- Define a welcome message that clearly describes the purpose of the assistant.
- Describe the assistant's key functions, explaining the problems it is designed to solve, the actions it can perform correctly and its known limitations, ensuring that the end user has realistic expectations about its performance.
- Add sample prompts that guide the user on how to interact with the assistant. These prompts can be specific requests such as "Show me the composition of the company’s profit during the last quarter" or "Create a bar chart with the sales data for the first 6 months of the year", which provide insight into the interactions that the assistant can effectively handle.
These guidelines are not only fundamental to improving the end user experience, but can also be leveraged in technical scenarios such as batch evaluations or synthetic data generation, providing a clear framework for understanding and analyzing the assistant's behavior in more advanced contexts.
Depending on the type of assistant you are configuring, the layout of the Start Page may vary slightly. There are two presentations: one for the Assistants (Data Analyst Assistant, API Assistant, Chat with Data Assistant) and one for the RAG Assistants. Despite these visual differences, both versions share the same essential functionalities.
To configure the Start Page for both Assistants and RAG Assistants, first go to the corresponding page in the Backoffice to work with your data and click on 'UPDATE'.
After that, depending on the type of assistant, the following tabs will be displayed:
- Assistants: 'General Information' and 'Start Page'.
- RAG Assistants: 'General Information', 'Prompt', 'Retrieval' and 'Start Page'.
In the Assistants Start Page option, first you will find the option to configure the Welcome Message, where you define a title and a description to explain how the assistant will help the end user. Clicking on the 'CONFIRM' button will save this data and the message will appear in the Playground when accessing the assistant, helping the user to get started.
In addition, you can add information about specific features of the assistant using the CREATE FEATURE button. Clicking on it opens a window for you to enter a title and a short description about the feature you are describing. After entering the title and description, click on CONFIRM to save the defined feature. Once saved, the feature will be displayed in the Playground along with its description.
You can also set up sample prompts by clicking on CREATE EXAMPLE PROMPT. These predefined prompts will appear in the Playground and, when selected, will be completed automatically, facilitating the end user's interaction with the assistant and showing practical suggestions to perform certain tasks.
Clicking on the CREATE EXAMPLE PROMPT button opens a window to enter the following information:
- Name: Specify a name for the prompt.
- Description: This field is optional; you can add a brief explanation describing the functionality of the prompt and how it should be used.
- Text: This field is mandatory and here you define the content that will be used as an example in the prompt. The assistant will take this text to perform the configured task.
Once you have entered the information, click on CONFIRM to save the prompt.
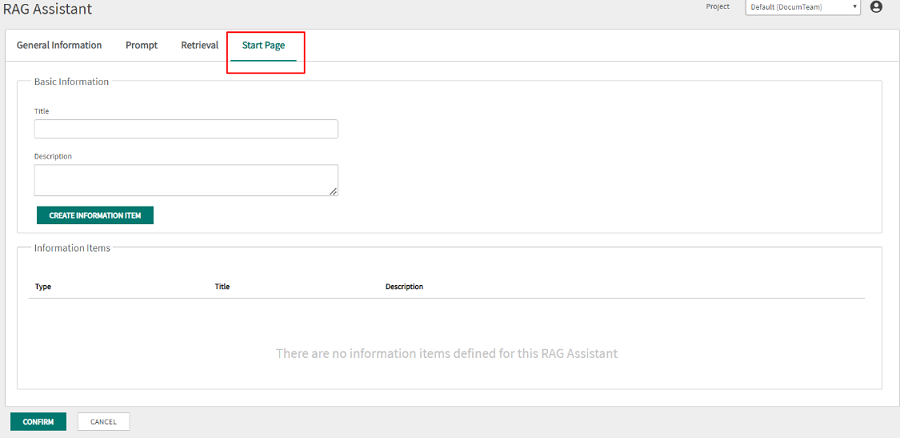
The RAG Assistants Start Page has a different layout compared to that of Assistants. Instead of the Welcome Message section used in Assistants, for RAG Assistants this section is called Basic Information. Here you define a title and description that clearly explain how the assistant will help end users in their tasks. This information is essential to provide users with information about the assistant's capabilities.
Once you have completed the title and description, click on CONFIRM to save the changes.
In RAG Assistants, instead of two buttons to create functionalities and examples of prompts, there is only one button: CREATE INFORMATION ITEM.

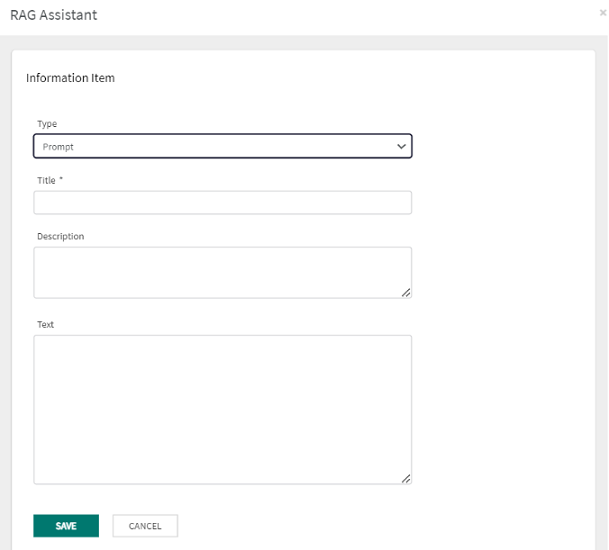
When you click on CREATE INFORMATION ITEM, a window will open where you can enter a title, a description and the text that will make up the body of the information item. In addition, in this window you must select the type of item you want to create: Prompt or Feature.

If you choose Prompt, you will define specific examples that will guide the end user when interacting with the assistant. If you select Feature, you will be describing a specific property of the assistant, clearly explaining its usefulness and how it can be used. Once you have completed the required fields, click on the SAVE button, and then click on CONFIRM (in Start Page) to save your changes.