GeneXus Server uses HTTPS to ensure a proper level of security. HTTPS is a protocol for secure communication over HTTP with a connection encrypted by Transport Layer Security (TLS) or Secure Sockets Layer (SSL) for authentication of websites, and protection of the privacy and integrity of the exchanged data.
Configuring IIS to support HTTPS connections requires two steps:
1. Configuring the Server Certificate
2. Creating an HTTPS binding for the site
Configuring the Server Certificate
Using a server certificate enables users and services to confirm the identity of the web server before transmitting sensitive data and also contain the server’s public key used for data encryption.
You may either obtain an internet server certificate, create a domain server certificate, or create a self-signed server certificate.
This is the recommended option if GeneXus Server will be used from an external network.
Internet server certificates are issued by a public certification authority (CA), such as Comodo Group, Symantec, GoDaddy, and many others.
To configure a server certificate, you request it to a CA, and install it once you receive it from the CA.
For more detailed instructions, you may refer to IIS documentation on how to request an internet server certificate, and how to install it.
The CA of your choice may offer additional information and support on the process.
If GeneXus Server will be used only within your internal domain, you may consider using a domain certificate.
A domain certificate is an internal certificate that does not have to be issued by an external certification authority (CA). If your Windows domain has a server that acts as a CA, you can create a domain certificate. This approach helps you reduce the cost of issuing certificates and eases certificate deployment.
Check here for detailed information on how to create a domain server certificate in IIS.
If GeneXus Server will only be used from an intranet, or for testing or proof-of-concept scenarios, you may create a self-signed server certificate.
Self-signed certificates are not issued by a generally trusted source and therefore should not be used to secure data transfer between your server and internet clients. Using self-signed certificates may also cause Web browsers to issue phishing warnings.
Refer to this information on how to create a self-signed server certificate in IIS.
Creating an HTTPS Binding
After configuring a server certificate, to create an HTTPS binding, follow these steps:
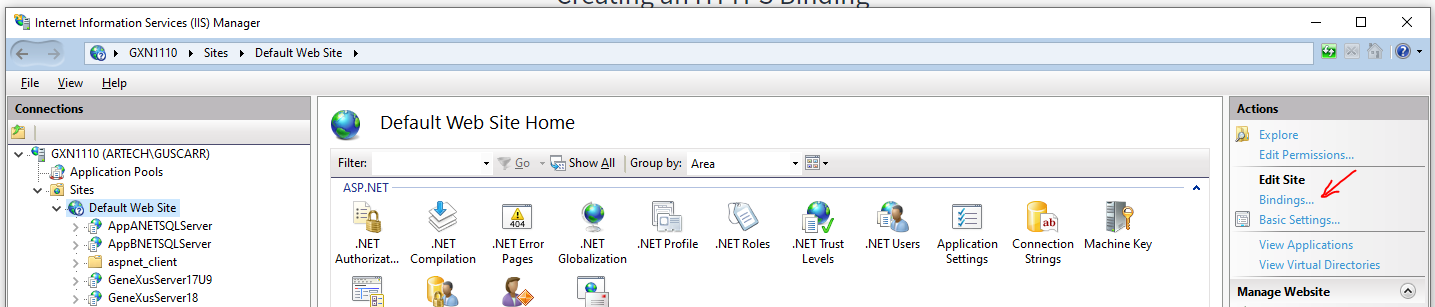
1. Click Start, point to Programs, point to Administrative Tools, and then click Internet Information Services (IIS) Manager.
2. In the Internet Information Services (IIS) Manager dialog box, in the Connections pane, expand your computer name, expand Sites, and then click Default Web Site.
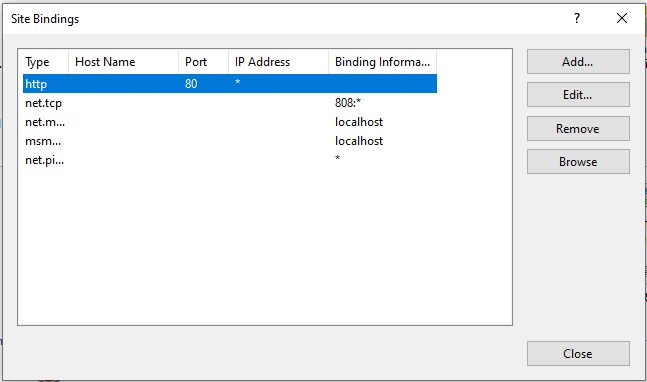
3. In the Actions pane, click Bindings. This will open the Site Bindings dialog box
4. In the Site Bindings dialog box, click Add. This will open the Add Site Binding dialog box
5. In the Add Site Binding dialog box, on the Type menu, select https.
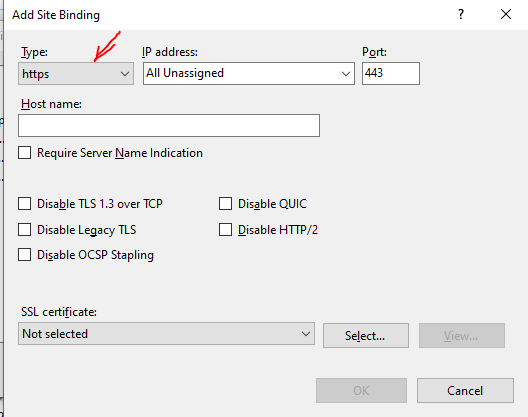
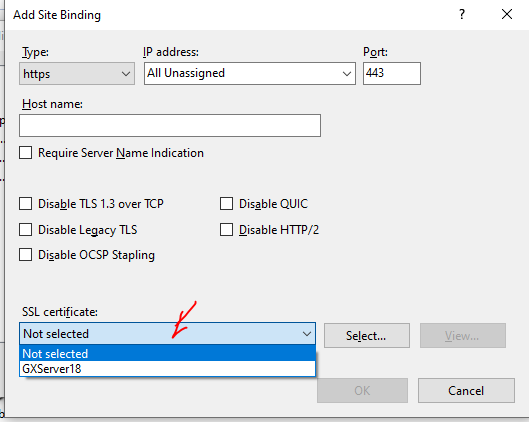
6. In the SSL Certificate list, select the entry that matches the certificate for your computer, and then click OK. You will now see the new binding
7. In the Site Bindings dialog box, click Close.