GXquery allows applying filters to queries, so that the user can obtain data according to his/her needs with as much flexibility as possible. All types of output formats support filters.
Basically, there are two types of filtering: simple and through parameters.
- Simple filtering. . This section shows how to apply a filter from the Filter window using the three types of filters:
- Filtering with parameters. This section shows how to create a parameter and how it is used from the dialog boxes for creating filters.
For the following examples we will use the Invoicing query of the TravelAgency KB which represents a table containing the following attributes in the columns area:
 Customer name
Invoice date
Invoice amount
A simple filter can be defined as specific indications set in GXquery so that it returns the data that matches these criteria. Therefore, to create a filter, first we need to define the attribute(s) to be considered. In our case, we will begin with the Invoice Amount attribute by dragging it to the filters area in the editor. The following dialog box will be opened right away.

GXquery has found that Invoice Amount is of numeric type and for this reason it offers this window that requests numeric values. In addition, it prompts the user for some of the criteria to be given to Invoice Amount as well as for a value that has to be entered in the cell to the right.
If we open the combo box, we will see that the available criteria are as follows:
| is equal to |
Indicates that the records whose attribute value is the same as the one to be indicated will be displayed. |
| is less than |
Indicates that the records whose attribute value is lower than the one to be indicated will be displayed. |
| is grater than |
Indicates that the records whose attribute value is greater than the one to be indicated will be displayed. |
| is less than or equal to |
Indicates that the records whose attribute value is lower than or equal to the one to be indicated will be displayed. |
| is greater than or equal to |
Indicates that the records whose attribute value is greater than or equal to the one to be indicated will be displayed. |
| is not equal to |
Indicates that the records whose attribute value is not equal to the one to be indicated will be displayed. |
| is between |
Indicates that the records whose attribute value is in a from-to range will be displayed. |
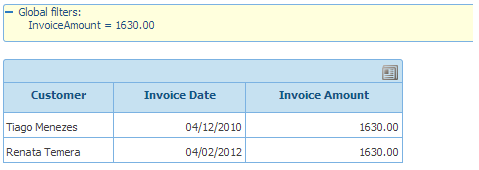
If we want to see the records whose amounts are equal to 1630, we select the value “is equal to” and to the right we type 1630; we do the same with the other criteria.
It’s worth mentioning that upon selecting the “is between” value, the dialog window will change as shown below:
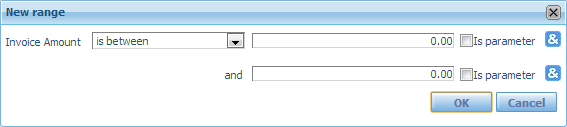
If we used this variation for the previous example, we would leave the first cell unchanged and in the second one we would type 1630. However, we will leave the value “is equal to” selected because it is more adequate for the example. Clicking OK will open the following window, which manages all the filters for the selected attribute.
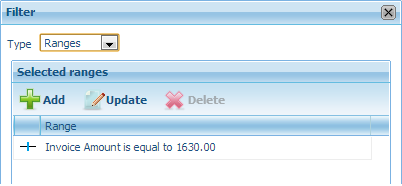
Note that on top of the screen there is a combo box with the Range value selected, and in the middle we can see the value of the filter that we’ve just applied.
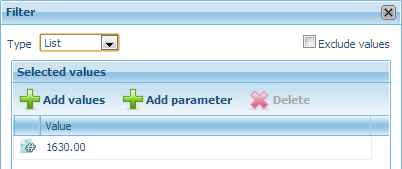
If we open the combo box list, we can see the List, Ranges and Expression values. By selecting List, we can see that the criterion is now shown in this way:
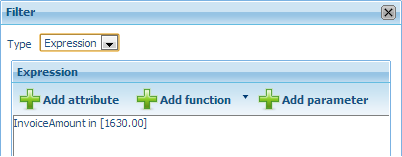
If we select the Expression option, we will see the following:
Upon running the query, we will see that the result is as follows:
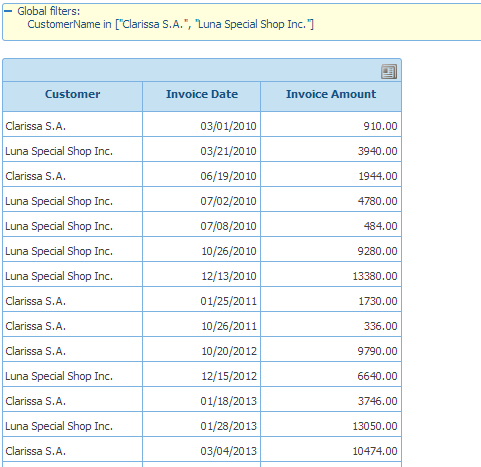
Now we will add a new filter because we need to know the customers whose amounts are equal to 4500. We repeat the same action as before but for the new value, and look at the screens of each type: Ranges, List and Expression.

At runtime, we see the following:
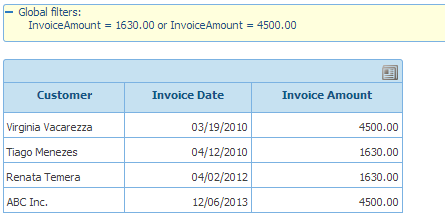
…which meets the selected criteria.
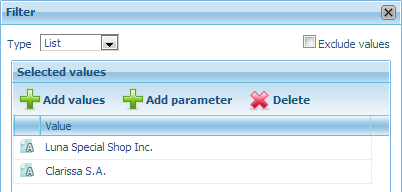
When the query element is of Character type, even though the selection option is different (there isn’t a combo box as in the previous example), the filter management window is the same. The image below shows the dialog screen after we drag the Customer Name attribute to the filter area.

We click on OK and return to the filter management window, which will look as shown below.
If we click on OK we will see an image similar to the one below.
Unlike simple filtering, filtering with parameters allows the user to load the values when the query is triggered.
For the example, we will create a filter that allows us to select the name of the customer that we want to have displayed.
First, we create a parameter called CustomerToSee. To do so, we click on the “More actions” button located to the right above the query’s toolbar. In the menu we select Parameters. Next, a tab labeled Parameters is added to the lower left margin of the query screen.

We will insert a parameter simply by clicking on the Insert button. A default parameter will be displayed on the empty screen.

We will change the parameter’s name, description and data type. In its properties window, in the Name and Description cells we type CustomerToSee; next, we select the Character value in the combo box of the Type property, and click on the Save button.
Next, we click on the Table tab and drag the Customer Name attribute to the customers area. As explained before, a customer selection window will be displayed. In this case we will close it.
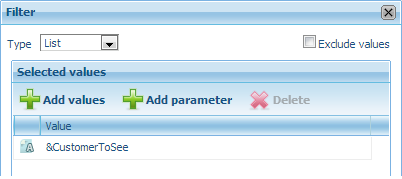
In the Filter management window, we click on the Add parameter button to open the Select parameter window. The name of the parameter we've just created will be displayed there. We select it and click on OK. The parameter has now been included in the query.
Click on OK to close the window and click on the View button. The following dialog window will be opened for us to enter the name of the customer we want to have displayed.
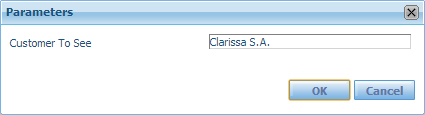
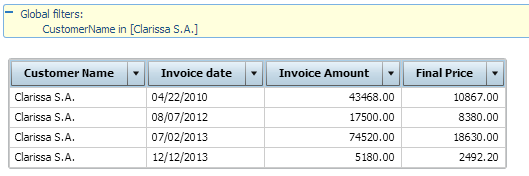
We click on OK and the following screen will be displayed.
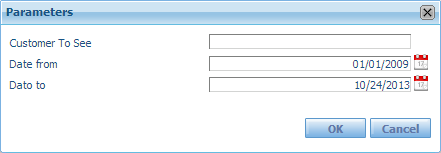
In addition, we can combine two or more parameters to work together and help us refine the search data. For example, we can not only offer the option to select a customer, but also a date range of invoices, as shown in the image below.