This is the first exercise of GXquery 4.0 Lab.
 Exercise 1: How to create a Pivot table
This exercise teaches how to create a Pivot table (also known as dynamic table) that shows the tourist attractions of every city in every country contained in the database.
To create a Pivot table, click on the New query link on the Shortcuts panel (top left), then select the Pivot table icon.
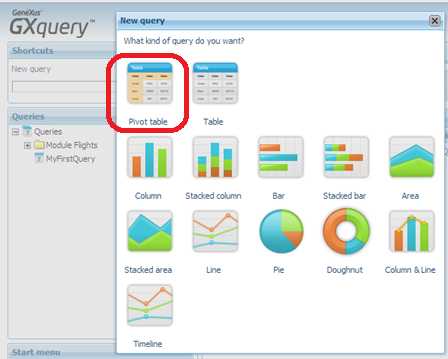
Next, you will see a dialogue like the one shown in the image below.

The purpose of this window is to capture the name of the query, an optional description, and the name of the folder in which to hang it (by default, GXquery provides the root node named Queries from which all the Folder and Query structure will hang).
In the Name cell, write AttractionsPerCity (no spaces between words) as the query name and press the OK button, leaving the other two dialogue fields as they are.
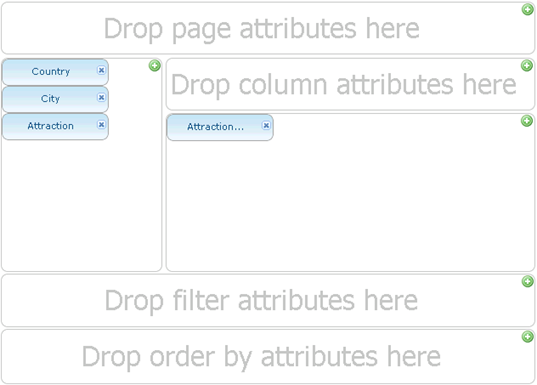
Next, you will see a screen divided into areas that contain labels. This is the Pivot table, but in editing status.
On the right, you will see a panel containing all the attributes of the active metadata, which can be used by users.

1. Open the node of the Attraction folder on the Attributes panel.
2. Drag and drop the attributes Country, City and Attraction in the row sector (it says “Drop row attributes here” inside).
3. Drag the Attraction attribute again, but this time drop it in the data sector (it says “Drop data attributes here” inside).
Why inserting this attribute? If you wish to have file totals, it is necessary to enter some attributes in the data area. GXquery automatically sums the fields placed in this area in case they are numeric; this is why we placed a character-type field, which is considered a unit (1) and not a number. That is, if we had placed, for example, the Attraction Id attribute, which is numeric, GXquery would have considered its absolute value, and not the attribute as a unit. The image should be similar to the one below:
4. Press View. The result should be similar to the following figure.
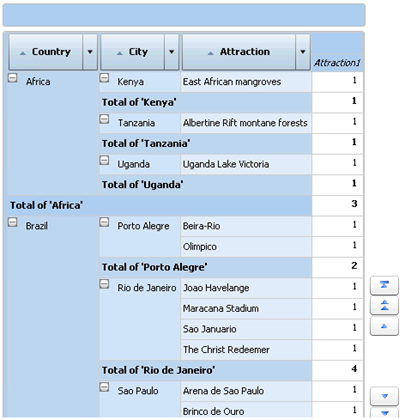
Once an attribute is dropped in any of the Pivot table areas, it turns into a Query Element.
Exercise 2
Before getting started
Exercise 2
Exercise 3
Exercise 4
Exercise 5