Previous Version
This article explains the steps needed to configure the GXflow Client for Smart Devices.
To enable GAM - Authentication the property Enable Integrated Security property must be set to true, for details see My first Native Mobile application with GAM.
- Create Knowledge Base from server http://samples.genexusserver.com/v17/.
- Check out GXflowMXCustomClient KB version 17u11.

- From GXflowMXCustomClientKBGXflowMXCustomClient KB, generate a GXflowMXCustomClient.xpz file with all the objects inside the WorkflowClientMobile folder and all languages and images inside customization node and all files from root node.
- Import that xpz file into your original KB (option Knowledge Manager > Import).
- Select WorkflowMobileMenu as Startup Object.
Create a Business Process Diagram object and run it.
A good example of a native Business Process Diagram using Smart Devices objects assinged to user tasks can be found in the My first BPM Application for Smart Devices article as well as an example using Web objects assinged to user tasks can be found in the My first BPM Application article.
The following steps can be skipped if the user wfadministrator is used (created by default when importing the GXflowClientSD.xpz).
Steps to create a new user:
- Login to the GAM as administrator, using admin/admin123.
- Choose the option Users and then ADD one.
- Assign the GXflow Prototyper role to the new user. To do this click the image in the column roles of the grid (
 ).
).
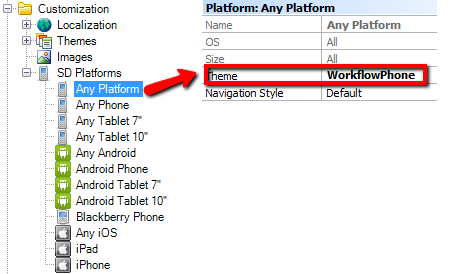
Set the Theme for each SD Plataform as follows:
- Any Platform: WorkflowPhone
- Any Table 10: WorkflowTablet
- Any Android: WorkflowAndroid
- Any iOS: WorkflowIphone
- iPad: WorkflowIpad
Set the Startup Object property to "WorkflowSDClient", and the Login Object for SD property to "WorkflowSDLogin".
Press F5 and test your Workflow.
GXflow
Native Mobile Generator
My first BPM Application for Smart Devices
GAM Use Example: Public Application With Some Private Components